Workflow diagrams allow you to create a visual representation of a business process that consists of steps and paths. Complete the steps in the sections below to create and manage workflow diagrams.
Create workflow diagrams
To create workflow diagrams, do the following:
- Access the Workflow Manager web app.
- Click the Design tab.
The Design page appears.
Note:
If you don't have sufficient privileges, the Design tab is not available.
- Click Diagrams
 .
.The Workflow Diagrams panel and workflow canvas appear.
- In the Workflow Diagrams panel, click Create New.
The Step Library and Settings panels appear, and a new diagram appears in the workflow canvas.
- Provide a name for the diagram in the Diagram Name text box in the Diagram Settings section of the Settings panel.
Note:
If Diagram Settings isn't available, click a blank area of the workflow canvas.
- Provide a description for the workflow diagram in the Diagram Description text box.
- Optionally, configure workflow diagram options in the Options section.
- Optionally, add spatial data to the workflow diagram in the Spatial Data section.
- Click Add Data Source.
The Add Data Source dialog box appears.
- Type the item ID of the branch versioned feature service in the Item Id text box.
The data source must be a branch versioned feature service published to the same Enterprise site as Workflow Manager.
- Type the reference name in the Reference Name text box.
Note:
If the item ID is valid, the Reference Name text box is automatically populated.
- Click OK.
The data source appears in the list. If the data source isn't available or your account doesn't have access to the data source, an invalid data source icon appears and the data source name needs to be manually entered in the Name text box.
To edit the data source, click the Edit Source button
 , and to delete the data source, click the Delete Source button
  .
.
- Click Add Data Source.
- Use any of the following methods to add steps to the workflow diagram:
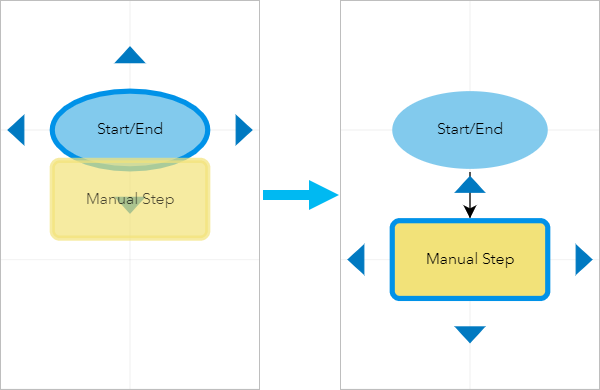
Drag a step template from the Step Library panel to a step's connection arrow on the workflow canvas.

The step appears in the direction of the connection arrow and is automatically connected to the step.
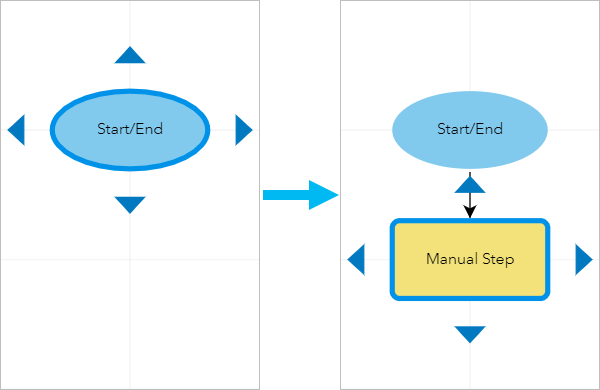
Click a step and click one of its connection arrows to add a manual step.

The manual step appears in the direction of the arrow and is automatically connected to the step.
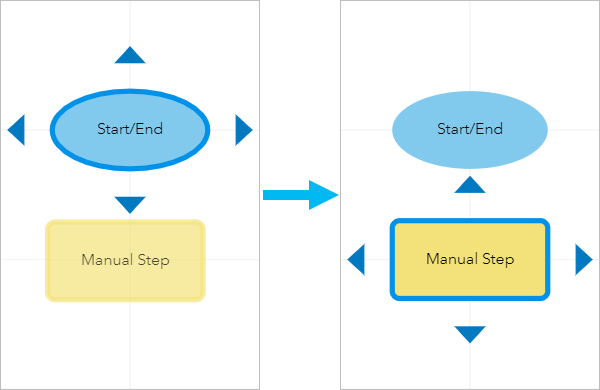
Drag a step template from the Step Library panel to an empty area of the workflow canvas.

The step appears on the workflow canvas without a path and must be manually connected.
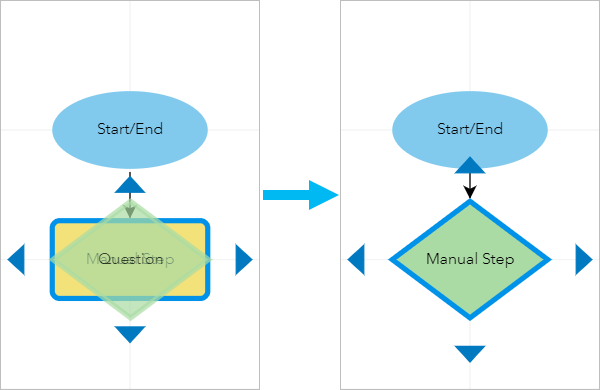
- To replace an existing step in the diagram with a different step type, drag a step from the Step Library panel or a step from the canvas onto the middle of the step you want to change and click Yes when the Overwrite Step dialog box appears.
When a step is replaced, it retains the original name and any path settings, path assignments, and customizations.

- Configure step settings as necessary.
- Repeat steps 9 through 11 to add more steps and add paths to the workflow diagram as necessary.
- Optionally, double-click a blank area of the workflow canvas next to a step or a path to add text labels to the workflow diagram.
- Click Save to save a draft of the workflow diagram.
A confirmation message appears, and Draft appears next to the name of the diagram.
- Optionally, click Print Diagram
 and click Print All to print the workflow diagram or click Print Visible to print what's visible in the workflow canvas.
 - When the workflow diagram is ready for use, click Activate to make it available for use in job templates.
When a diagram is activated for the first time, a message appears asking if you want to create a job template from the workflow diagram.
- Click Back to return to the Design page.
Duplicate workflow diagrams
Duplicating a workflow diagram allows you to make a draft copy of a diagram that can be used as a starting point for a new diagram with similar steps. Complete these steps to duplicate a workflow diagram:
- Access the Workflow Manager web app.
- Click the Design tab.
The Design page appears.
Note:
If you don't have sufficient privileges, the Design tab is not available.
- Click Diagrams
 .
.The Workflow Diagrams panel and workflow canvas appear.
- Click the workflow diagram you want to duplicate in the Workflow Diagrams panel.
- Click the More Actions button
 and click Duplicate Diagram.
The duplicated diagram appears in the Workflow Diagrams panel with - Copy appended to the workflow diagram name.
The workflow diagram can now be edited and activated for use in job templates.
Edit workflow diagrams
To edit workflow diagrams, do the following:
- Access the Workflow Manager web app.
- Click the Design tab.
The Design page appears.
Note:
If you don't have sufficient privileges, the Design tab is not available.
- Click Diagrams
 .
.The Workflow Diagrams panel and workflow canvas appear.
- Hover over the workflow diagram that you want to edit in the Workflow Diagrams panel and click Edit.
The Step Library and Settings panels appear and the workflow diagram appears in the workflow canvas.
Note:
You can type a keyword in the Search Diagrams text box to filter the list to workflow diagrams that contain the keyword.
- Update the workflow diagram as necessary.
- Click Save to save a draft of the workflow diagram.
A confirmation message appears and Draft appears next to the name of the diagram.
- Optionally, click Print Diagram
 and click Print All to print the workflow diagram or click Print Visible to print what's visible in the workflow canvas.
 - When the workflow diagram is ready for use, click Activate to make it available for use in job templates.
Note:
Once the workflow diagram has been activated, it is used for all new jobs. Existing jobs that have not been upgraded continue to use the previous version of the workflow diagram.
- Click Back to return to the Design page.
Delete workflow diagrams
To delete workflow diagrams, do the following:
- Access the Workflow Manager web app.
- Click the Design tab.
The Design page appears.
Note:
If you don't have sufficient privileges, the Design tab is not available.
- Click Diagrams
 .
.The Workflow Diagrams panel and workflow canvas appear.
- Click the workflow diagram you want to delete in the Workflow Diagrams panel.
- Click the More Actions button
 and click Delete Diagram.
The Delete Workflow Diagram dialog box appears.
Caution:
Deleted workflow diagrams can't be recovered.
- Click Yes to delete the workflow diagram or click No to cancel.