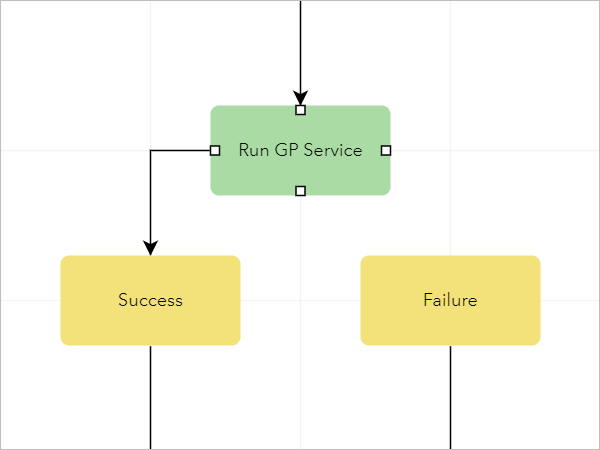
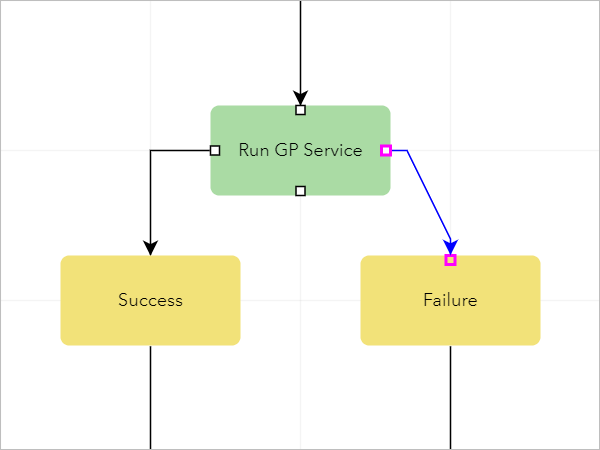
Paths in ArcGIS Workflow Manager connect steps in a workflow. Each step can be configured with multiple paths to dynamically assign the next step in the workflow to a user or group based on the result of a previous step.
Complete these steps to add and configure paths for steps in the workflow diagram:
- On the workflow canvas, hover over the step to which you want to add a path.
The step's connection points appear.

- Click a connection point and drag it to the connection point of another step in the workflow.

The Path Details panel appears.
Tip:
You can delete a path by clicking the path and pressing the Delete key.
- Optionally, drag the path's nodes to change the shape and position of the path.
- In the Path Details panel, under Path Assignment, click the Change Input Type drop-down arrow and choose one of the following options:
- Selection—Choose a static value for the path assignment.
- Arcade Expression—Determine the path assignment at runtime using dynamic job properties.
- If you chose Selection, click the Path Assignment drop-down arrow and choose one of the following options:
- Job Creator—Reassign the step to the user who created the job.
- Job Owner—Reassign the step to the user who owns the job.
- Last Run By—Reassign the step to the user who originally completed the step.
- Maintain Assignment—Assign the step to the user who ran the previous step. This is the default.
- <UserName>—Assign the step to the specified user.
- <GroupName>—Assign the step to the specified group.
Tip:
You can also type a keyword in the Path Assignment combo box to filter the list to show options that contain the keyword.
- If you chose Arcade Expression, do the following:
- Provide an ArcGIS Arcade expression in the Arcade Expression text box.
Tip:
Click This input supports Arcade Expressions
 and choose an Arcade expression to add it to its associated text box.
 - Choose one of the following path assignment options:
- User—Assign the step to the user returned by the Arcade expression.
- Group—Assign the step to the group returned by the Arcade expression.
Note:
If the Arcade expression doesn't return a user or group, the step is unassigned and must be manually assigned to a user or group.
- Provide an ArcGIS Arcade expression in the Arcade Expression text box.
- Optionally, if the path assignment is configured to assign the step to a group, check the Force Group Assignment check box to ensure that the step is always assigned to the group, even when the user running the step is a member of the group.
- Optionally, click the Status drop-down arrow and choose the status to assign to the job when the path is followed.
You can also type a custom status name in the Status combo box.
- Optionally, choose one of the following Path Logic options:
-
Return Value—Evaluate the return value of the step that just completed to determine the next step in the workflow diagram.
For example, a step can be configured with two paths, one for Return Code = Success and one for Return Code = Failure. If the step succeeds, the job proceeds to the next step. If the step fails, you are prompted to run the step again. Multiple combinations of return values can be managed using the AND and OR logic operators. For example, if two return values are configured and the OR logic operator is used, the path is followed when the step's return value matches either value. However, if the AND logic operator is used, the path is only followed when the step's return value matches both values. Click Add Return Code to add return values.
Arcade Expression—Evaluate the return value from the step that just completed or evaluate a completed step's output value using an Arcade expression to determine the next step in the diagram.
For example, if the Status output value for the Send Web Request step returns a response code equal to 200, the job proceeds to the next step, JobOutputValue($Job, 'd27395ec-ddfe-2b11-777a-6df02e86d835', 'Status') == 200. Supported Arcade expression values for paths are Boolean, date, double, integer, and string.
- Any—Proceed to the next step in the workflow regardless of the previous step's return value.
-
- Repeat the steps to add and configure more paths.