What is GeoEvent Logger?
GeoEvent Logger is a Windows application available with ArcGIS GeoEvent Server that allows you to review a delimited representation of event data as it is processed by GeoEvent Server. Event data broadcast from a TCP/Text output connector can be displayed by GeoEvent Logger and optionally written to a system file.
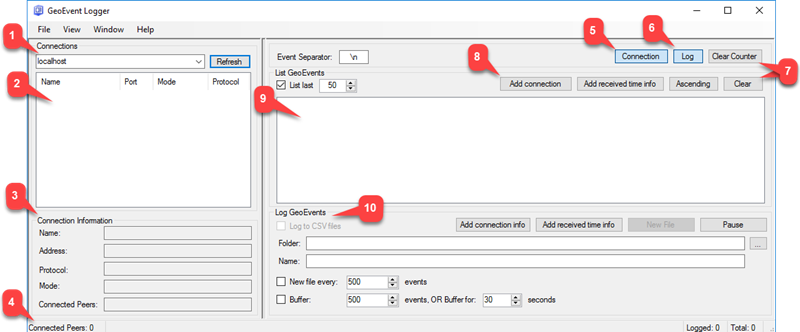
Access GeoEvent Logger from the Windows ArcGIS program group. Below are some of the key elements of GeoEvent Logger:
| Property or Field Name | Description |
|---|---|
1 - Connections | The hostname of the server to which GeoEvent Simulator should try to connect. The default is localhost. Use the Refresh button to log in to a GeoEvent Server. |
2 - Output Connectors | The TCP socket on the specified server to which GeoEvent Simulator should send its simulated event data. |
3 - Connection Information | Specify whether the simulated event data will be loaded from a text file or a feature layer. Simulating data from a CSV file is the most typical use case for GeoEvent Simulator. |
4 - Connected Peers | Text field specifying the path name to the file or the URL to the feature layer from which GeoEvent Simulator will retrieve event data. |
5 - Connections panel | The rate at which event data will be sent. The default is to send one event record every 1000 milliseconds. Change this value to send data at a faster rate (for example: 5 messages every 250 milliseconds) or a slower rate (for example: 1 message every 2500 milliseconds). |
6 - Log panel | Use the Go to Start, Play, and Step controls to set GeoEvent Simulator to the beginning of the event data, to start sending all events, or to send a single event record to GeoEvent Server. Continuous Loop specifies whether GeoEvent Simulator should continuously loop back (or replay) the event data once the last record is reached. |
7 - Clear Counter / Clear | Displays a delimited text representation of the next event record to be sent to GeoEvent Server. |
8 - Add connection / Add received time info | Provides the ability to scroll through the simulated event data. As the position changes, the current index displayed in the middle of the range changes to indicate the current event index. |
9 - Event data display | Choose the field in the simulated event data which specifies the date/time. The array is zero-based, meaning the epoch long integer (in the example illustrated above) is the value immediately to the right of the event record's unique identifier (or TRACK_ID). |
10 - Log GeoEvents | When checked, GeoEvent Simulator will discard the date/time information retrieved from the simulated event data and replace it with the system's current time. |
Authenticate GeoEvent Logger with GeoEvent Server
In GeoEvent Logger, in the top left of the application, is a text box that allows you to enter the server name of a GeoEvent Server. In most cases, when running GeoEvent Logger on the same machine as GeoEvent Server, you can leave this set to localhost. In some cases, localhost will not work such as if you are running GeoEvent Logger on a different machine from GeoEvent Server. In this case, you will need to enter the machine name that GeoEvent Server is running on using the server.domain.com format.
After entering the GeoEvent Server machine name, click Refresh. This will open the Login dialog, where you can enter the credentials for connecting to the GeoEvent Server. Make sure the Server URL is set correctly, enter your User Name and Password, and then click Login.
Nota:
If GeoEvent Server is federated, you will need to use the administrative credentials for Portal for ArcGIS to login. If GeoEvent Server is not federated, then use the administrator credentials as defined in the underlying ArcGIS Server user/role provider.
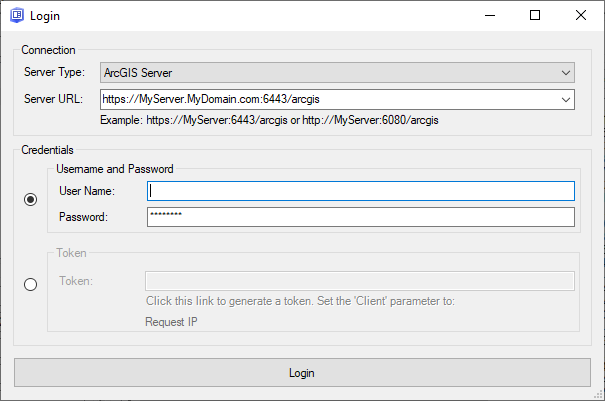
Login to GeoEvent Server is enabled by default. For backward compatibility (version 10.8 or earlier) you will need to disable authentication. To disable authentication in GeoEvent Logger, click Options in the menu and uncheck Use GeoEvent Server admin Endpoints. Once again, this is only necessary for backward compatibility when you need to connect GeoEvent Logger at version 10.8.1 or later to a GeoEvent Server that is version 10.8 or earlier.

Establish a connection to an output connector
GeoEvent Logger lists the output connectors available on a selected GeoEvent Server that are capable of connecting to either a TCP or UDP socket hosted by an external server or application.
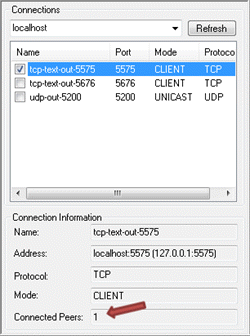
For example, illustrated below, notice this GeoEvent Server has three available output connectors. Two are TCP/Text outputs and one is a UDP/Text output. GeoEvent Logger discovers and lists these three GeoEvent Server outputs as connections, with the first output checked by default.
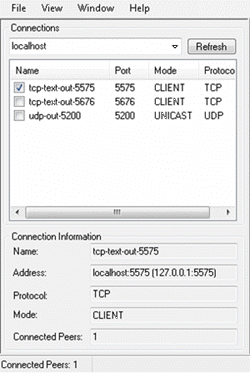
GeoEvent Logger opened a TCP socket (5575) on the specified server (localhost) for the selected output (tcp‑text‑out‑5575). GeoEvent Server output connectors run as clients, so an output must be started to be discovered in GeoEvent Logger. However, prior to opening GeoEvent Logger no hosted socket existed to which the output could connect.
Stopping and restarting a output connector will clear the error message displayed in GeoEvent Manager:
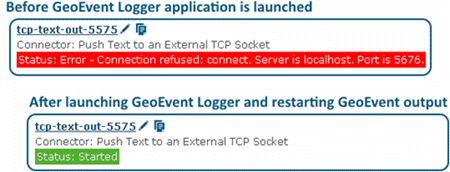
Restarting the output connector guarantees the client will reattempt to connect to the TCP socket opened by GeoEvent Logger on the specified server. Event data broadcast by the output connector will be received by GeoEvent Logger and displayed in the display.
Confirm a client connection
A client connection can be confirmed two ways. First, in GeoEvent Manager, the output will indicate a Started status. Second, in GeoEvent Logger, by selecting the connection in the list, you will see a count of the clients connected (Connected Peers) on that socket.
Visualize received event data
GeoEvent Logger receives and displays a delimited text representation of event data broadcast by an output connector. As event data is received, a total count of event data received is displayed in GeoEvent Logger.
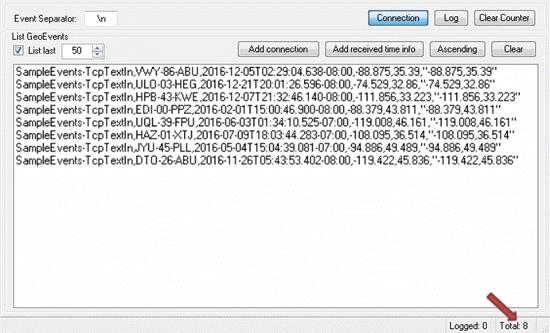
Clicking Add connection prepends the name of the output connector to the event data in the display.

Clicking Add received time info prepends the receiving server's current date/time to the event data in the display.

Logging event data to a system file
GeoEvent Logger's primary purpose is to visualize and review event data, in real-time, as it is received. However, it can also be used to log the received event data to a system file which can be useful for exploratory and archival purposes.
In GeoEvent Logger, clicking Log displays the Log GeoEventspanel. To log event data to a system log file, enter a path to a system folder, specify a filename, and check the checkbox labeled Log to CSV files.
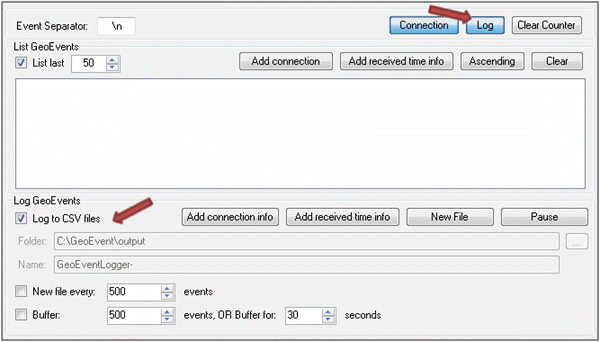
Upon checking Log to CSV files, a status message will display at the bottom of GeoEvent Logger confirming the file to which event data is being written. By unchecking the checkbox, a status message will confirm the log file is no longer receiving event data.
System file logging includes an option to automatically create a new file after a specified number of event records has been received. If this option is checked, a new log file will be created every 500 events by default.
System file logging also includes the option to buffer event data as a batch and only commit the batch to the log file once a specified number of events has been received (or after a specified number of seconds). If this option is checked, the default behavior is to flush the buffer every 500 events or every 30 seconds. This option is only used when event data is being received at a reasonably high velocity (for example, a hundred or more events per second). It controls GeoEvent Logger's disk access so the server can more efficiently write batches of events to disk.
Similar to event visualization in the event data display, you can choose to prepend connection information and/or received date/time information to each event in the log file. You can also manually close the current log file and force a new log file be created by clicking New File. Clicking Pause allows you to temporarily stop and then resume logging event data to the specified log file. Event counters in the lower right-hand corner of GeoEvent Logger provide a status of the total number of events received and written to the log file.