Disponible con licencia de Location Referencing.
The Add Linear Events widget allows ArcGIS Event Editor to add events to redlines. This provides the ability to characterize the pipeline with the appropriate attributes before the LRS editor has added or fixed the route in the LRS, so their workflow is not impeded by having an incorrect LRS route based on current information.
Learn more about redlining a route
Nota:
- This functionality is only available when you've included the redline layer in the map service configured against Event Editor.
- You can save events on redlines that have Create Route or Reverse Route activity types.
- For the reverse route redline, the measure provided upon storage will be translated to the measures required to get the events to locate at the same location before the reverse.
You can use the following steps to add linear events using redlines. A redline with the following attributes is used for this example.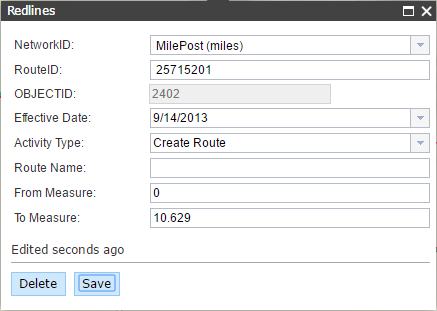
- Abra Event Editor y, si se le solicita, inicie sesión en Portal for ArcGIS o ArcGIS Online.
- Haga clic en la pestaña Editar.
- En el grupo Editar eventos, haga clic en el botón Eventos de línea
 .
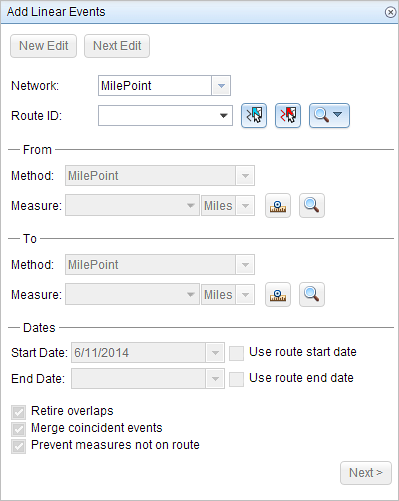
.Aparece el widget Agregar eventos lineales.
Nota:
Las selecciones para el método de red de destino y origen y de medición se pueden configurar previamente al configurar, crear o editar los ajustes predeterminados de los conjuntos de atributos.
Más información sobre cómo configurar y crear y editar los ajustes predeterminados de los conjuntos de atributos.
- Haga clic en la flecha de lista desplegable Red y elija la red que servirá como método de referenciación lineal (LRM) de origen para definir las mediciones de entrada para los nuevos eventos.
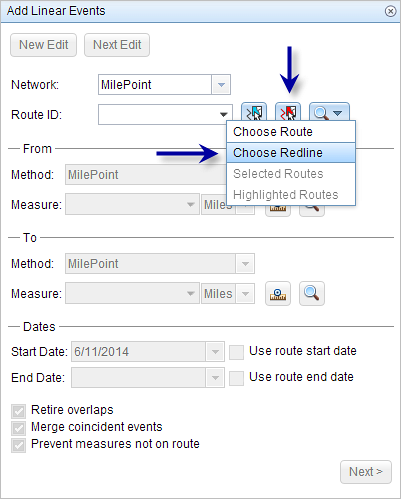
- Click the Select a Redline on the Map button
 to select the redline from the map.
Sugerencia:
You can also click the Route ID drop-down arrow and click Choose Redline, then type the route ID for which the new event measures will be provided.
- In the From section, click the Method drop-down arrow and use one of the following methods to choose the from measure value for the events.
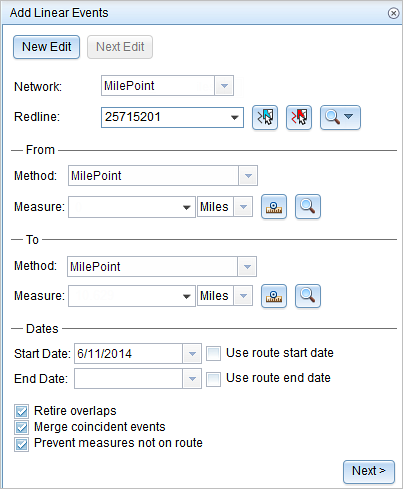
- Choose the network (MilePoint in this case) to enter the from measure value for a single redline.
- Choose a reference offset method to enter the from measure value using a reference offset.
- Provide the intended start location for the new linear event along the redline using any of these options:
- Type the value in the Measure text box.
- Click the Select From Measure on the Map button
 and choose the from measure value along the route on the map.
 - Click the Measure drop-down arrow and choose either Use the Route Start or Use the Route End as the from measure value for the event.
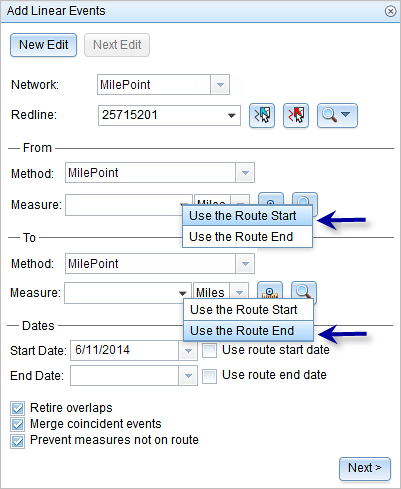
- In the To section, click the Method drop-down arrow and use one of the following methods to choose the to measure value for the events.
- Choose the network (MilePoint in this case) to enter the to measure value for a single redline.
- Choose a reference offset method to enter the to measure value using a reference offset.
- Elija la fecha que definirá la fecha de inicio de los eventos mediante una de las siguientes acciones:
- Escriba la fecha de inicio en el cuadro de texto Fecha inicial.
- Haga clic en la flecha desplegable Fecha de inicio y elija la fecha de inicio.
- Active la casilla de verificación Utilizar fecha de inicio de ruta.
De forma predeterminada, la fecha de inicio es la fecha de hoy, pero puede elegir otra fecha con el selector de fecha.
Nota:
Si configuró su instancia de Event Editor para que no permita fechas anteriores a la fecha de inicio de la ruta, e introduce una fecha anterior a la fecha de inicio de la ruta seleccionada en Fecha de inicio, aparece un mensaje de advertencia que le avisa de que debe seleccionar una fecha igual o posterior a la fecha de inicio de la ruta seleccionada.
- Elija la fecha que definirá la fecha de finalización de los eventos mediante una de las siguientes acciones:
- Escriba la fecha final en el cuadro de texto Fecha final.
- Haga clic en la flecha desplegable Fecha de finalización y elija la fecha de finalización.
- Active la casilla de verificación Utilizar fecha de finalización de ruta.
La fecha de finalización es opcional y, si no se proporciona, el evento sigue siendo válido ahora y en el futuro.
- Haga clic en Siguiente.
- Elija la información de atributos para el nuevo evento mediante las opciones siguientes:
- Escriba la información del atributo para el nuevo evento en las tablas definidas por conjuntos de atributos.
- Haga clic en el botón Copiar valores de atributos
 y haga clic en una ruta del mapa para copiar atributos de evento de otra ruta.
Event Editor utiliza un conjunto de atributos predeterminados en la pestaña Editar. Puede modificar el conjunto de atributos para crear conjuntos de atributos personalizados o usar el conjunto de atributos configurados por el administrador.
Nota:
Se admiten valores codificados, dominios de rango y subtipos cuando se configuran para cualquier campo de la tabla Atributo-Valor.
- Utilice las siguientes opciones para acceder a más información sobre el conjunto de atributos:
- Active la casilla de verificación Mostrar nombre de red para mostrar la Red LRS asociada a la capa de eventos seleccionada.
- La lista de atributos de las tablas definidas por conjuntos de atributos puede estar relacionada con más de una capa de eventos. Si desea identificar la capa de eventos de origen para cada atributo, active la casilla de verificación Mostrar nombres de capa.
- Checking the Go to the next measure upon save check box results in prepopulating the from measure value using the to measure value of the present section to continue the event creation process. For example, this will occur if events are created on the route using a from measure value of 0 miles and a to measure value of 0.289 miles. If you click Save, using this option checked on the Attribute Set tab, the Add Linear Events widget is prepopulated with the value of 0.289 miles as the from measure value for the new events.
- Haga clic en Guardar.
Los nuevos eventos lineales se crean y aparecen en el mapa. Aparece un mensaje de confirmación en la parte inferior derecha una vez que se guardan los eventos de línea recién agregados.
Después de crear un evento correctamente, tiene las dos opciones siguientes para seguir caracterizando la ruta:
- Haga clic en Nueva edición para borrar todas las entradas del widget y restaurar los valores predeterminados de la geodatabase a la tabla de atributos.
- Haga clic en Siguiente edición para conservar todas las entradas existentes en el widget y la tabla de atributos para facilitar la edición rápida de características similares.