Disponible con licencia de Location Referencing.
Use stationing to locate measures
Stationing is the fundamental system of measurement used for pipeline layout and construction. Stations are reference points that are placed along the horizontal measurement of a route centerline or a baseline at some regular interval. Generally, the distance between two adjoining stations along a route is 100 feet. The first station located at the beginning of the baseline is 0+00, and the next station located 100 feet from it is 1+00. Therefore, a station number of 10+34.05 denotes 1,034.05 feet (10*100 + 34.05) from the starting station.

The station numbers increase from west to east or south to north based on the cardinal direction of the overall pipeline. For pipeline projects, a starting reference station is first established, and all distances along the route centerline are measured from that point location. You can add event data to routes by entering station numbers in the Point Events tool interface. The station data is translated to routes and measures for storage.
You can use the stationing data as an input for adding point events by using these three scenarios:
- Create a starting or base station on the route and define the station values as offsets from that station.
- Identify a starting or base station on the route and define the station values as offsets from that location.
- Use the existing stations on the route to calculate or define measures in the form of station values.
Using the existing stations on the route to calculate the measures
You can use this method when stations exist on the route. The measures are calculated using the location and values of the existing stations. This functionality is available only for the LRS Networks that contain a stationing event layer.
In the following
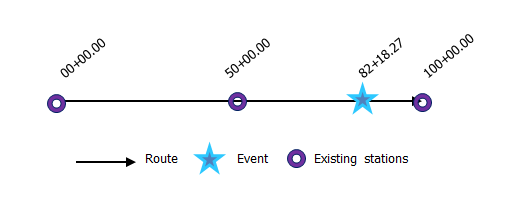
example, there are three existing stations on the route. Stations A, B, and C have station values of 00+00.00, 50+00.00, and 100+00.00. respectively. The stations increase in value
following the direction of calibration of the route, which is from
left to right on the map. The measures on the route are located
by taking these three stations into consideration. Therefore, the measure of the event (station value 82+18.27) is located nearer to the third station—that is, 100+00.00 between the second and the third stations.
- Abra ArcGIS Event Editor y, si se le solicita, inicie sesión en su organización ArcGIS.
- Haga clic en la pestaña Editar.
- In the Edit Events group, click the Point Events button
 .
.The Add Point Events widget appears.

If there are no editable point event layers, the widget is unavailable.
- Haga clic en la flecha desplegable Capa de eventos y elija la capa de eventos que desee editar.
- Haga clic en la flecha desplegable Red y elija la red que servirá como fuente para proporcionar la medición para el nuevo evento.
- El widget acepta una red LRS como origen para identificar la ubicación para agregar el nuevo evento de punto. Sin embargo, cuando los nuevos datos de eventos de punto se almacenan en la base de datos, la aplicación realiza una traducción interna de las mediciones para almacenar siempre el valor de medición en el método de referenciación lineal (LRM) de la red LRS con la que se registra el evento.
- El valor Red puede ser una capa de red LRS publicada.
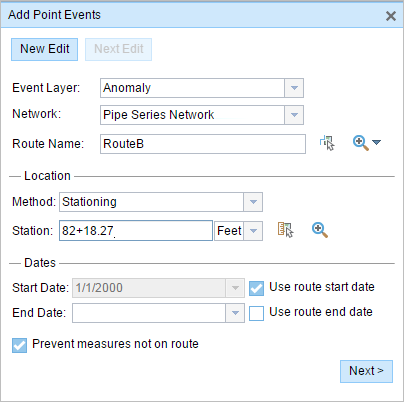
- Type a route name in the Route Name text box on which the new event measure will be based.
Sugerencia:
You can also click the Select a Route on the Map button
 to select the route on the map.
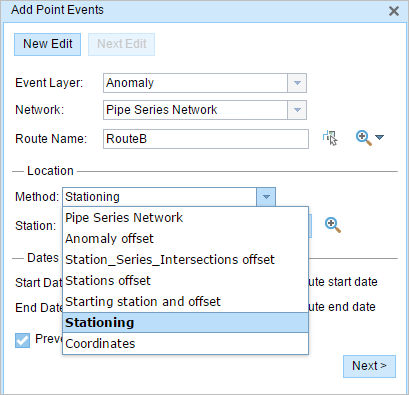
 - In the Location section, click the Method drop-down arrow and choose Stationing.

- In the Location section, click the drop-down arrow and choose the units for station values.
- En la sección Ubicación, proporcione el número de estación mediante una de las siguientes opciones para asignar la medición para el nuevo evento de punto:
- Escriba el número de estación en el cuadro de texto Estación.
- Haga clic en la herramienta Seleccionar una ubicación en el mapa
 y haga clic en una ubicación de la ruta seleccionada. El número de estación se rellena en el cuadro de texto Estación.
La ubicación de medición se situará con un desplazamiento con respecto a la estación de inicio.
Aparece una x roja en la ubicación seleccionada en el mapa.
- Elija la fecha que definirá la fecha de inicio de los eventos mediante una de las siguientes acciones:
- Escriba la fecha de inicio en el cuadro de texto Fecha inicial.
- Haga clic en la flecha desplegable Fecha de inicio y elija la fecha de inicio.
- Active la casilla de verificación Utilizar fecha de inicio de ruta.
De forma predeterminada, la fecha de inicio es la fecha de hoy, pero puede elegir otra fecha con el selector de fecha.
Nota:
Si configuró su instancia de Event Editor para que no permita fechas anteriores a la fecha de inicio de la ruta, e introduce una fecha anterior a la fecha de inicio de la ruta seleccionada en Fecha de inicio, aparece un mensaje de advertencia que le avisa de que debe seleccionar una fecha igual o posterior a la fecha de inicio de la ruta seleccionada.
- Elija la fecha que definirá la fecha de finalización de los eventos mediante una de las siguientes acciones:
- Escriba la fecha final en el cuadro de texto Fecha final.
- Haga clic en la flecha desplegable Fecha de finalización y elija la fecha de finalización.
- Active la casilla de verificación Utilizar fecha de finalización de ruta.
La fecha de finalización es opcional y, si no se proporciona, el evento sigue siendo válido ahora y en el futuro.
- Haga clic en Siguiente para ver la tabla Valor de atributo.
Esta tabla contiene todos los atributos de la capa de eventos.
- Proporcione información de atributos para el nuevo evento en la tabla.
Sugerencia:
Puede hacer clic en el botón Copiar valores de atributos
 y hacer clic en un evento de punto existente que pertenezca a la misma capa de eventos en el mapa para copiar atributos de evento de ese punto.
 - Active la casilla de verificación Mostrar nombre de red para mostrar la red LRS a la que está asociada la capa de eventos seleccionada.
- Haga clic en Guardar.
Aparece un mensaje de confirmación en la parte inferior derecha una vez que se haya guardado el evento de punto recién agregado. El nuevo punto se crea y aparece en el mapa.
Nota:
Si aparece un mensaje que está relacionado con la adquisición de bloqueos, la necesidad de conciliar o no poder adquirir bloqueos, se habilita la prevención de conflictos de Pipeline Referencing Desktop.
Puede obtener más información sobre la prevención de conflictos en el Editor de eventos de ArcGIS.
Después de crear un evento correctamente, tiene las dos opciones siguientes para seguir caracterizando la ruta:
- Haga clic en Nueva edición para borrar todas las entradas del widget y restaurar los valores predeterminados de la geodatabase a la tabla de atributos.
- Haga clic en Siguiente edición para conservar todas las entradas existentes en el widget y la tabla de atributos para facilitar la edición rápida de características similares.