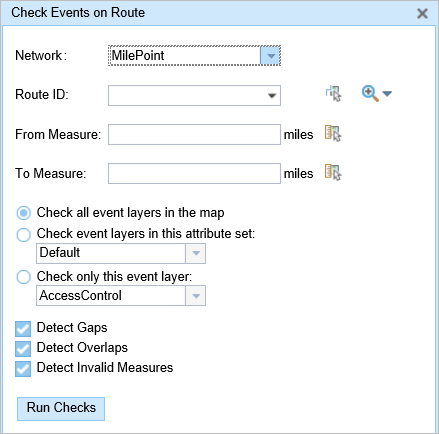
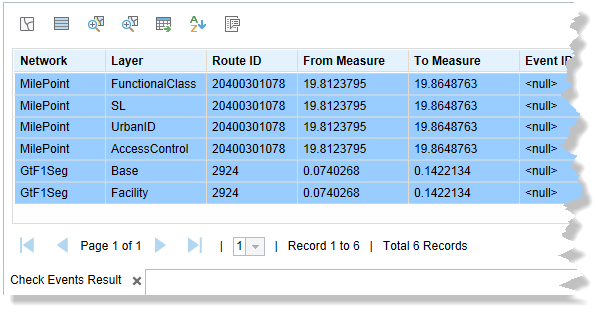
You can execute the Esri Roads and Highways quality control checks to detect gaps, overlaps, and invalid measures on event data with the Event Editor.
- Open Event Editor and, if prompted, sign in to Portal for ArcGIS or ArcGIS Online.
- Click the Review tab.
- In the QC group, click Check Events.

The Check Events on Route widget appears.

- Click the Network drop-down arrow and choose the LRS Network that will serve as a source for selecting the location of the quality control check.
This can be any LRS Network published as a layer in the Event Editor.
- Choose a route using any one of the following options:
Nota:
If your network is configured to have a route name, the Route Name text box appears; otherwise, the Route ID text box appears. You can use any LRS Network published as a layer in Event Editor.
- Type a route name or route ID.
- Click the drop-down arrow, click Choose Routes, click the Select a Route on the Map button
 , and select the route on the map that will be used to check events.
 - Click the drop-down arrow and click Selected Routes to use all the routes in the route selection set.
- Click the drip-down arrow and click Highlighted Routes to select only those routes that are highlighted from the route selection set.
The selected routes are highlighted on the map.
- Type a from measure value of the intended start location of the quality control check along the route in the From Measure text box, or use the Select From Measure on the Map tool
 to select the start location on the map.
A green plus appears at the selected location on the map.
Nota:
The Select From Measure on the Map tool is unavailable if you choose either Selected Routes or Highlighted Routes. In those cases, the from measure defaults to the start measure of the route.
- Enter a to measure value of the intended end location of the quality control check along the route in the To Measure text box, or use the Select To Measure on the Map tool
 to select the end location from the map.
If you do not enter the from and to measure values, the tool runs with the start and end measure values of the route.
A red cross symbol appears at the selected location on the map.
Nota:
The Select To Measure on the Map tool is unavailable if you choose either Selected Routes or Highlighted Routes. In those cases, the to measure defaults to the end measure of the route.
- Choose an option for validating events.
- Check all event layers in the map.
- Choose all the events present in a particular attribute set.
- For more information on , see Learn more about creating an attribute set containing multiple events
- Choose a specific event layer using the drop-down arrow.
- Choose checks from the following options:
- Detect Gaps
- Detect Overlaps
- Detect Invalid Measures
- Click Run Checks.
The Quality Control Results grid appears and is populated with results.

- Use the navigation buttons at the bottom of the table to explore the results.
- Click the First Page button
 or Last Page button
  to go to the first or last page of results.
 - Click the Next Page button
 or Previous Page button
  to go to the next or previous page of results.
 - Click the drop-down arrow and choose the page number to directly access a page.
- Click the First Page button
| Tool | Function |
|---|---|
 | Clear map highlights. |
 | Highlight all. |
 | Zoom to highlighted error. |
 | Zoom to selected errors. |
 | Export selected features to a CSV file. |
 | Use advanced table sorting to organize results. |
 | Configure to show Route ID, Route Name, Line Id, and Line Name when applicable, and navigate to highlighted results. |