Characteristics of a route such as speed limit or functional class can be represented as a linear event with starting and ending measure information along the route. The Line Events tool provides an interface to add linear events by typing or selecting their x- and y-coordinates. You can also use reference offset data to add events to a route. The reference offset data is translated to routes and measures for storage.
Nota:
In cases where events are being modified on a route and you want to see the previous events on the route at that location, don't use the Add Linear Event widget. Instead, edit events in the Event Selection table or the Attribute Set Selection table. If this method is used, you can see what was previously on the routes at the specified measures.
- Abra ArcGIS Event Editor y, si se le solicita, inicie sesión en su organización ArcGIS.
- Haga clic en la pestaña Editar.
- En el grupo Editar eventos, haga clic en el botón Eventos de línea
 .
.Aparece el widget Agregar eventos lineales.
Nota:
Las selecciones para el método de red de destino y origen y de medición se pueden configurar previamente al configurar, crear o editar los ajustes predeterminados de los conjuntos de atributos.
Más información sobre cómo configurar y crear y editar los ajustes predeterminados de los conjuntos de atributos.
- Haga clic en la flecha de lista desplegable Red y elija la red que servirá como método de referenciación lineal (LRM) de origen para definir las mediciones de entrada para los nuevos eventos.
- Choose the route ID on which the events will be located using any of the following options:
- Type a route ID on which the new event measure will be based in the Route ID text box.
- Click the Select a Route on the Map tool
 and select the route from the map.
Sugerencia:
If the selected line is not in the active view of the map, click the Zoom to the route extent or center on the route start or end point on the Map button
 to refresh the map display to zoom in to the entire extent of the selected line.
The line is highlighted in light blue. The arrow at the end shows the direction of calibration of the line.
Nota:
If a message appears that is related to acquiring locks, the need to reconcile, or not being able to acquire locks, Roads and Highways conflict prevention is enabled.
Learn more about conflict prevention messages in the ArcGIS Event Editor
- In the From section, click the Method drop-down arrow and click Coordinates.
The Coordinate System section appears.
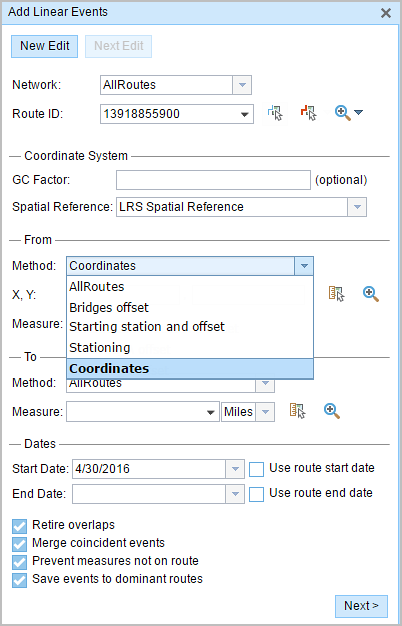
- Optionally type a value in the GC Factor text box.
This will adjust the coordinates by dividing X and Y by the value specified.
- Specify a spatial reference by choosing an option from the Spatial Reference drop-down menu.
- LRS Spatial Reference—The spatial reference of your LRS network
- Web Map Spatial Reference—The spatial reference of your basemap
- GCS_WGS_1984—A geographic spatial reference using units of degrees
Additionally, you can configure different coordinate systems by specifying the well-known ID (WKID) or well-known Text (WKT) in the configuration file of your Event Editor.
Learn more about configuring the ArcGIS Event Editor web app
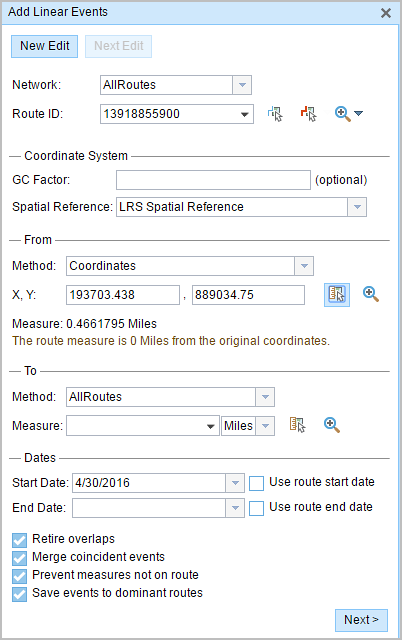
- In the From section, click the Method drop-down arrow and choose Coordinates.
- Input the x- and y-coordinate values for X and Y.
Sugerencia:
You can select a coordinate by using the Select an X/Y Location on the Map button
 .
.The route measure closest to the original coordinates will be selected and its distance from the route will be displayed.
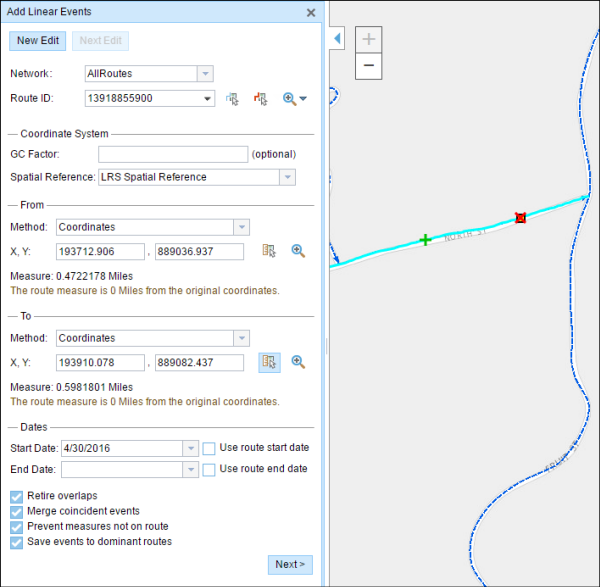
- In the To section, click the Method drop-down arrow and choose Coordinates.
- Input the x- and y-coordinate values for X and Y.
Sugerencia:
You can select a coordinate by using the Select an X/Y Location on the Map button
 .
.The route measure closest to the original coordinates will be selected, and its distance from the route will be displayed.
- Choose the date that will define the start date of the events by doing one of the following:
- Type the start date in the Start Date text box.
- Click the Start Date drop-down arrow and choose the start date.
- Check the Use route start date check box.
The start date defaults to today's date, but you can choose a different date using the date picker. The end date is optional, and if it is not provided, the event remains valid now and into the future.
Nota:
If you configured your instance of ArcGIS Event Editor to not allow dates prior to the start date of the route, and you enter a date prior to the start date of the selected route in Start Date, a warning message appears alerting you to choose a date on or after the start date of the selected route.
- Choose the date that will define the end date of the events by doing one of the following:
- Type the end date in the End Date text box.
- Click the End Date drop-down arrow and choose the end date.
- Check the Use route end date check box.
- Elija entre las siguientes opciones de validación de datos para evitar entradas erróneas a la vez que caracteriza una ruta con eventos lineales:
- Retirar superposiciones: el sistema ajusta la medición y las fechas de inicio y finalización de los eventos existentes de modo que el nuevo evento no genere una superposición con respecto a los valores de tiempo y medición.
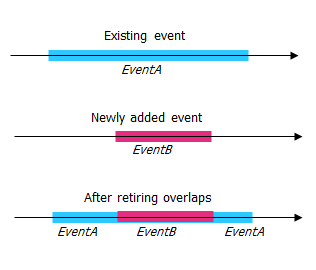
- Fusionar eventos coincidentes: cuando todos los valores de atributo para un nuevo evento son exactamente iguales que los de un evento existente, y si el nuevo evento es adyacente o superpuesto al evento existente en términos de valores de medición, el nuevo evento se fusiona en el evento existente y el rango de mediciones se expande en consecuencia.
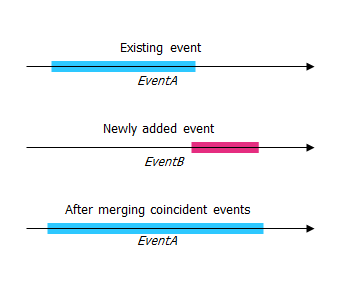
- Evitar mediciones que no estén en la ruta: esta opción de validación de datos garantiza que los valores de medición de entrada de la medición inicial y la medición final se encuentren en el rango mínimo y máximo de los valores de medición en la ruta seleccionada.
- Guardar eventos en rutas dominantes: los eventos se agregan a la ruta dominante en una sección con rutas concurrentes. Si está habilitada, cualquier sección concurrente de la ruta seleccionada le permite elegir la ruta a la que se agregarán los eventos en cada sección concurrente. Esta opción está disponible cuando la red seleccionada tiene reglas de dominio configuradas.
- Retirar superposiciones: el sistema ajusta la medición y las fechas de inicio y finalización de los eventos existentes de modo que el nuevo evento no genere una superposición con respecto a los valores de tiempo y medición.
- Haga clic en Siguiente.
Aparece la pestaña que muestra el conjunto de atributos de los eventos. Los campos de evento se muestran bajo el grupo de atributos G1.
Nota:
Puede utilizar las casillas de verificación para agregar datos para eventos específicos en el conjunto de atributos. No se agrega ningún registro para los eventos desactivados. Como se muestra en el ejemplo siguiente, no se agrega ningún registro a los eventos County_A y City_A.
- Elija la información de atributos para el nuevo evento mediante las opciones siguientes:
- Escriba la información del atributo para el nuevo evento en las tablas definidas por conjuntos de atributos.
- Haga clic en el botón Copiar valores de atributos
 y haga clic en una ruta del mapa para copiar atributos de evento de otra ruta.
Event Editor utiliza un conjunto de atributos predeterminados en la pestaña Editar. Puede modificar el conjunto de atributos para crear conjuntos de atributos personalizados o usar el conjunto de atributos configurados por el administrador.
Nota:
Se admiten valores codificados, dominios de rango y subtipos cuando se configuran para cualquier campo de la tabla Atributo-Valor.
- Utilice las siguientes opciones para acceder a más información sobre el conjunto de atributos:
- Active la casilla de verificación Mostrar nombre de red para mostrar la Red LRS asociada a la capa de eventos seleccionada.
- La lista de atributos de las tablas definidas por conjuntos de atributos puede estar relacionada con más de una capa de eventos. Si desea identificar la capa de eventos de origen para cada atributo, active la casilla de verificación Mostrar nombres de capa.
- Checking the Go to the next measure upon save check box results in prepopulating the From measure value using the to measure value of the present section to continue the event creation process. For example, this will occur if events are created on the route using a From measure value of 0 miles and a to measure value of 0.289 miles. If you click Save with this option checked on the Attribute Set tab, the Add Linear Events widget is prepopulated with the value of 0.289 miles as the from measure value for the new events.
- Haga clic en Guardar.
Los nuevos eventos lineales se crean y aparecen en el mapa. Aparece un mensaje de confirmación en la parte inferior derecha una vez que se guardan los eventos de línea recién agregados.
Después de crear un evento correctamente, tiene las dos opciones siguientes para seguir caracterizando la ruta:
- Haga clic en Nueva edición para borrar todas las entradas del widget y restaurar los valores predeterminados de la geodatabase a la tabla de atributos.
- Haga clic en Siguiente edición para conservar todas las entradas existentes en el widget y la tabla de atributos para facilitar la edición rápida de características similares.