Prepare ArcGIS Enterprise Builder for installation
- Obtain an authorization file for the machine on which you're installing ArcGIS Enterprise Builder.
- Verify that your site meets the system requirements. For more information, see System requirements.
- Log in as a non-root user.
- Browse to the location of the downloaded setup files or insert the ArcGIS Enterprise Builder media into the appropriate drive to automatically launch the setup program.
You're now ready to proceed with the ArcGIS Enterprise Builder installation.
Install ArcGIS Enterprise Builder
The instructions below describe how to install ArcGIS Enterprise Builder from the setup user interface. For instructions on installing ArcGIS Enterprise Builder silently from the command line, see Installing ArcGIS Enterprise Builder silently.
To start the ArcGIS Enterprise Builder Setup, browse to the location of the downloaded setup files and run ./Setup to launch the setup program.
During the installation, read the license agreement and accept it, or exit if you do not agree with the terms.
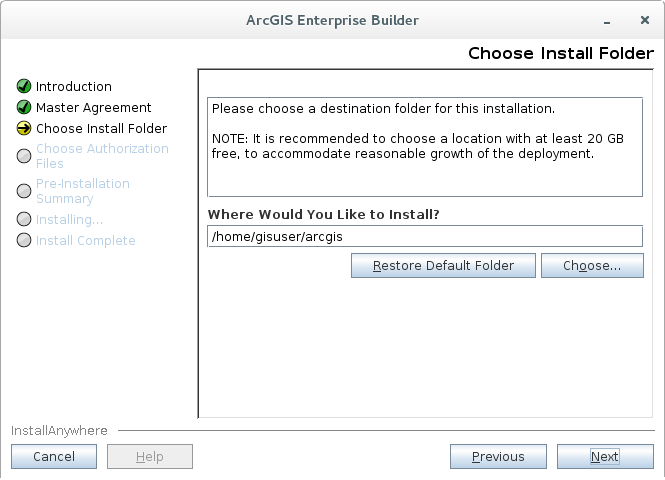
At the Choose Install Folder dialog, provide the installation location for ArcGIS Enterprise Builder. All components will be installed to subdirectories at this specified location. The default location is your home directory.
Portal for ArcGIS database services uses a directory to store user generated content, as well as the default content initially installed. The content will remain on the machine after ArcGIS Enterprise Builder has been uninstalled, enabling subsequent Portal for ArcGIS installations to use existing content. A content directory will be created at <Install Folder>/usr/arcgisportal (for example, /home/gisuser/arcgis/usr/arcgisportal).
Remarque :
You cannot install ArcGIS Enterprise Builder on a shared network directory (NFS mounted folder). The directory must be local on the target system.An installation of ArcGIS Enterprise Builder requires a valid authorization file for both ArcGIS Server and Portal for ArcGIS. You will need to have both of these product's authorization files prior to installing. In the Software Authorization dialog, provide the location of your Portal for ArcGIS authorization file that you received from Customer Service. This can be an .ecp or .prvc file. Also provide the location of your ArcGIS Server authorization file that you received from Customer Service. This can be an .ecp or .prvc file. See Obtain an authorization file for more information.

To complete the installation, follow the directions on the screen. After the installation completes, post installation steps will be displayed
Vous avez un commentaire à formuler concernant cette rubrique ?