Location Referencing ライセンスで利用可能です。
Using stationing to locate measures
Stationing is the fundamental system of measurement used for pipeline layout and construction. Stations are reference points that are placed along the horizontal measurement of a route
centerline or a baseline at some regular interval. Generally, the distance between two adjoining stations along a route is 100 feet. The first station located at the beginning of the baseline is 0+00, and the next station located 100 feet from it is 1+00. Therefore, a station number of 10+34.05 denotes 1,034.05 feet (10*100 + 34.05) from the starting station.
The station numbers increase from west to east or south to north based on the cardinal direction of the overall pipeline. For pipeline projects, a starting reference station is first established; then all distances along the route centerline are measured from that point location. You can add event data to routes by entering station numbers in the Line Events tool interface. The station data is translated to routes and measures for storage.
You can use the stationing data as an input for adding linear events in the following three scenarios:
- Create a starting or base station on the route and enter the station values as an offset from that station.
- Identify a starting or base station on the route and enter the station values as an offset from that location.
- Use the preexisting stations on the route to calculate or enter the measures in the form of station values.
Using preexisting stations on the route to calculate the measures
You can use this method when stations exist on the route using the Event Editor application. The measures will be calculated using the location and values of the preexisting stations. This functionality is available only for the LRS Networks that contain a Stationing event layer.
In the following
example, there are three existing stations on the route. Stations A, B, and C have station values of 00+00.00, 50+00.00, and 100+00.00, respectively. The stations increase in value
following the direction of calibration of the route, which is from
left to right on the map. The measures on the route are located
by taking these three stations into consideration. The starting measure of the event (station value 18+39.12) is located nearer to the first station (00+00.00) between the first and second (50+00.00) stations.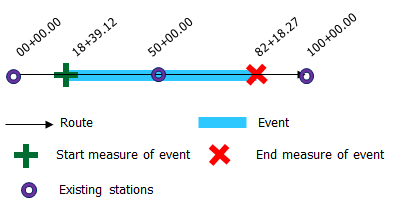
- Event Editor を開き、サイン インが要求されたら、ArcGIS 組織にサイン インします。
- [編集] タブをクリックします。
- In the Edit Events group, click the Line Events button
 .
. - [ネットワーク] ドロップダウン矢印をクリックし、新しいリニア イベントの入力メジャーを定義するためのソース リニア リファレンス方法 (LRM) として使用するネットワークを選択します。
ネットワークは、Event Editor のレイヤーとして公開された LRS ネットワークです。 新しいリニア イベントの開始メジャーと終了メジャーを定義するための LRM として使用する、LRS ネットワークを指定できます。 Event Editor は、リニア イベント レイヤーが関連付けられているネットワークまたは LRM 以外のメジャー値も受け入れます。
新しいイベントは、イベント ロケーションが交差する LRS ネットワークのルート (ルート ID) に関連付けられます。
- 次のいずれかのオプションを使用し、イベントを配置するライン フィーチャの名前を選択します。
- ドロップダウン矢印をクリックし、[ライン名] テキスト ボックスのライン名を選択します。
- [マップ上でラインを選択] ツール
 をクリックし、マップからラインを選択します。
ヒント:
選択されたラインがマップのアクティブ ビューにない場合は、[マップ上でラインの範囲にズームまたはラインの始点/終点を中央配置] ボタン
 をクリックしてマップの表示を更新し、選択したラインの範囲全体を拡大します。
ラインは明るい青色でハイライト表示されます。 端の矢印は、ラインのキャリブレーション方向を示します。
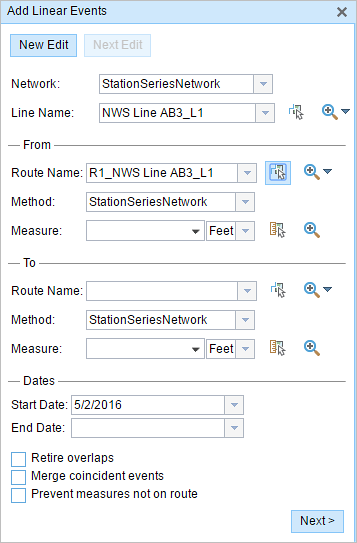
- In the From section, choose Stationing from the Method drop-down list.
- Choose the route on which the event's From measure will be located using the following options:
- Type the route name in the text box.
- Click the Route Name drop-down arrow and choose the route.
- Click the Select a Route on the Map tool
 and select the route on the map.
Only routes that are part of the chosen line can be chosen.
- Using the drop-down arrow, choose the units for station values.
- In the From section, provide the station number using one of the following options to allot the From measure for the event:
- Click the Select a Location on the Map tool
 , and click a location on the selected route. The station number is derived from the route.
 - Type the station number.
A green plus symbol appears at the selected location on the map.
- Click the Select a Location on the Map tool
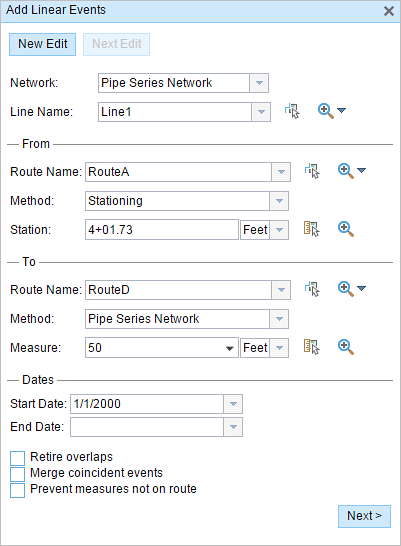
- You can use separate methods to locate the From and To measures of the events. In the following example, the To measure of the event is located using the route and measure method.
A red x appears at the selected location on the map.
- 次のいずれかの操作を実行し、イベントの開始日を定義する日付を選択します。
- [開始日] テキスト ボックスに開始日を入力します。
- [開始日] ドロップダウン矢印をクリックし、開始日を選択します。
開始日のデフォルト設定は当日の日付ですが、日付ピッカーを使用して別の日付を選択することもできます。
- 次のいずれかの操作を実行し、イベントの終了日を定義する日付を選択します。
- [終了日] テキスト ボックスに終了日を入力します。
- [終了日] ドロップダウン矢印をクリックし、終了日を選択します。
終了日は任意です。指定しなければ、イベントはこれから将来にわたって有効であり続けます。
- リニア イベントでルートを特徴付ける際に入力エラーを回避するために、次のデータ検証オプションの中から選択します。
- [オーバーラップの廃止] - 既存イベントのメジャー値と開始日および終了日をシステムが調整し、新しいイベントによって、時間とメジャー値のオーバーラップが発生しないようにします。
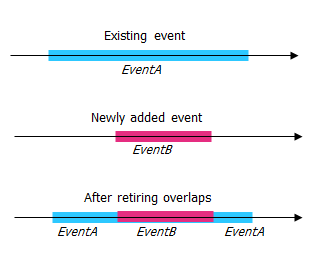
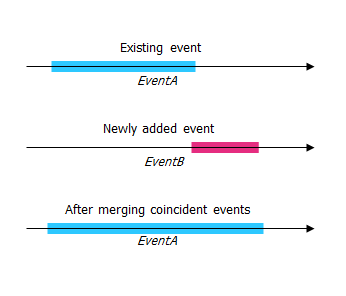
- [一致イベントのマージ] - 新しいイベントのすべての属性値が既存のイベントと完全に一致し、かつ、新しいイベントのメジャー値が既存イベントのメジャー値と隣接しているかオーバーラップしている場合、新しいイベントは既存のイベントにマージされ、メジャーの範囲はそれに応じて拡大されます。
- [ルート上にないメジャーを使用しない] - このデータ検証オプションを使用すると、開始メジャー値と終了メジャー値の入力メジャー値が、選択されたルートの最小メジャー値と最大メジャー値の範囲内にあることが保証されます。
- [オーバーラップの廃止] - 既存イベントのメジャー値と開始日および終了日をシステムが調整し、新しいイベントによって、時間とメジャー値のオーバーラップが発生しないようにします。
- [次へ] をクリックします。
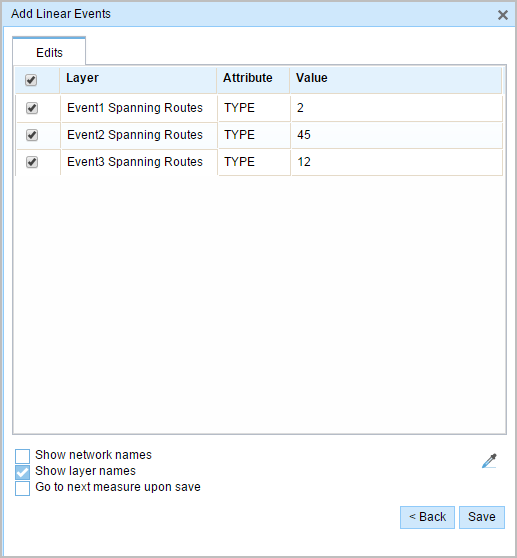
イベントの属性セットを示すタブが表示されます。
備考:
チェックボックスを使用し、属性セットの特定のイベントのデータを追加します。 オンになっていないイベントには、レコードは追加されません。
- 属性セットで定義されたテーブルに、新しいイベントの属性情報を指定します。
[属性値をコピー] ツール
 を使用し、別のルートからイベント属性をコピーします。 ツールを使用して、マップ上のルートをクリックし、イベント属性をコピーします。
Event Editor では、[編集] タブに示される、デフォルトの属性セットを使用します。 属性セットを変更してカスタム属性セットを作成したり、管理者が構成した属性セットを使用したりできます。
- Use the following options to access more information on the attribute set:
- Check the Show network name check box to show the LRS Network associated with the selected event layer.
- The list of attributes in the tables defined by attribute sets can be from more than one event layer. If you want to identify the source event layer for each attribute, check the Show layer names check box.
- Checking the Go to the next measure upon save check box results in prepopulating the From measure value using the To measure value of the present section to continue the event creation process.
- [保存] をクリックします。
新しいリニア イベントが作成され、マップに表示されます。 新しいライン イベントが保存されると、右下に確認メッセージが表示されます。
リニア イベントが正常に作成されると、次の 2 通りの方法でルートの特徴付けを行えます。
- [新しい編集] をクリックして、ウィジェットのすべての入力内容を消去し、ジオデータベースからテーブルにデフォルト値を復元します。
- [次の編集] をクリックして、ウィジェットと属性セットの既存の入力をすべて維持し、同様の特徴の素早い編集と利便性を確保します。
Stationing with equation points
If the reference station has both Ahead and Back station values, that implies that at that location along the route, the alignment or measuring has changed. In the example below, there is an equation point along the route where the station values are 1+04.7 Ahead and 1+05.7 Back.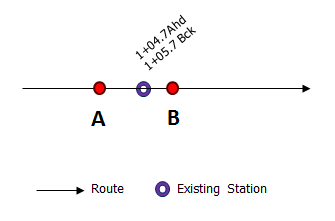
Assume that you have to enter a From measure value of 1+04.8 in the Station parameter. You'll have two options to locate that measure. The first option is to locate it using the Ahead station value of 1+04.7, and the second option is to locate it using the Back station value of 1+05.7.
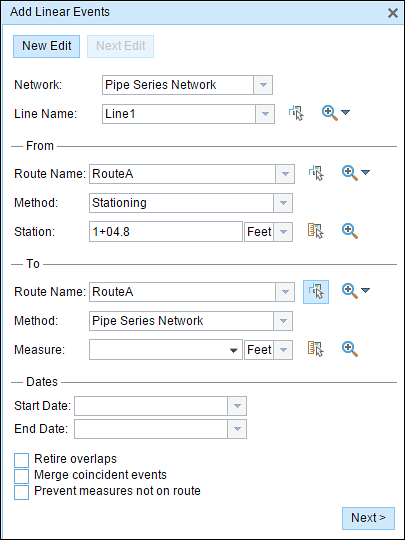
In this case, a pop-up appears so you can select the location of the measure from the two available options.

The first option is to choose measure 104.8 (measure on route), which is shown by B above; this location is calculated using the Ahead station value. The second option is to choose measure 103.8 (measure on route), which is shown by A above; this location is calculated using the Back station value. The proposed From measure location of 1+04.8 is closer to the Ahead station value of 1+04.7 when compared to the Back station value of 1+05.7; therefore, point B is located closer to the station compared to point A.