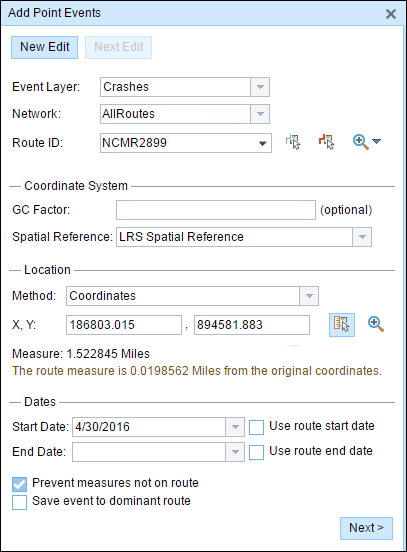
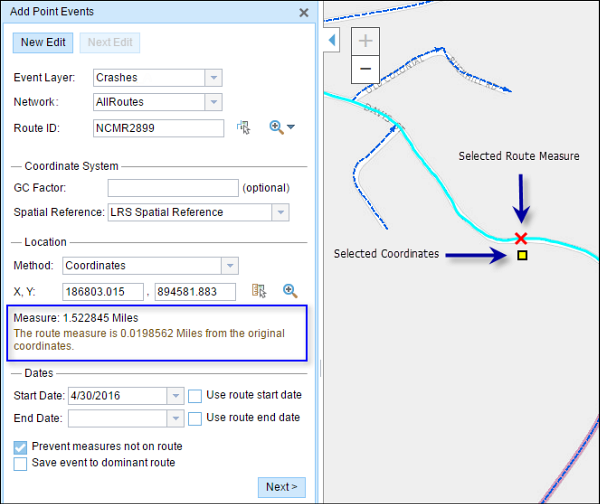
Point events such as crashes and traffic count sites can be represented as a single point event with measure information along the route. The Add Point Events widget allows you to create new point events by typing or selecting its x- and y-coordinates.
- Open Event Editor and, if prompted, sign in to Portal for ArcGIS or ArcGIS Online.
- Click the Edit tab.
- In the Edit Events group, click the Point Events button
 .
.The Add Point Events widget appears.
If there are no editable point event layers, the widget is disabled.
- Choose an event layer you want to edit from the Event Layer drop-down list.

- Click the Network drop-down arrow and choose the network that will serve as a source for providing the measure for the new point event.
- Type a route ID in the Route ID text box on which the new event measure will be based.
ヒント:
You can also click the Select a Route on the Map button
 to choose the route on the map.
注意:
If a message appears that is related to acquiring locks, the need to reconcile, or not being able to acquire locks, Roads and Highways conflict prevention is enabled. For more information about these messages, see Conflict prevention in the Event Editor.
- Optionally input a value in the GC Factor text box.
This will adjust the coordinates by dividing x and y by the value specified for GC Factor.
- Choose a coordinate system from the Spatial Reference menu options.
- LRS Map Service—The spatial reference of your LRS network.
- Web Map Spatial Reference—The spatial reference of your basemap.
- GCS_WGS_1984—A geographic spatial reference using units of degrees.
Additionally, you can configure different coordinate systems by specifying the Well Known ID (WKID) or Well Known Text (WKT) in the configuration file of your Event Editor. For more information, see Configuring the Event Editor (EE) web app.
注意:
If your event stores referents, the referents will be stored in the coordinate system of the event feature class.
- In the Location section, click the Method drop-down arrow and choose Coordinates.
The Coordinate System section appears.
- Input the x- and y-coordinate values for X and Y.
ヒント:
You can also select a coordinate by using the Select an X/Y Location on the Map button.
- Click the Start Date and End Date calendar controls to choose the start and end dates of the event.
The start date defaults to today's date, but you can select a different date using the date picker. The end date is optional.
注意:
If you configured your instance of Event Editor to not allow dates prior to the start date of the route and you enter a date prior to the start date of the selected route in Start Date, a warning message will appear alerting you to choose a date on/after the start date of the selected route.

- Click Next to view the Attribute-Value table.
This table contains all the attributes of the event layer.
注意:
Coded value, range domains, and subtypes are supported when configured for any field in the Attribute-Value table.
- Provide attribute information for the new event in the table.
- Check the Show network name check box to see with which LRS Network the selected event layer is associated.
- Click Save.
The new point is created and displayed on the map.
After an event has been successfully created, you have the following two options to continue characterizing the route:
- When you click New Edit, all the input entries in the widget are cleared, and the default values from the geodatabase are populated in the attribute table.
- When you click Next Edit, all the existing entries in the widget and the attribute table are retained for the convenience of quick editing of similar characteristics.