Adding filters to the Reviewer table
The Reviewer Table can be customized through filters or by changing the display columns.
注意:
The Review tab in the ArcGIS Event Editor will only display if your deployment has been configured to support ArcGIS Data Reviewer Server.
- Event Editor を開き、プロンプトが表示されたら Portal for ArcGIS か ArcGIS Online にサイン インします。
- Click the Review tab on the Event Editor toolbar.
- In the Data Reviewer group, click the Reviewer Table button
 to open the Reviewer table.
 - Click the Table Properties button
 to open the Table Properties widget.
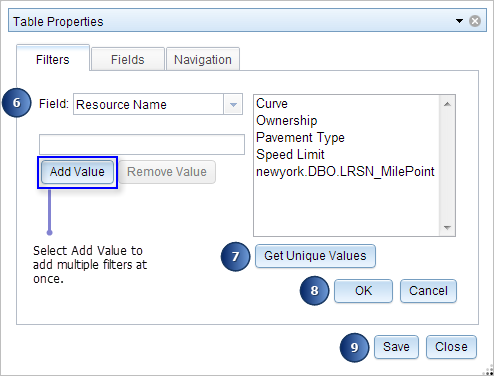
 - Click Add Filter to create a new filter for your reviewer records.
- Click the Field drop-down arrow and select the field to filter.
- If you don't know the values you would like to filter by, you can click Get Unique Values and choose a value. Double-click the value to add it as a filter parameter value.
- Click OK.
To add multiple filters at once, click Add Value and repeat steps 5 through 7.

- Click Save to apply your filters. The Reviewer table refreshes and a filtered view is returned.
- Click Close.
Deleting filters in the Reviewer table
To delete Reviewer Table filters, perform the following actions.
- Click the Table Properties button
 to open the Table Properties widget.
 - Select the filter you would like to delete from the Filters tab and click Delete.
Reviewer table filters for Event Editor are saved with the browser in the HTML5 web storage.
- Click Close to close the widget.
Adding and removing columns in the Reviewer table
Choose which Reviewer Table columns you'd like to display.
- Click the Table Properties button
 to open the Table Properties widget.
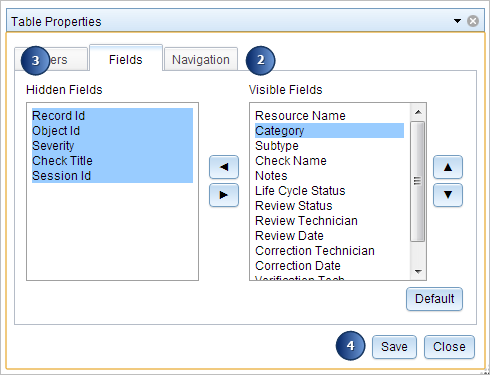
 - Click the Fields tab.
- The Visible Fields list displays all fields currently visible in your Reviewer table. Choose one or more fields you would like to hide.
- Drag the selected fields into the Hidden Fields list, or use the arrows.
- Click Save and Close to apply changes.
To restore your default settings, click Default. To make selected hidden fields visible, drag the selected fields from the Hidden Fields list to the Visible Fields list.

Navigation properties
To set your navigation properties to center the map on highlighted errors, perform the following steps.
- Click the Table Properties button
 to open the Table Properties widget.
 - Click the Navigation tab.
- Check the Center map on highlighted errors check box.
- Click Save.
- Click Close to close the widget.