The sample interface that comes with Products on Demand (PoD) highlights the capabilities of the technology through a few tools that allow you to define, create, and export information products on demand.
Defining and creating a product
The following steps guide you through defining and creating a product with PoD.
- Pan and Zoom to the area where you want to create a new product.
- Click the Define a Product button
 .
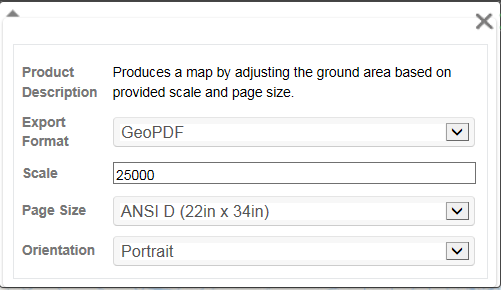
.The Define a Product dialog box appears.
注意:
GeoPDF is now the only supported Export Format.
With the latest release of Maritime Chart Service, the GeoPDF layer is a vector layer. It can be edited in supported Adobe applications and saved as TIFF or JPEG file.

- Define the scale of the product with a numeric value.
- Click the Page Size drop-down arrow and choose a size.
注意:
Page sizes A0 and ANSI E now contain common chart notes.
- Click the Orientation drop-down arrow and choose Portrait or Landscape.
You are now ready to insert the product extent.
- Click the Create a new extent button
 .
. - Move the pointer so that it is centered over the location where you want to create the new product.
- Click on the map to create a new product extent.
A new extent is inserted into the map.
Changing display properties
You can change all supported Maritime Chart Service Display Properties prior to exporting your product.
- Click the Display Properties button
 to open the Display Properties window.
 - Change either your Depth Contour (Meters) or Miscellaneous properties and see your display change based on the new values.
All display property changes will be reflected on your exported product.
Moving an existing product
After inserting a new extent, you may want to adjust its location. To adjust the position of your product extent, you can use the Move a custom extent tool.
- Click the Move a custom extent button
 .
. - Move the pointer over the Area Of Interest (AOI) on the map.
- Click and drag to move the AOI.
注意:
If a product is selected in the Export Queue window, and if it has a white frame around it, you must first click outside the extent of the product in the map to remove the Export Queue selection. A product extent cannot be moved while it is selected in the Export Queue window. Clicking the map outside of the extent with the Move a custom extent tool removes the Export Queue selection, allowing you to move the extent.
Exporting a product
You can export one or multiple products created from the Export Queue list using the following steps.
- Click the Export button
 to open the Export Queue window.
 - If there is more than one product in the export queue, select the one you want to export. To select multiple products, press the Ctrl key while you click the products you want to export from the Export Queue list.
注意:
If nothing in the Export Queue is selected, all of the products in the queue will be exported.
- Click Export Products.
The export process begins. When the process is complete, a link to the product export appears under the Export Products button.
- Click the link to open the exported product.
注意:
If you want to download your exported product, you must do so before exiting or refreshing the PoD website. The download link will no longer be accessible once the website is refreshed.
Deleting a product
You can delete one or multiple products by selecting them in the Export Queue window.
- If the product you want to delete is not selected, click to select it in the Export Queue window.
- Click the Clear selected extents button
 .
.The product is deleted.
注意:
You can also press Delete on your keyboard to remove a selected extent.