Доступно с лицензией Location Referencing.
Using stationing to locate measures
Stationing is the fundamental system of measurement used for pipeline layout and construction. Stations are reference points that are placed along the horizontal measurement of a route
centerline or a baseline at some regular interval. Generally, the distance between two adjoining stations along a route is 100 feet. The first station located at the beginning of the baseline is 0+00, and the next station located 100 feet from it is 1+00. Therefore, a station number of 10+34.05 denotes 1,034.05 feet (10*100 + 34.05) from the starting station.
The station numbers increase from west to east or south to north based on the cardinal direction of the overall pipeline. For pipeline projects, a starting reference station is first established; then all distances along the route centerline are measured from that point location. You can add event data to routes by entering station numbers in the Line Events tool interface. The station data is translated to routes and measures for storage.
You can use the stationing data as an input for adding linear events in the following three scenarios:
- Create a starting or base station on the route and enter the station values as an offset from that station.
- Identify a starting or base station on the route and enter the station values as an offset from that location.
- Use the preexisting stations on the route to calculate or enter the measures in the form of station values.
Using preexisting stations on the route to calculate the measures
You can use this method when stations exist on the route using the Event Editor application. The measures will be calculated using the location and values of the preexisting stations. This functionality is available only for the LRS Networks that contain a Stationing event layer.
In the following
example, there are three existing stations on the route. Stations A, B, and C have station values of 00+00.00, 50+00.00, and 100+00.00, respectively. The stations increase in value
following the direction of calibration of the route, which is from
left to right on the map. The measures on the route are located
by taking these three stations into consideration. The starting measure of the event (station value 18+39.12) is located nearer to the first station (00+00.00) between the first and second (50+00.00) stations.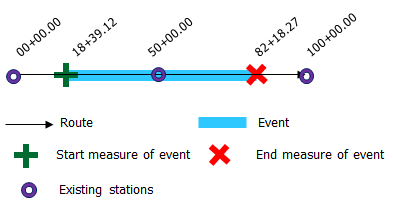
- Откройте Event Editor, и, если необходимо, выполните вход для учетной записи организации ArcGIS.
- Щелкните вкладку Редактировать.
- In the Edit Events group, click the Line Events button
 .
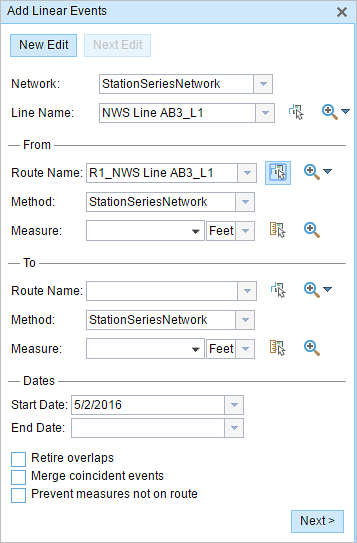
. - Щелкните ниспадающую стрелку Сеть и выберите сеть, которая будет использоваться в качестве источника метода линейной привязки (LRM) для определения входных сообщений для новых линейных событий.
Сеть - это Сеть LRS, опубликованная как слой в Event Editor. Вы можете указать Сеть LRS, которая будет использоваться в качестве линейного метода привязки (LRM) для определения измерения начала и окончания нового линейного события. Event Editor также принимает измерения в сети или LRM, отличных от тех, с которыми связан слой линейных событий.
Новое событие будет связано с маршрутами (ID маршрутов) из сети LRS, с которыми пересекается местоположение события.
- Выберите имя линейного объекта, на котором будут располагаться события, с помощью одной из следующих опций:
- Щелкните ниспадающую стрелку, чтобы выбрать название линии в текстовом окне Имя линии.
- Щелкните инструмент Выбрать линию на карте
 и выберите линию на карте.
Подсказка:
Если выбранная линия не находится в активном виде карты, щелкните кнопку Приблизить к экстенту линии или центрировать на начальной или конечной точке линии на карте
 , чтобы обновить отображение карты и масштабирования к полному экстенту выбранной линии.
Линия будет подсвечена ярко-голубым цветом. Стрелка в конце показывает направление калибровки линии.
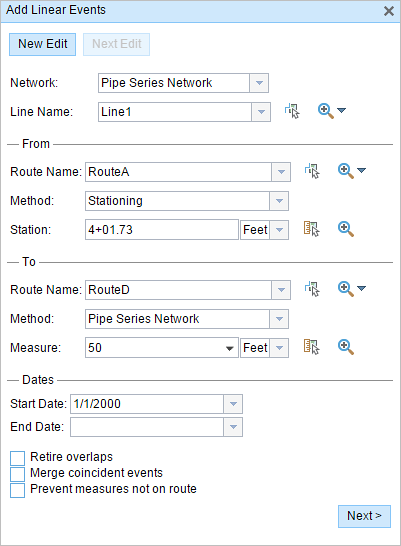
- In the From section, choose Stationing from the Method drop-down list.
- Choose the route on which the event's From measure will be located using the following options:
- Type the route name in the text box.
- Click the Route Name drop-down arrow and choose the route.
- Click the Select a Route on the Map tool
 and select the route on the map.
Only routes that are part of the chosen line can be chosen.
- Using the drop-down arrow, choose the units for station values.
- In the From section, provide the station number using one of the following options to allot the From measure for the event:
- Click the Select a Location on the Map tool
 , and click a location on the selected route. The station number is derived from the route.
 - Type the station number.
A green plus symbol appears at the selected location on the map.
- Click the Select a Location on the Map tool
- You can use separate methods to locate the From and To measures of the events. In the following example, the To measure of the event is located using the route and measure method.
A red x appears at the selected location on the map.
- Выберите дату, которая будет определять начальную дату событий, выполнив одно из следующего:
- Введите дату начала в текстовом окне Дата начала.
- Щелкните ниспадающую стрелку Дата начала и выберите дату начала.
По умолчанию датой начала является текущая дата, но вы можете выбрать другую.
- Выберите дату, которая будет определять конечную дату событий, выполнив одно из следующего:
- Введите дату окончания в текстовое окно Дата окончания.
- Щелкните ниспадающую стрелку Дата окончания и выберите дату окончания.
Дата окончания является необязательной, если она не задана, то событие останется допустимым сейчас и в будущем.
- Выполните одну из следующий опций проверки данных, чтобы предупредить ошибки ввода при назначении характеристик маршрута с линейными событиями:
- Исключить перекрытия — система выравнивание измерения, а также начальную и конечную даты существующих событий таким образом, что новое событие не вызывает наложения ни по времени, ни по измерению.
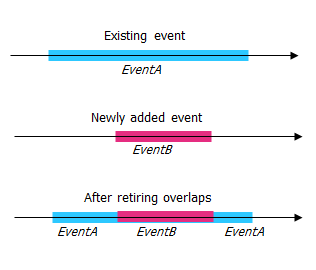
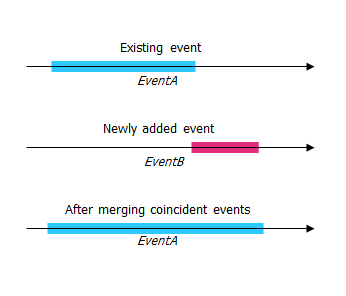
- Слияние совпадающих событий — когда все значения атрибутов для нового события абсолютно одинаковы, что и в существующем событии, и если новое событие смежно с или перекрывает существующее событие в плане значений измерений, то новое событие сливается с существующим, а диапазон измерении соответствующим образом расширяется.
- Предотвратить измерения не на маршруте — эта опция проверки данных гарантирует, что входные значения измерений для значений измерений от и до попадают в диапазон от минимального до максимального значений измерений на выбранном маршруте.
- Исключить перекрытия — система выравнивание измерения, а также начальную и конечную даты существующих событий таким образом, что новое событие не вызывает наложения ни по времени, ни по измерению.
- Щелкните Далее.
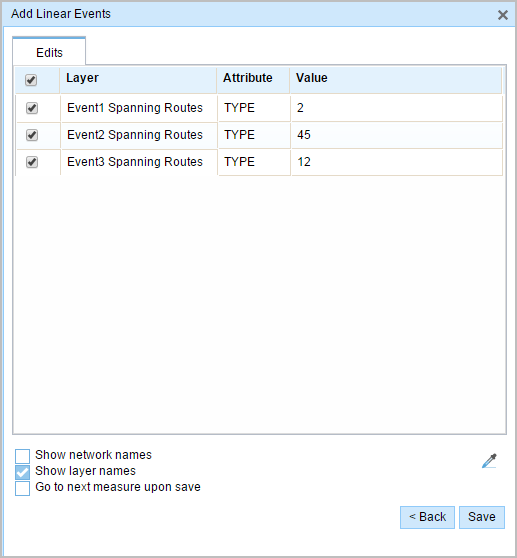
Появится вкладка, показывающая набор атрибутов для событий.
Примечание:
Вы можете использовать отметки для добавления данных к отдельным событиям в наборе атрибутов. Для событий, которые не отмечены, никакие записи не добавляются .
- Укажите атрибутивную информацию для нового события в таблицах, заданных наборами атрибутов.
Вы можете использовать инструмент Копировать значения атрибутов
 для копирования атрибутов событий из другого маршрута. Щелкните инструмент и затем щелкните на маршруте на карте, чтобы копировать атрибуты события.
Event Editor использует набор атрибутов по умолчанию, как это видно на вкладке Редактировать. Вы можете изменить набор атрибутов на создать пользовательский набор атрибутов или использовать набор атрибутов, настроенный администратором.
- Use the following options to access more information on the attribute set:
- Check the Show network name check box to show the LRS Network associated with the selected event layer.
- The list of attributes in the tables defined by attribute sets can be from more than one event layer. If you want to identify the source event layer for each attribute, check the Show layer names check box.
- Checking the Go to the next measure upon save check box results in prepopulating the From measure value using the To measure value of the present section to continue the event creation process.
- Щелкните Сохранить.
Новые линейные события будут созданы и появятся на карте. После сохранения нового добавленного линейного события в нижнем правом углу появится подтверждение.
После того, как линейное событие было создано успешно, у вас есть две опции для дальнейшей настройки маршрута:
- Щелкните New Edit, чтобы очистить все входные данные в виджете и восстановить значения по умолчанию из базы геоданных в таблице.
- Щелкните Next Edit, чтобы сохранить все существующие записи в виджете и наборе атрибутов для удобства быстрого редактирования однотипных характеристик.
Stationing with equation points
If the reference station has both Ahead and Back station values, that implies that at that location along the route, the alignment or measuring has changed. In the example below, there is an equation point along the route where the station values are 1+04.7 Ahead and 1+05.7 Back.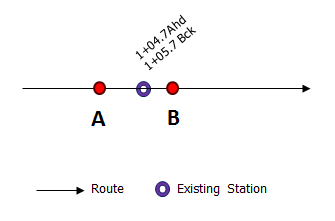
Assume that you have to enter a From measure value of 1+04.8 in the Station parameter. You'll have two options to locate that measure. The first option is to locate it using the Ahead station value of 1+04.7, and the second option is to locate it using the Back station value of 1+05.7.
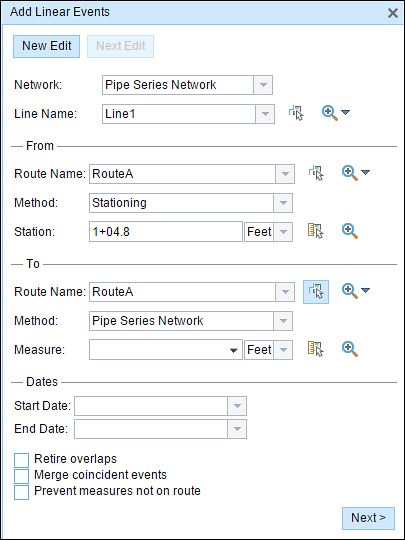
In this case, a pop-up appears so you can select the location of the measure from the two available options.

The first option is to choose measure 104.8 (measure on route), which is shown by B above; this location is calculated using the Ahead station value. The second option is to choose measure 103.8 (measure on route), which is shown by A above; this location is calculated using the Back station value. The proposed From measure location of 1+04.8 is closer to the Ahead station value of 1+04.7 when compared to the Back station value of 1+05.7; therefore, point B is located closer to the station compared to point A.