Доступно с лицензией Location Referencing.
Characteristics of a route such as speed limit or functional class can be represented as a linear event with starting and ending measure information along the route. The Line Events tool provides an interface to add linear events by typing or selecting their x- and y-coordinates. You can also use reference offset data to add events to a route. The reference offset data is translated to routes and measures for storage.
Примечание:
In cases where events are being modified on a route and you want to see the previous events on the route at that location, don't use the Add Linear Event widget. Instead, edit events in the Event Selection table or the Attribute Set Selection table. If this method is used, you can see what was previously on the routes at the specified measures.
- Откройте Event Editor, и, если необходимо, выполните вход для учетной записи организации ArcGIS.
- Щелкните вкладку Редактировать.
- В группе Редактировать события щелкните кнопку Линейные события
 .
.Появится виджет Добавить линейные события.
Примечание:
Опции выбора для метода сети До и От и измерения можно настроить предварительно при конфигурации, создании или редактировании настроек по умолчанию для наборов атрибутов.
Более подробно о настройке и создании и редактировании настроек по умолчанию для наборов атрибутов.
- Щелкните ниспадающую стрелку Сеть и выберите сеть, которая будет использоваться в качестве источника метода линейной привязки (LRM) для определения входных сообщений для новых событий.
- Choose the name of the line feature on which the events will be located using one of the following options:
- Click the drop-down arrow to choose the line name in the Line Name text box.
- Click Select a Line on the Map
 and select the line from the map.
Подсказка:
If the selected line is not in the active view of the map, click Zoom to the line extent or center on the line start or end point on the Map
 to refresh the map display to zoom in to the entire extent of the selected line.
The line is highlighted in light blue. The arrow at the end shows the direction of calibration of the line.
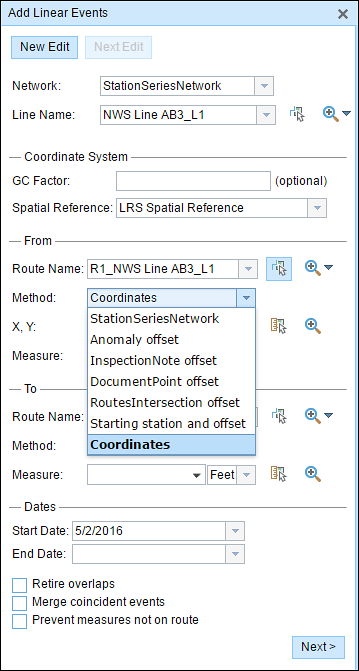
- In the From section, click the Method drop-down arrow and click Coordinates.
The Coordinate System section appears.

- Optionally, provide a value in the GC Factor text box.
This will adjust the coordinates by dividing X and Y by the value specified.
- Specify a spatial reference by choosing an option from the Spatial Reference drop-down menu.
- LRS Spatial Reference—The spatial reference of your LRS network
- Web Map Spatial Reference—The spatial reference of your basemap
- GCS_WGS_1984—A geographic spatial reference using units of degrees
Additionally, you can configure different coordinate systems by specifying the well-known ID (WKID) or well-known text (WKT) in the configuration file of your Event Editor.
- In the From section, click the Method drop-down arrow and choose Coordinates.
- Input the x- and y-coordinate values for X and Y.
Подсказка:
You can select a coordinate by clicking Select an X/Y Location on the Map
 .
.The route measure closest to the original coordinates will be selected and its distance from the route will be displayed.

- Choose the route name in the To section using any of the following options:
- Click the Route Name drop-down arrow and choose the route.
- Provide a route name in the Route Name text box.
- Click Select a Route on the Map
 and select the route from the map.
Подсказка:
If the selected route is not in the active view of the map, click Zoom to the route extent or center on the route start or end point on the Map
 to refresh the map display to zoom in to the entire extent of the selected line.
 - In the To section, click the Method drop-down arrow and choose Coordinates.
- Input the x- and y-coordinate values for X and Y.
Подсказка:
You can select a coordinate by clicking Select an X/Y Location on the Map
 .
.The route measure closest to the original coordinates will be selected, and its distance from the route will be displayed.

- Choose the date that will define the start date of the events by doing one of the following:
- Provide the start date in the Start Date text box.
- Click the Start Date drop-down arrow and choose the start date.
The start date defaults to today's date, but you can choose a different date using the date picker.
Примечание:
If you configured your instance of Event Editor to not allow dates before the start date of the route, and you provide a date before the start date of the selected route in Start Date, a warning message appears alerting you to choose a date on or after the start date of the selected route.
- Choose the date that will define the end date of the events by doing one of the following:
- Provide the end date in the End Date text box.
- Click the End Date drop-down arrow and choose the end date.
The end date is optional, and if it is not provided, the event remains valid now and into the future.
- Выполните одну из следующий опций проверки данных, чтобы предупредить ошибки ввода при назначении характеристик маршрута с линейными событиями:
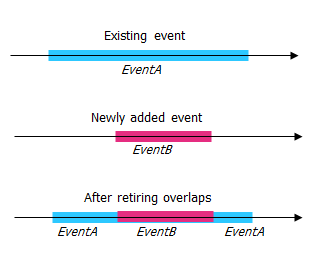
- Исключить перекрытия - система выравнивает измерение, а также начальную и конечную даты существующих событий таким образом, чтобы новое событие не вызывало наложения ни по времени, ни по измерению.

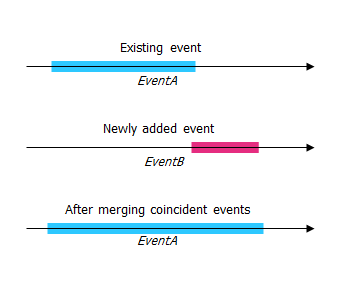
- Слияние совпадающих событий — когда все значения атрибутов для нового события абсолютно одинаковы, что и в существующем событии, и если новое событие смежно с или перекрывает существующее событие в плане значений измерений, то новое событие сливается с существующим, а диапазон измерении соответствующим образом расширяется.

- Предотвратить измерения не на маршруте — входные значения измерений для значений начального и конечного измерений попадают в диапазон от минимального до максимального значений измерений на выбранном маршруте.
- Исключить перекрытия - система выравнивает измерение, а также начальную и конечную даты существующих событий таким образом, чтобы новое событие не вызывало наложения ни по времени, ни по измерению.
- Щелкните Далее.
Появится вкладка, показывающая набор атрибутов для событий. Поля событий показаны под группой атрибутов G1.
Примечание:
Вы можете использовать отметки для добавления данных к отдельным событиям в наборе атрибутов. Для событий, которые не отмечены, никакие записи не добавляются. Как показано в примере ниже, к событиям County_A и City_A записи не добавляются.
- Укажите атрибутивную информацию для нового события, выполнив одно из следующих действий:
- Укажите атрибутивную информацию для нового события в таблицах, заданных наборами атрибутов.
- Щелкните Копировать значения атрибутов
 и щелкните маршрут на карте, чтобы копировать атрибуты события из другого маршрута.
Event Editor использует набор атрибутов по умолчанию на вкладке Edit. Вы можете изменить набор атрибутов на создать пользовательский набор атрибутов или использовать набор атрибутов, настроенный администратором.
Примечание:
Домены кодированных значений, интервальные домены и подтипы поддерживаются при настройке для любого поля в таблице атрибутивных значений.
- Чтобы получить доступ к дополнительной информации о наборе атрибутов, выполните любое из следующих действий:
- Поставьте отметку Показать имя сети, чтобы показать Сеть LRS, связанную с выбранным слоем событий.
- Список атрибутов в таблицах, определенных наборами атрибутов, может быть получен из нескольких слоев событий. Чтобы идентифицировать исходный слой событий для каждого атрибута, поставьте отметку Показать названия слоев.
- Checking the Go to the next measure upon save check box results in prepopulating the starting measure value using the ending measure value of the present section to continue the event creation process. For example, this will occur if events are created on the route using a From measure value of 0 miles and a To measure value of 0.289 miles. If you click Save with this option checked on the Attribute Set tab, the Add Linear Events widget is prepopulated with the value of 0.289 miles as the starting measure value for the new events.
- Щелкните Сохранить.
Новые линейные события будут созданы и появятся на карте. После сохранения нового добавленного линейного события в нижнем правом углу появится подтверждение.
После того, как событие было создано, для дальнейшей настройки маршрута можно сделать следующее:
- Щелкните Новое редактирование, чтобы очистить все входные данные в виджете и восстановить значения по умолчанию из базы геоданных в таблице атрибутов.
- Щелкните Следующее редактирование, чтобы сохранить все существующие записи в виджете и таблице атрибутов для удобства быстрого редактирования однотипных характеристик.