To deploy the Event Editor and supporting dataset, follow the steps below.
Примечание:
It is strongly recommended that you follow the steps in the order outlined.
- Install Esri Roads and Highways for Server.
For more information, see Installing Location Referencing.
- Create a
map document (MXD) with the appropriate routes, event layers, and (optionally) redline layer using Esri Roads and Highways for Server.
You can include the redline layer in the same map document or you can create a different map document just for redline. For more information, see Deploying redline routes. Make sure the redline feature class has its m- and z-values disabled.
Примечание:
The map data must be from an enterprise geodatabase for the LRS service to work in Event Editor. If the data source for the layers is a file geodatabase, then the LRS will not be copied to the server during publishing and all the layers will be seen as non-LRS layers in the service.
Примечание:
Event Editor supports viewing relationships if they are available through the map service. To publish a relationship in the maps service, have both Origin table or feature class and Destination table or feature class in your map document. Simple relationship classes with one-to-one (1:1), one-to-many (1:M) are supported.
- Publish
the map document with ArcGIS Server and enable the linear referencing capability.
Assign the map service an appropriate name. This name will be displayed in the Event Editor table of contents.
Примечание:
Prior to publishing your web map, you must remove all time definition filters from internal event layers, LRS Networks, intersection feature classes, and calibration points. Time filters can be added and removed on your desktop. To learn more, see Setting the time view for LRS data. The time setting in Event Editor only applies to Roads and Highways layers. Other layers published in the Event Editor map will not be impacted or changed as a result of the user changing the time view.
- In step 2, if you have chosen to create a different map document for redline, publish the map document with ArcGIS Server and enable feature access. To enable feature access, see Deploying redline routes.
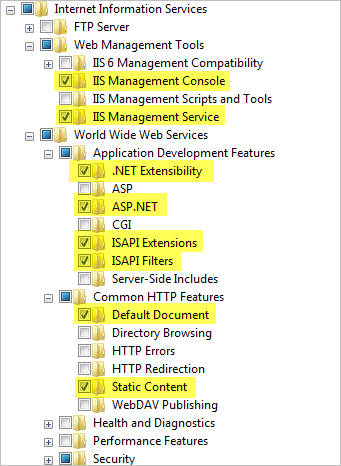
- In the Windows Features dialog box, enable the Internet Information Services, .NET and ASP.NET features.
The following is an example of the Windows Features dialog box and features, which may look different based on your operating system. The highlighted features are required to be enabled on your machine.

- Using Windows Explorer, browse to and copy the contents of <Installation location>\Server\Web\EventEditor into the web folder of the web server.
For example, in IIS, the web folder may be located at C:\inetpub\wwwroot\EventEditor.
Примечание:
The actual location of the IIS wwwroot directory could differ on your server machine. Use the IIS Management Console to obtain the location of the IIS wwwroot directory.
If you are upgrading from 10.4 or an earlier release, delete the index.html file from the folder.
- Author a web map that includes the map services created in the previous steps and the appropriate basemaps.
- Open the configuration (config.json) file within the EventEditor web folder and modify it to use the web map and geoprocessing services created from previous steps. Optionally, you can choose to change some default administrative settings such as user authentication, map selection symbology, and attribute sets while modifying the configuration file. Use the following guides to deploy: Adding DGN and DWG data: Deployment guide, Producing attribute sets, and Deploying redline routes.
- Configure Portal for ArcGIS or ArcGIS Online with Event Editor to secure your web services.
- Optionally validate and correct your organization's event data by integrating ArcGIS Data Reviewer for Server with the Event Editor web app.
Event IDs when adding or editing events
Event Editor requires an Event ID column in each of the event layers it is configured to edit. When new events are created by Event Editor, an event ID must be provided for each record. Event Editor can generate and provide event IDs if the Event ID column is a string and greater than 32 characters in length. It will generate a globally unique identifier (GUID) as a string and use that.
If the Event ID column is not a string greater than 32 characters, the app will not specify an event ID. If the database is not configured to generate a value, a null value will be stored. You can provide an event ID by placing this column in the attribute set used for the edit and provide a value, but this approach is not recommended because you would need to provide an event ID for each and every record, and the value must be unique.