The ArcGIS Event Editor allows you to add point events to dominant routes in case route concurrences exist.
Concurrent routes
Concurrent routes are routes that share the same centerlines; that is, they travel the same pavement but are modeled with different measures. This relationship may exist to model two routes with different directions of calibration, to model different directions of travel on the highway, or to model locations on highways where multiple routes converge into a common roadway for a subset of their paths. Where these concurrent routes exist, you can choose a route that's considered dominant using a set of rules.
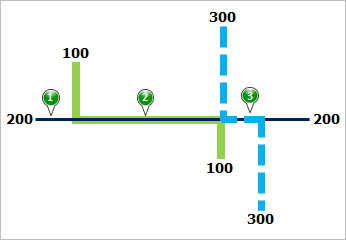
The Event Editor app allows you to add point events to the dominant routes. For example, in the following graphic and tables, there are three routes with route IDs: 100 with Name A, 200 with Name B, and 300 with Name B. The concurrent routes have different ranges in time.
| Route ID | From Date | To Date | Route Name |
|---|---|---|---|
100 | 1/1/2000 | Null | A |
200 | 1/1/2000 | Null | B |
300 | 1/1/2010 | Null | B |
| Point Event | Dominant Route ID |
|---|---|
1 | 200 |
2 | 100 |
3 | 200 or 300 |
Правило доминирования маршрута устанавливается таким образом, что чем меньше название маршрута, тем более доминирующим является маршрут. Используя это условие, маршрут 100 является наиболее доминирующим маршрутом, а маршруты 200 и 300 имеют одинаковый порядок доминирования.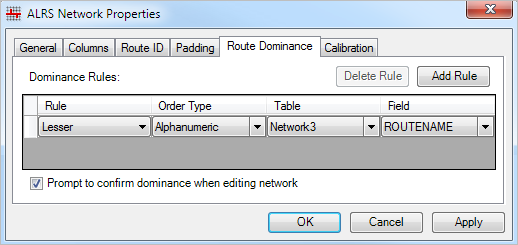
For example, you want to add point events at three locations on route 200. In Location 1, route 200 is the dominant route. Since no other route exists at that point, the event will be added to route 200. In Location 2, route 100 has a greater order of dominance, so the event will be added to route 100. In Location 3, both route 200 and route 300 have the same order of dominance, so the event will be added to the route of your choice.
Примечание:
- Для доступа к этой функциональности должны быть настроены правила доминирования маршрутов.
Complete the following steps to add point events to dominant routes:
- Откройте ArcGIS Event Editor, и, если необходимо, выполните вход для учетной записи организации ArcGIS.
- Щелкните вкладку Редактировать.
- В группе Редактировать события щелкните кнопку Точечные события
 .
.Появится виджет Добавить точечные события.
Если редактируемых слоев точечных событий нет, виджет будет отключен.
- Выберите слой событий, который хотите изменить, из ниспадающего списка Слой событий.
The point event will be added to this layer.
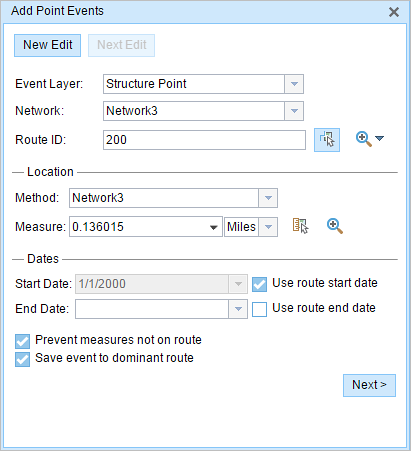
- Щелкните ниспадающую стрелку Сеть и выберите сеть, которая будет использоваться в качестве источника метода линейной привязки (LRM) для определения входных сообщений для новых событий.
Сеть - это сеть LRS, опубликованная как слой в Event Editor.
You can specify the LRS Network to be used as the LRM for defining the measure of the new point event.
- Type the route's ID on which the event's measure will be located in the Route ID text box.
Подсказка:
Также вы можете щелкнуть кнопку Выбрать маршрут на карте
 .
. - In the Location section, choose the first option (with the suffix Network) in the Method drop-down menu.
- Provide the intended location for the new point event along the route using any of the following options:
- Type the value in the Measure text box.
- Click the Select From Measure on the Map button
 and choose the measure value along the route on the map.
 - Click the Measure drop-down arrow to choose either Use the Route Start or Use the Route End option as the measure value for the event.
If you type the measure value, you can choose the unit for that value using the drop-down arrow. The measure value will be converted into LRS units before saving the newly added events. For example, if the LRS is in miles and you type 528 feet as the measure value, the newly added event will have a measure value of 0.1 miles, since 528 feet equals to 0.1 miles.
A red cross appears at the selected location on the map.
- Выберите дату, которая будет определять начальную дату событий, выполнив одно из следующего:
- Введите дату начала в текстовом окне Дата начала.
- Щелкните ниспадающую стрелку Дата начала и выберите дату начала.
- Поставьте отметку Использовать дату начала маршрута.
По умолчанию датой начала является текущая дата, но вы можете выбрать другую.
Примечание:
Если вы настроили экземпляр Event Editor таким образом, что даты до начала маршрута недопустимы, а вы ввели такую дату для выбранного маршрута в параметре Дата начала, то появится предупреждение о том с возможностью выбора даты в момент или после даты начала выбранного маршрута.
- Выберите дату, которая будет определять конечную дату событий, выполнив одно из следующего:
- Введите дату окончания в текстовое окно Дата окончания.
- Щелкните ниспадающую стрелку Дата окончания и выберите дату окончания.
- Поставьте отметку для параметра Использовать дату окончания.
Дата окончания является необязательной, если она не задана, то событие останется допустимым сейчас и в будущем.
- Choose Prevent measures not on route to prevent erroneous input while characterizing a route with point events.
This data validation option ensures that the input measure value falls in the minimum and maximum range of measure values on the selected route.
- Check the Save events to dominant routes check box.
This option can be configured to be checked or unchecked by default using the Event Editor's configuration file. For more information, see Configuring the ArcGIS Event Editor web app.
- Click Next.
The route dominance table appears.
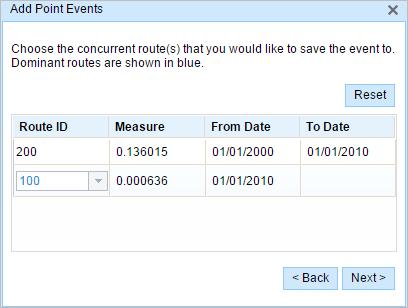
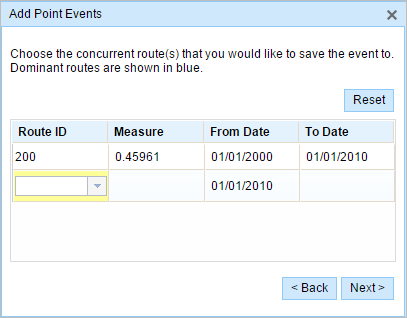
The Route ID and Measure columns show the values for each dominant route where the events will be added.
As an example, route 200 has a From Date value of 1/1/2000, and route 100 and route 300 have a From Date value of 1/1/2010. Therefore, if you choose 1/1/2000 as the start date of the event, there will be two time ranges:
- 1/1/2000–1/1/2010, when only route 200 existed.
- 1/1/2010–Null, when all three routes existed.
A black route ID without a drop-down arrow signifies that there was a single route in that location. A blue route ID with a drop-down arrow signifies that there are concurrent routes in that location, and the blue route is chosen by the software based on the route dominance rules. You can choose any other route using the drop-down arrow.
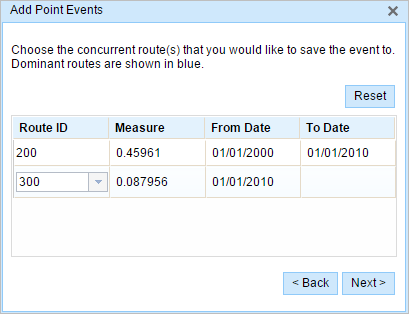
A yellow route ID box with a drop-down arrow signifies that there is an ambiguous situation (Location 3, for example) in choosing the dominant route, as there is a tie in the route names of route 200 and route 300. In this case, you need to manually choose a route ID using the drop-down arrow. The yellow disappears once you've manually chosen a route.
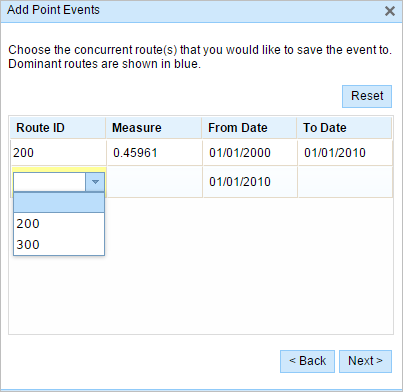
In this example, you would choose route 300. The Measure value along route 300 is the measure of that route at the same location in the separate time range.
- Щелкните Далее, чтобы посмотреть таблицу Значение атрибута.
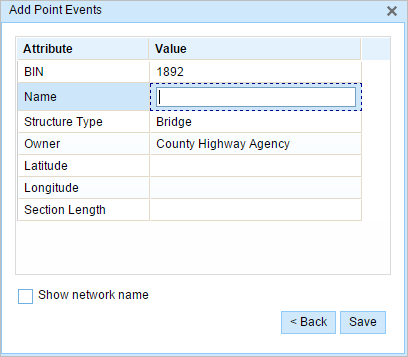
Эта таблица содержит все атрибуты слоя событий.
Примечание:
Домены кодированных значений, домены диапазонов и подтипы поддерживаются при настройке любого поля в таблице Attribute-Value.
- Укажите атрибутивную информацию для нового события в таблице.
Подсказка:
Вы можете нажать кнопку Копировать значения атрибутов
 и затем на существующей точке события, которая принадлежит тому же слою событий, на карте, чтобы копировать атрибуты этой точки.
 - Поставьте отметку для опции Показать имя сети, чтобы посмотреть сеть LRS, с которой связан выбранный слой событий.
- Щелкните Сохранить.
После сохранения нового добавленного точечного события в нижнем правом углу появится подтверждение. Будет создана новая точка, она появится на карте.
После того, как событие было создано успешно, у вас есть две опции для дальнейшей настройки маршрута:
- Щелкните Новое редактирование, чтобы очистить все входные данные в виджете и восстановить значения по умолчанию из базы геоданных в таблице атрибутов.
- Щелкните Следующее редактирование, чтобы сохранить все существующие записи в виджете и таблице атрибутов для удобства быстрого редактирования однотипных характеристик.