适用于 Location Referencing 许可。
Use stationing to locate measures
Stationing is the fundamental system of measurement used for pipeline layout and construction. Stations are reference points that are placed along the horizontal measurement of a route centerline or a baseline at some regular interval. Generally, the distance between two adjoining stations along a route is 100 feet. The first station located at the beginning of the baseline is 0+00, and the next station located 100 feet from it is 1+00. Therefore, a station number of 10+34.05 denotes 1,034.05 feet (10*100 + 34.05) from the starting station.

The station numbers increase from west to east or south to north based on the cardinal direction of the overall pipeline. For pipeline projects, a starting reference station is first established, and all distances along the route centerline are measured from that point location. You can add event data to routes by entering station numbers in the Point Events tool interface. The station data is translated to routes and measures for storage.
You can use the stationing data as an input for adding point events by using these three scenarios:
- Create a starting or base station on the route and define the station values as offsets from that station.
- Identify a starting or base station on the route and define the station values as offsets from that location.
- Use the existing stations on the route to calculate or define measures in the form of station values.
Using an existing station on the route as the starting station, then offset
You can use this method when you want to enter the measures using an offset distance from a selected station on the route. This functionality is available only for an LRS Network that contains a Stationing event layer.
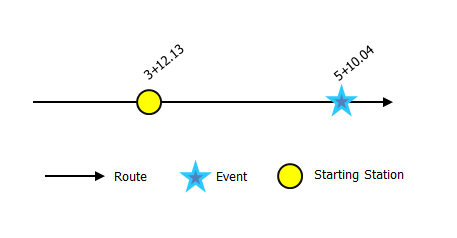
In the following example, a starting station (yellow dot) is temporarily located on a route with an existing station value. The new point event's location is then identified using an offset distance (in station values) from the starting/base station. When the new point events are created using this method, the stationing data is translated to routes and measures for storage.
- 打开 Event Editor 并在出现提示时登录到您的 ArcGIS 组织。
- 单击编辑选项卡。
- 在编辑事件组中,单击点事件按钮
 。
。随即显示添加点事件微件。
如果没有可编辑的点事件图层,则该微件将被禁用。
- In the Location section, click the Method drop-down arrow and click Starting station and offset.
- In the Starting Station section, for Station, click the Select a Station on the Map tool
 and select one of the existing stations as the starting station on a route in the map.
- A yellow dot shows the location of the starting station on a route in the map.
- The station value of the selected station populates the Station parameter value.
- The station value's Units has a default unit and it can be changed to other units.
- The Direction parameter value defaults to From route start, and it can be changed to the opposite direction. This indicates the direction the station values increase along the route compared to the calibration direction of the route.
- The linear referencing method (LRM) measure equivalent of the location is displayed in the Reference field. For example, if the LRM is mile point, the number of miles at that location will be displayed.
- 在位置部分,使用以下选项之一提供站点号,以便为新点事件分配测量:
- 在站点文本框中键入站点号。
- 单击在地图上选择位置
 工具,然后单击所选路径上的位置。 在站点文本框中填充站点号。
测量位置应距起始站点稍有偏移。
地图上的所选位置上出现了一个红色的 x。
- 按如下步骤选择事件的开始日期:
- 在开始日期文本框中键入开始日期。
- 单击开始日期下拉菜单,然后选择开始日期。
- 选中使用路径开始日期复选框。
开始日期默认为今天的日期,也可以使用日期选择器选择不同的日期。
注:
如果将 Event Editor 实例配置为不允许输入路径开始日期之前的日期,那么当您在开始日期中提供所选路径开始日期之前的日期时,将出现一条警告消息,提醒您选择一个位于所选路径开始日期当天或之后的日期。
- 按如下步骤选择事件的结束日期:
- 在结束日期文本框中键入结束日期。
- 单击结束日期下拉菜单,然后选择结束日期。
- 选中使用路径结束日期复选框。
结束日期是可选的,如果未提供,则事件在现在和将来都仍然有效。
- 默认情况下,防止测量值不在路径上复选框处于选中状态。
防止测量不在路径上 - 此数据验证选项可确保开始和结束测量的输入测量值落在所选路径上测量值的最小和最大范围内。
- 单击下一步以查看属性值表。
此表包含所有的事件图层属性。
- 在表中提供新事件的属性信息。
提示:
可以单击复制属性值按钮
 并单击地图上属于同一事件图层的现有点事件以从该点复制事件属性。
 - 选中显示网络名称复选框以显示与选定事件图层关联的 LRS 网络。
- 单击保存。
新添加的点事件保存后,将在右下角显示一条确认消息。 新的点图层将创建并出现在地图中。
成功创建点事件后,您有以下两个选项来继续表征路径:
- 单击新建编辑以清除微件中的所有输入条目并将默认值从地理数据库恢复到表。
- 单击下一编辑可以保留微件和属性集中的所有现有条目,以便于快速编辑相似的特征。