适用于 Location Referencing 许可。
Using stationing to locate measures
Stationing is the fundamental system of measurement used for pipeline layout and construction. Stations are reference points that are placed along the horizontal measurement of a route
centerline or a baseline at some regular interval. Generally, the distance between two adjoining stations along a route is 100 feet. The first station located at the beginning of the baseline is 0+00, and the next station located 100 feet from it is 1+00. Therefore, a station number of 10+34.05 denotes 1,034.05 feet (10*100 + 34.05) from the starting station.
The station numbers increase from west to east or south to north based on the cardinal direction of the overall pipeline. For pipeline projects, a starting reference station is first established; then all distances along the route centerline are measured from that point location. You can add event data to routes by entering station numbers in the Line Events tool interface. The station data is translated to routes and measures for storage.
You can use the stationing data as an input for adding linear events in the following three scenarios:
- Create a starting or base station on the route and enter the station values as an offset from that station.
- Identify a starting or base station on the route and enter the station values as an offset from that location.
- Use the preexisting stations on the route to calculate or enter the measures in the form of station values.
Locating measures by creating a starting or base station on the route
You can use this method when no stations are present on the route.
You'll create a starting or base station on the route and specify
the stationing values for measures. The measures will be located at
an offset from the starting station. As shown in the example below, a starting station (yellow star) is temporarily located, and a station value is provided. The event's start or end location is then identified using an offset distance (in station values) from the starting station. When the new linear events are created using this method, the stationing data is translated to routes and measures for storage.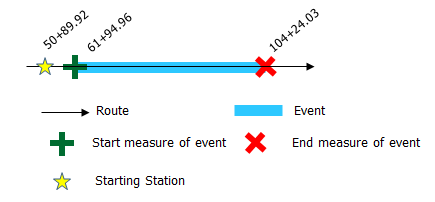
- 打开 ArcGIS Event Editor 并在出现提示时登录到您的 ArcGIS 组织。
- 单击编辑选项卡。
- In the Edit Events group, click the Line Events button
 .
. - 单击网络下拉箭头并选择将用作源线性参考方法 (LRM) 的网络,用于定义新线性事件的输入测量值。
该网络是一个 LRS 网络,作为图层发布在 Event Editor 中。 可以指定 LRS 网络用作定义新线性事件测量开始和结束的 LRM。 Event Editor 也接受网络或 LRM 中的测量值,而不是与线性事件图层相关联的测量值。
新事件将与来自 LRS 网络的路径(路径 ID)相关联,事件位置与该路径相交。
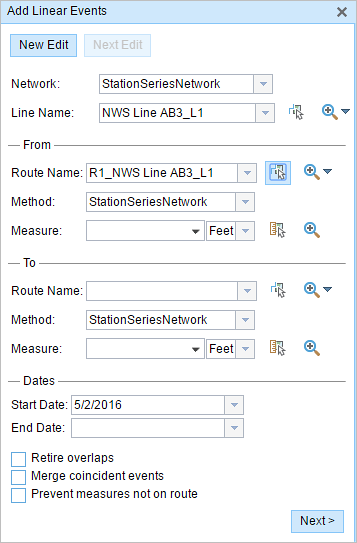
- 使用以下选项之一选择事件所在的线要素的名称:
- 单击下拉箭头,在线名称文本框中选择线名称。
- 单击在地图上选择线工具
 ,然后从地图中选择线。
提示:
如果所选线不在地图的活动视图中,请单击在地图上缩放至线范围或线起点或终点的中心按钮
 以刷新地图显示以放大所选线的整个范围。
该线以浅蓝色突出显示。 末尾的箭头表示线的校准方向。
- In the From section, click the Method drop-down arrow and choose Starting station and offset.
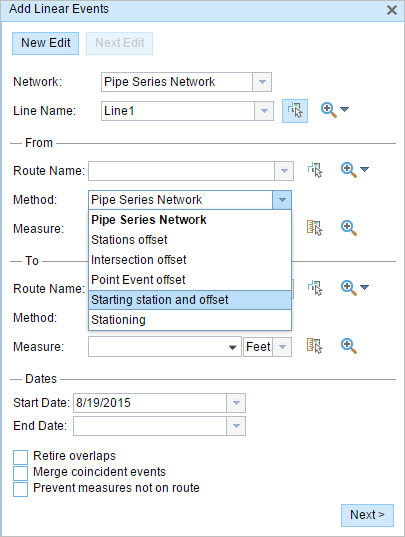
The Starting Station section appears.
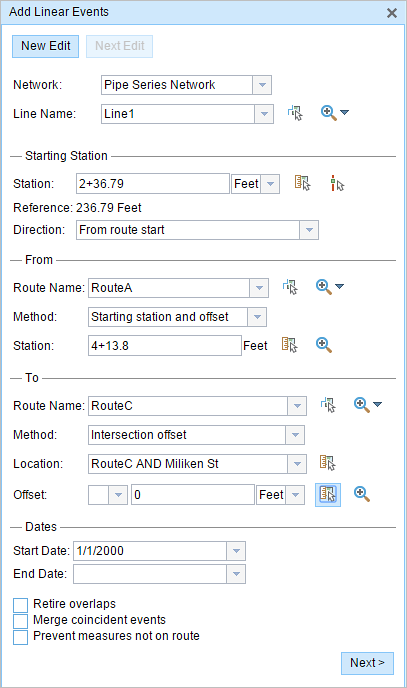
- 在起始站点部分中,对于站点,单击在地图上选择位置工具
 ,然后在地图中的路径上选择起始站点的位置。
- 黄色星标表示地图中路线上的起始站点的位置。
- 与该位置等效的线性参考方法 (LRM) 测量显示在参考中。 例如,如果 LRM 是英里点,则将显示该位置的英里数。
- 在站点文本框中键入站点号。
- 在起始部分中填充路径名称文本框。
- 输入起始站点的站点值。
- 在起始站点部分中,单击下拉箭头并选择站点值的测量单位。
- 在起始站点部分中,单击方向下拉箭头并选择方向。
此选项指示与路径校准方向相比,站点值在哪个方向上沿路径增加。
- In the From section, provide the station number to allot the From measure for the event using one of the following options:
- Click the Select a Location on the Map tool
 , and click a location on the selected route. The station number is derived from the route.
 - Type the station number.
The From measure location will be placed at an offset from the starting station.
A green cross symbol appears at the selected location on the map.
- Click the Select a Location on the Map tool
- In the To section, click the Method drop-down arrow and choose an offset method.
You can use separate methods to locate the From and To measures of the events. For example, by locating the To measure of the event using an intersection offset as shown in Step 6.
A red cross symbol appears at the selected location on the map.
- 按如下步骤选择事件的开始日期:
- 在开始日期文本框中键入开始日期。
- 单击开始日期下拉菜单,然后选择开始日期。
开始日期默认为今天的日期,也可以使用日期选择器选择不同的日期。
- 按如下步骤选择事件的结束日期:
- 在结束日期文本框中键入结束日期。
- 单击结束日期下拉菜单,然后选择结束日期。
结束日期是可选的,如果未提供,则事件在现在和将来都仍然有效。
- 从以下数据验证选项中进行选择,以防止在表征具有线性事件的路径时出现错误输入:
- 停用重叠 - 系统调整现有事件的测量值以及开始和结束日期,以使新事件不会出现时间和度量值重叠。
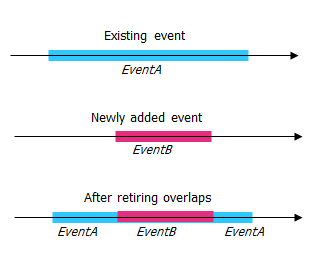
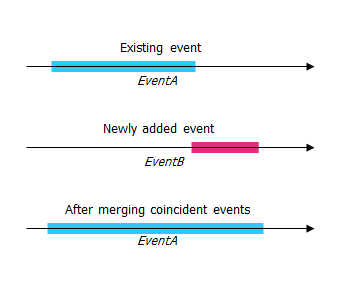
- 合并重合事件 - 当新事件的所有属性值与现有事件完全相同时,如果新事件在测量值方面与现有事件相邻或重叠,则将新事件合并到现有事件中,而且测量范围将相应扩大。
- 防止测量不在路径上 - 此数据验证选项可确保开始和结束测量的输入测量值落在所选路径上测量值的最小和最大范围内。
- 停用重叠 - 系统调整现有事件的测量值以及开始和结束日期,以使新事件不会出现时间和度量值重叠。
- 单击下一步。
显示事件属性集的选项卡出现。
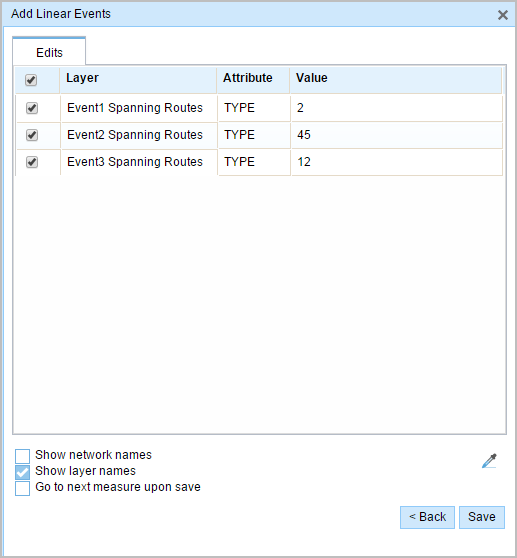
注:
您可以使用复选框为属性集中的特定事件添加数据。 未选中的事件不会添加任何记录。
- 使用以下选项为新事件选择属性信息:
- 在属性集定义的表中键入新事件的属性信息。
- 单击复制属性值按钮
 并单击地图上的一条路径以从另一条路径复制事件属性。
Event Editor 使用默认属性集,位于编辑选项卡上。 可以修改属性集以创建自定义属性集或使用管理员配置的属性集。
注:
配置属性值表中的任何字段时,支持编码值属性域和范围属性域以及子类型。
- Use the following options to access more information on the attribute set:
- Check the Show network name check box to show the LRS Network associated with the selected event layer.
- The list of attributes in the tables defined by attribute sets can be from more than one event layer. If you want to identify the source event layer for each attribute, check the Show layer names check box.
- Checking the Go to the next measure upon save check box results in prepopulating the From measure value using the To measure value of the present section to continue the event creation process.
- 单击保存。
新线性事件已创建并出现在地图中。 新添加的线事件保存后,将在右下角显示一条确认消息。
成功创建线性事件后,您有以下两个选项来继续表征路径:
- 单击新建编辑以清除微件中的所有输入条目并将默认值从地理数据库恢复到表。
- 单击下一编辑可以保留微件和属性集中的所有现有条目,以便于快速编辑相似的特征。