适用于 Location Referencing 许可。
ArcGIS Event Editor supports Location Referencing services native to ArcGIS Server, which are supported in ArcGIS Pro and in services added by the Location Referencing installer for ArcMap.
To install and deploy the Event Editor and supporting dataset, use the following steps.
注:
It is strongly recommended that you follow the steps in the order outlined.
- If you're using ArcGIS Pro skip to step two, otherwise install ArcGIS Pipeline Referencing Server.
- Create a
map with the appropriate routes, event layers, and (optionally) a redline layer.
You can include the redline layer in the same map or you can create a different map just for redline. Make sure the redline feature class has its m- and z-values disabled.
Learn more about deploying redline routes
注:
The map data must be from an enterprise geodatabase for the LRS service to work in Event Editor. If the data source for the layers is a file geodatabase, then the LRS will not be copied to the server during publishing and all the layers will be seen as non-LRS layers in the service.
注:
Event Editor supports viewing relationships if they are available through the map service. To publish a relationship in the maps service, have both Origin table or feature class and Destination table or feature class in your map. Simple relationship classes with one-to-one (1:1), one-to-many (1:M) are supported.
- Publish
the map using ArcGIS Enterprise with the linear referencing capability enabled.
Assign the map service an appropriate name. This name will be displayed in the Event Editor table of contents.
- If you chose to create a different redline map in step 2, publish the map and enable feature access.
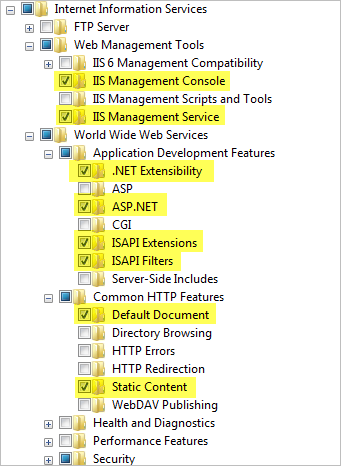
- In the Windows Features dialog box, enable the Internet Information Server (IIS), .NET, and ASP.NET features.
The following is an example of the Windows Features dialog box and features, which may look different based on your operating system. The highlighted features must be enabled on your machine.

- If Event Editor has not been installed:
- Sign in as a user with administrative privileges.
- Sign in to My Esri and click My Organizations > Downloads.
- Click View Downloads for the Location Referencing version you want to download. This includes the Event Editor installer.
- Click Download to run the setup. The Event Editor download offers the option to start the installation after the files have been extracted. To manually launch the setup program, use setup.exe.
- Browse to and copy the contents of <Installation location>\Server\Web\EventEditor into the web folder of the web server.
For example, in IIS, the web folder may be located at C:\inetpub\wwwroot\EventEditor.
注:
The actual location of the IIS wwwroot directory could differ on your server machine. Use the IIS Management Console to obtain the location of the IIS wwwroot directory.
- Author a web map that includes the map services created in the previous steps and the appropriate basemaps.
- Open the configuration (config.json) file in the EventEditor web folder and modify it to use the web map and geoprocessing services created from previous steps. Optionally, you can choose to change some default administrative settings such as user authentication, map selection symbology, and attribute sets while modifying the configuration file. Use the following guides to deploy: Adding DGN and DWG data: Deployment guide, Producing attribute sets, and Deploying redline routes.
- Configure Portal for ArcGIS or ArcGIS Online with Event Editor to secure your web services.
- Optionally, validate and correct your organization's event data by integrating ArcGIS Data Reviewer Server with the Event Editor web app.