适用于 Location Referencing 许可。
Intersection offset
Characteristics of a route can be represented as a linear event offset from an intersection. The reference offset data is translated to routes and measures for
storage.
In the example below, imagine the route has the From and To measure values of 0 and 10 miles, respectively. The From measure of the event is located at a distance of 2 miles from the intersection on the left. The To measure of the event is located at a distance of 4 miles from the intersection on the right. Since the direction of calibration of the route is from left to right, the offset distance is calculated in the reverse direction (from right to left). Hence, the offset distance is shown with a negative number. Alternatively, the To measure could have been located by an offset distance of 6 miles from the intersection on the left.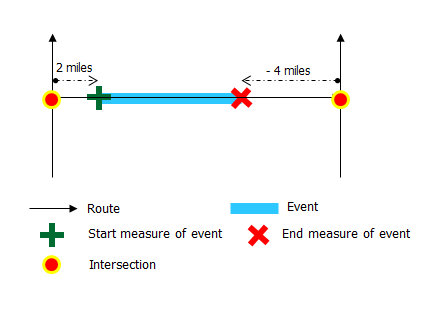
- 打开 ArcGIS Event Editor 并在出现提示时登录到您的 ArcGIS 组织。
- 单击编辑选项卡。
- 在编辑事件组中,单击线事件按钮
 。
。 - 单击网络下拉箭头并选择将用作源线性参考方法 (LRM) 的网络,用于定义新线性事件的输入测量值。
该网络是一个 LRS 网络,作为图层发布在 Event Editor 中。 可以指定 LRS 网络用作定义新线性事件测量开始和结束的 LRM。 Event Editor 也接受网络或 LRM 中的测量值,而不是与线性事件图层相关联的测量值。
新事件将与来自 LRS 网络的路径(路径 ID)相关联,事件位置与该路径相交。
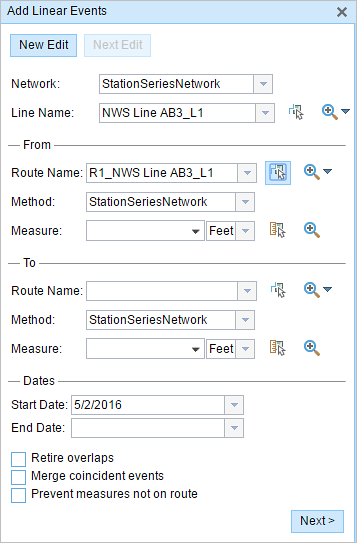
- 使用以下选项之一选择事件所在的线要素的名称:
- 单击下拉箭头,在线名称文本框中选择线名称。
- 单击在地图上选择线工具
 ,然后从地图中选择线。
提示:
如果所选线不在地图的活动视图中,请单击在地图上缩放至线范围或线起点或终点的中心按钮
 以刷新地图显示以放大所选线的整个范围。
该线以浅蓝色突出显示。 末尾的箭头表示线的校准方向。
- In the From section, click the Method drop-down arrow and choose Intersection Offset (Intersection layer name with offset suffix).
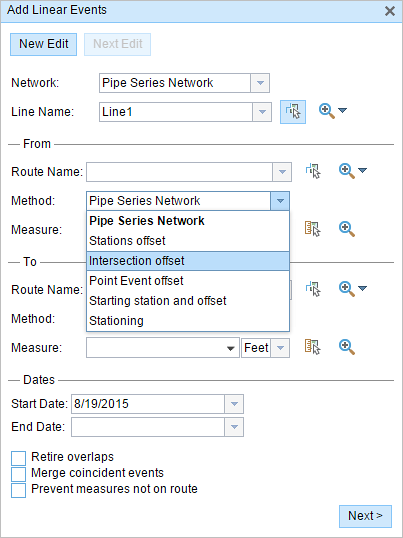
All the intersection point layers that are published with the map service and are registered with the chosen network appear in the drop-down list.
- Choose the Route Name using any one of these options:
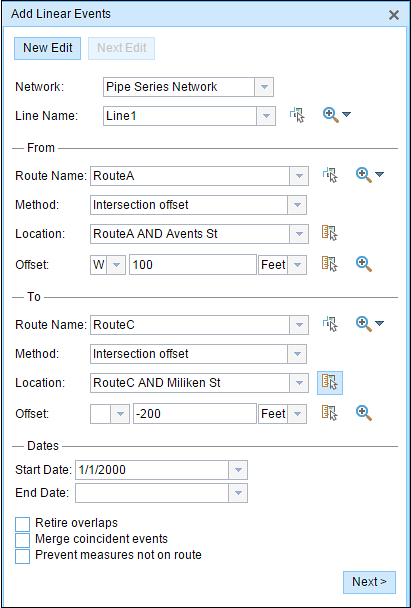
- Click the Route Name drop-down arrow and choose the route on which the event's From measure will be located.
- Type the route's name
- Click the Select a Route on the Map tool
 and choose the route on the map.
Only routes that are part of the chosen line can be selected.
- Choose the Location of the intersection using any one of these options:
- Type the intersection name in the Location text box.
- Click the Select a Location on the Map tool
 and choose an intersection point feature that participates in the layer selected for offsetting on the map.
 - Click the Location drop-down arrow and choose an intersection.
Only intersections that are part of the chosen route can be selected.
- Choose the Offset value for the reference offset using any one of these options:
- Choose the direction of the offset using the Direction drop-down arrow, type the offset value, and choose the units.
- Type the value and choose the units.
- Click the Select an Offset Location on the Map tool
 and select a location along the route on the map.
A green plus symbol is placed at the offset location along the route on the map. This is the location of the From measure value for the events.
注:
- This value denotes the distance between the chosen intersection and the proposed From measure on the selected route.
- The direction is an optional selection.
- If no direction is selected, a positive offset value will place the From measure location along the direction of calibration from the selected point feature.
- If no direction is selected, a negative offset value will place the From measure location opposite the direction of calibration from the selected point feature.
- For the To measure value, repeat steps 6 through 9 in the To section.
A red cross symbol appears at the selected location on the map.
- 按如下步骤选择事件的开始日期:
- 在开始日期文本框中键入开始日期。
- 单击开始日期下拉菜单,然后选择开始日期。
开始日期默认为今天的日期,也可以使用日期选择器选择不同的日期。
- 按如下步骤选择事件的结束日期:
- 在结束日期文本框中键入结束日期。
- 单击结束日期下拉菜单,然后选择结束日期。
结束日期是可选的,如果未提供,则事件在现在和将来都仍然有效。
- 从以下数据验证选项中进行选择,以防止在表征具有线性事件的路径时出现错误输入:
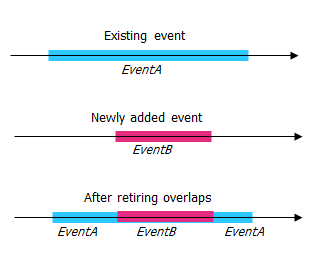
- 停用重叠 - 系统调整现有事件的测量值以及开始和结束日期,以使新事件不会出现时间和度量值重叠。
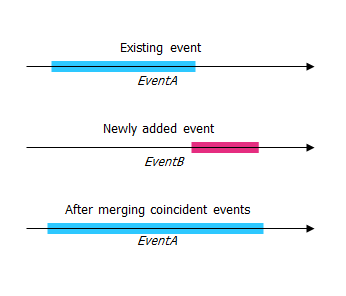
- 合并重合事件 - 当新事件的所有属性值与现有事件完全相同时,如果新事件在测量值方面与现有事件相邻或重叠,则将新事件合并到现有事件中,而且测量范围将相应扩大。
- 防止测量不在路径上 - 此数据验证选项可确保开始和结束测量的输入测量值落在所选路径上测量值的最小和最大范围内。
- 停用重叠 - 系统调整现有事件的测量值以及开始和结束日期,以使新事件不会出现时间和度量值重叠。
- 单击下一步。
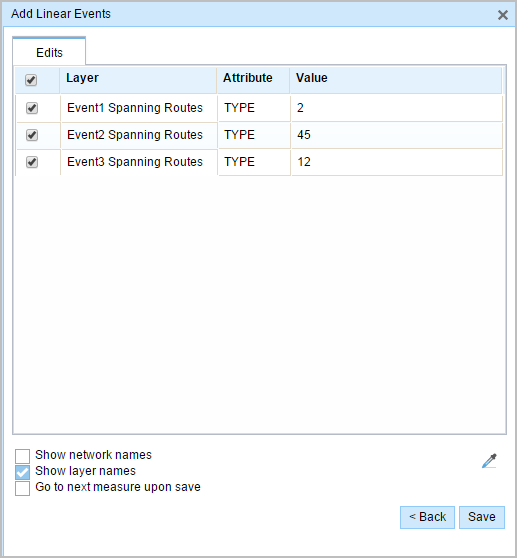
显示事件属性集的选项卡出现。
注:
您可以使用复选框为属性集中的特定事件添加数据。 未选中的事件不会添加任何记录。
- 使用以下选项为新事件选择属性信息:
- 在属性集定义的表中键入新事件的属性信息。
- 单击复制属性值按钮
 并单击地图上的一条路径以从另一条路径复制事件属性。
Event Editor 使用默认属性集,位于编辑选项卡上。 可以修改属性集以创建自定义属性集或使用管理员配置的属性集。
注:
配置属性值表中的任何字段时,支持编码值属性域和范围属性域以及子类型。
- Use the following options to access more information on the attribute set:
- 选中显示网络名称复选框以显示与所选事件图层关联的 LRS 网络。
- 由属性集定义的表中的属性列表可以来自多个事件图层。 如果要识别每个属性的源事件图层,请选中显示图层名称复选框。
- Checking the Go to the next measure upon save check box results in prepopulating the From measure value using the To measure value of the present section to continue the event creation process.
- 单击保存。
新线性事件已创建并出现在地图中。 新添加的线事件保存后,将在右下角显示一条确认消息。
成功创建线性事件后,您有以下两个选项来继续表征路径:
- 单击新建编辑以清除微件中的所有输入条目并将默认值从地理数据库恢复到表。
- 单击下一编辑可以保留微件和属性集中的所有现有条目,以便于快速编辑相似的特征。