Stationing is the fundamental system of measurement used for road layout and construction. The stations are reference points that are placed along the horizontal measurement of a route
centerline or a baseline at some regular interval. Generally, the distance between two adjoining stations along a route is 100 feet. The first station located at the beginning of the baseline is 0+00 and the next station located 100 feet away is 1+00. Therefore, a station number of 10+34.05 depicts 1034.05 feet (10*100 + 34.05) away from the starting station.
The station numbers increase from west to east or south to north based on the cardinal direction of the overall highway. For highway projects, a starting reference station is first established and all distances along the route centerline are measured from that point location. You can add event data to routes by entering station numbers in the Add Point Events widget. The station data is translated to routes and measures for storage.
You can use the stationing data as an input for adding linear events by using the following scenarios:
- Create a station by selecting a point on a route and calculating the measures in the form of station values.
- Identify a starting or base station on the route and input the station values as an offset from that location.
Input the station values by selecting a point on the route
You can use this method when no stations are present on the route. You'll create a station on the route and enter the stationing values for measures.
- 打开 Event Editor 并在出现提示时登录到您的 ArcGIS 组织。
- 单击编辑选项卡。
- 在编辑事件组中,单击点事件按钮
 。
。随即显示添加点事件微件。
如果没有可编辑的点事件图层,则该微件将被禁用。
- 从事件图层下拉列表中选择要编辑的事件图层。
- 单击网络下拉箭头并选择将用作源线性参考方法 (LRM) 的网络,用于定义新事件的输入测量值。
该网络是一个 LRS 网络,作为图层发布在 Event Editor 中。
可以指定 LRS 网络用作定义新点事件测量的线性参考方法 (LRM)。 该微件接受 LRS 网络作为源来识别添加新点事件的位置。 但是,当新的点事件数据存储在数据库中时,应用程序会执行测量值的内部转换,以始终将测量值存储在事件注册的 LRS 网络的 LRM 中。
- Type a route ID in the Route ID text box on which the new event measure will be based.
提示:
也可以单击在地图上选择路径按钮
 以在地图上选择路径。
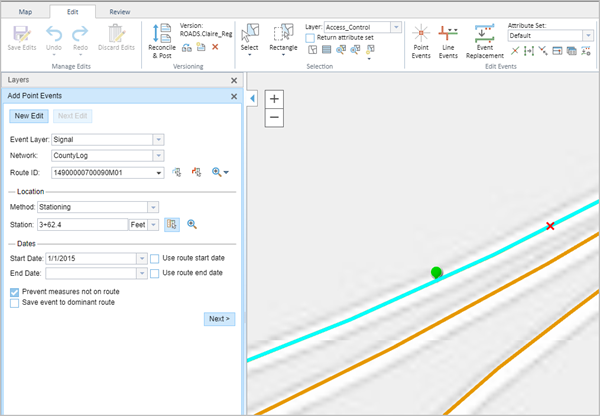
 - In the Location section, click the Method drop-down arrow and choose Stationing.

- Select the station location on the map by using one of the following methods:
- Click the Select a Location on the Map button
 to select the location of the station on a route in the map.
 - Type the station number.
Click the drop-down arrow next to Station and choose the units.
A yellow star shows the location of the station on a route in the map. The measure equivalent of the location is displayed in Location. For example, if the LRM is mile point, the number of miles at that location will be displayed. The Route ID gets populated.
A red X symbol appears at the selected location on the map.
- Click the Select a Location on the Map button
- Provide the Start Date and End Date for the events.
注:
如果将 Event Editor 实例配置为不允许输入路径开始日期之前的日期,那么当您在开始日期中输入所选路径开始日期之前的日期时,将出现一条警告消息,提醒您选择一个位于所选路径开始日期当天或之后的日期。
- 单击下一步以查看属性值表。
此表包含所有的事件图层属性。
注:
配置属性值表中的任何字段时,支持编码值属性域和范围属性域以及子类型。
- 在表中提供新事件的属性信息。
提示:
可以单击复制属性值按钮
 并单击地图上属于同一事件图层的现有点事件以从该点复制事件属性。
 - 选中显示网络名称复选框以显示与选定事件图层关联的 LRS 网络。
- 单击保存。
新添加的点事件保存后,将在右下角显示一条确认消息。 新的点图层将创建并出现在地图中。
The stationing data is translated to routes and measures for storage.
成功创建事件后,您有以下两个选项来继续表征路径:
- 单击新建编辑以清除微件中的所有输入条目并将默认值从地理数据库恢复到属性表。
- 单击下一编辑可以保留微件和属性表中的所有现有条目,以便于快速编辑相似的特征。
Add point events by starting station and offset
Point events, such as crashes and traffic count sites, can be added to the geodatabase by offsetting from a station location. The reference offset data is translated to routes and measures for storage.
- 打开 Event Editor 并在出现提示时登录到您的 ArcGIS 组织。
- 单击编辑选项卡。
- 在编辑事件组中,单击点事件按钮
 。
。随即显示添加点事件微件。
如果没有可编辑的点事件图层,则该微件将被禁用。
- 从事件图层下拉列表中选择要编辑的事件图层。
- 单击网络下拉箭头并选择将用作源线性参考方法 (LRM) 的网络,用于定义新事件的输入测量值。
该网络是一个 LRS 网络,作为图层发布在 Event Editor 中。
可以指定 LRS 网络用作定义新点事件测量的线性参考方法 (LRM)。 该微件接受 LRS 网络作为源来识别添加新点事件的位置。 但是,当新的点事件数据存储在数据库中时,应用程序会执行测量值的内部转换,以始终将测量值存储在事件注册的 LRS 网络的 LRM 中。
- Type the route ID on which the new event measure will be provided in the Route ID text box.
提示:
也可以单击在地图上选择路径按钮
 以在地图上选择路径。
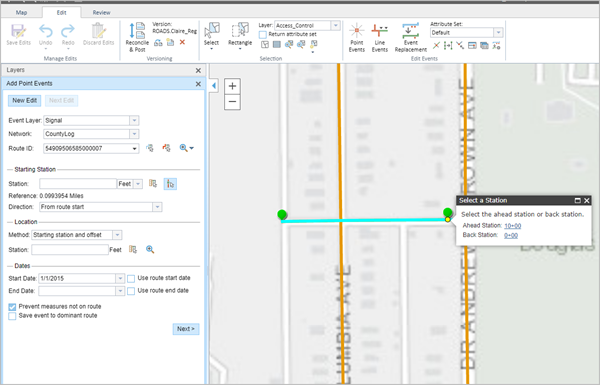
 - In the Location section, click the Method drop-down arrow and choose Starting station and offset.
The Starting Station section gets added to the widget.
- Provide the Station value of your starting station using one of the following methods:
- Click the Select a Station on the Map button
 to select the location of the starting station on a route in the map.
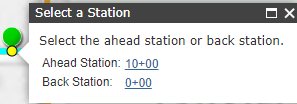
A yellow circle shows the location of the starting station on a route in the map. Since the station value for the location contains an equation, a station value picker pops out on the map.

The Route ID and station value of the starting station gets populated by the selection. The units get populated from the station attributes. The measure equivalent of the location is displayed in Location. For example, if the LRM is mile point, the number of miles at that location will be displayed. The direction the station measures increase along the route gets populated.
注:
This functionality is available only for the networks that contain a stationing event layer.
- Click the Select a Location on the Map button
 and click a location on the selected route. The station value is derived from the map.
A yellow star shows the location of the starting station on a route in the map. The measure equivalent of the location is displayed in Reference. For example, if the LRM is mile point, the number of miles at that location will be displayed. If you did not select a route in step 4, the Route ID will be populated with the route ID associated with the selected station.
- Type the station value.
- Click the Select a Station on the Map button
- Click the drop-down arrow next to Station and choose the units.
- If you chose to type your station value, use the drop-down arrow to select the direction.
This selection indicates the direction the station measures increase along the route.
- In the Location section, provide the station measure by using one of the following methods:
- Click the Select a Location on the Map button
 and click a location on the selected route. The station value is derived from the map.
 - Type the station value.
A red X symbol appears at the selected location on the map.
- Click the Select a Location on the Map button
- Provide the start and end dates in the Start Date and End Date text boxes.
注:
如果将 Event Editor 实例配置为不允许输入路径开始日期之前的日期,那么当您在开始日期中输入所选路径开始日期之前的日期时,将出现一条警告消息,提醒您选择一个位于所选路径开始日期当天或之后的日期。
- 单击下一步以查看属性值表。
此表包含所有的事件图层属性。
注:
配置属性值表中的任何字段时,支持编码值属性域和范围属性域以及子类型。
- 在表中提供新事件的属性信息。
提示:
可以单击复制属性值按钮
 并单击地图上属于同一事件图层的现有点事件以从该点复制事件属性。
 - 选中显示网络名称复选框以显示与选定事件图层关联的 LRS 网络。
- 单击保存。
新添加的点事件保存后,将在右下角显示一条确认消息。 新的点图层将创建并出现在地图中。
The stationing data is translated to routes and measures for storage.
成功创建事件后,您有以下两个选项来继续表征路径:
- 单击新建编辑以清除微件中的所有输入条目并将默认值从地理数据库恢复到属性表。
- 单击下一编辑可以保留微件和属性表中的所有现有条目,以便于快速编辑相似的特征。