Characteristics of a route such as speed limit or functional class can be represented as a linear event with starting and ending measure information along the route. The Line Events tool provides an interface to add linear events by typing or selecting their x- and y-coordinates. You can also use reference offset data to add events to a route. The reference offset data is translated to routes and measures for storage.
注:
In cases where events are being modified on a route and you want to see the previous events on the route at that location, don't use the Add Linear Event widget. Instead, edit events in the Event Selection table or the Attribute Set Selection table. If this method is used, you can see what was previously on the routes at the specified measures.
- 打开 Event Editor 并在出现提示时登录到您的 ArcGIS 组织。
- 单击编辑选项卡。
- 在编辑事件组中,单击线事件按钮
 。
。 - 单击网络下拉箭头并选择将用作源线性参考方法 (LRM) 的网络,用于定义新事件的输入测量值。
- Choose the route ID on which the events will be located using any of the following options:
- Provide a route ID on which the new event measure will be based in the Route ID text box.
- Click Select a Route on the Map
 and select the route from the map.
提示:
If the selected line is not in the active view\ of the map, click Zoom to the route extent or center on the route start or end point on the Map
 to refresh the map display to zoom in to the entire extent of the selected line.
The line is highlighted in light blue. The arrow at the end shows the direction of calibration of the line.
注:
If a message appears that is related to acquiring locks, the need to reconcile, or not being able to acquire locks, Roads and Highways conflict prevention is enabled.
Learn more about conflict prevention messages in the Event Editor
- In the From section, click the Method drop-down arrow and click Coordinates.
The Coordinate System section appears.
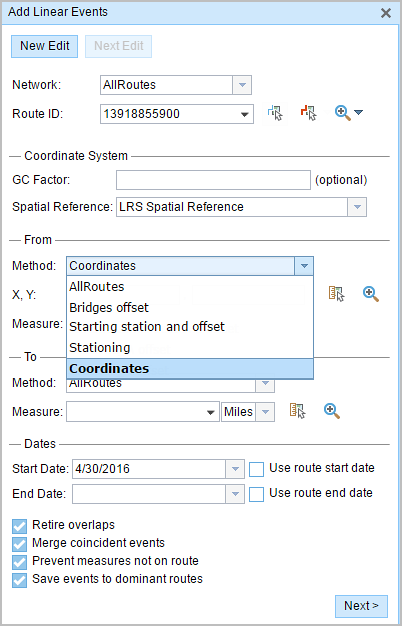
- Optionally, provide a value in the GC Factor text box.
This will adjust the coordinates by dividing X and Y by the value specified.
- Specify a spatial reference by choosing an option from the Spatial Reference drop-down menu.
- LRS Spatial Reference—The spatial reference of your LRS network
- Web Map Spatial Reference—The spatial reference of your basemap
- GCS_WGS_1984—A geographic spatial reference using units of degrees
Additionally, you can configure different coordinate systems by specifying the well-known ID (WKID) or well-known Text (WKT) in the configuration file of your Event Editor.
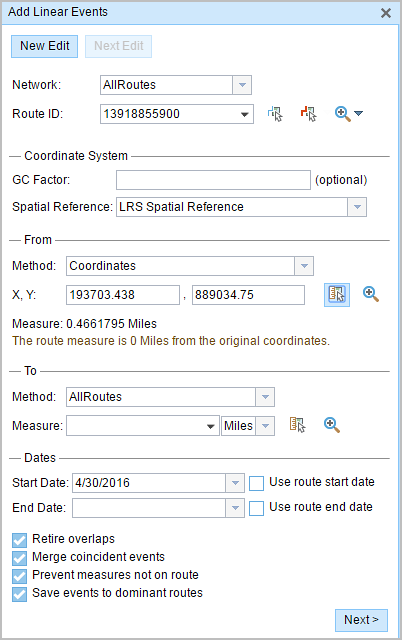
- In the From section, click the Method drop-down arrow and choose Coordinates.
- Input the x- and y-coordinate values for X and Y.
提示:
You can select a coordinate by clicking Select an X/Y Location on the Map
 .
.The route measure closest to the original coordinates will be selected and its distance from the route will be displayed.
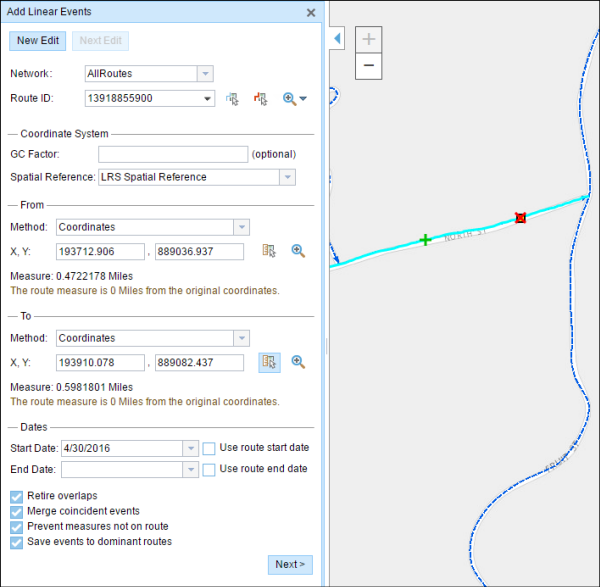
- In the To section, click the Method drop-down arrow and choose Coordinates.
- Input the x- and y-coordinate values for X and Y.
提示:
You can select a coordinate by clicking Select an X/Y Location on the Map
 .
.The route measure closest to the original coordinates will be selected, and its distance from the route will be displayed.
- Choose the date that will define the start date of the events by doing one of the following:
- Provide the start date in the Start Date text box.
- Click the Start Date drop-down arrow and choose the start date.
- Check the Use route start date check box.
The start date defaults to today's date, but you can choose a different date using the date picker.
注:
If you configured your instance of Event Editor to not allow dates before the start date of the route, and you provide a date before the start date of the selected route in Start Date, a warning message appears alerting you to choose a date on or after the start date of the selected route.
- Choose the date that will define the end date of the events by doing one of the following:
- Provide the end date in the End Date text box.
- Click the End Date drop-down arrow and choose the end date.
- Check the Use route end date check box.
The end date is optional, and if it is not provided, the event remains valid now and into the future.
- 从以下数据验证选项中进行选择,以防止在表征具有线性事件的路径时出现错误输入:
- 停用重叠 - 系统调整现有事件的测量值以及开始和结束日期,以使新事件不会出现时间和度量值重叠。
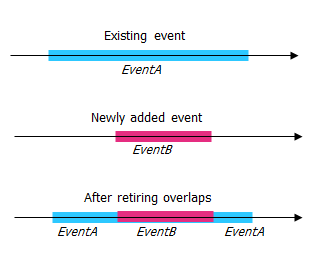
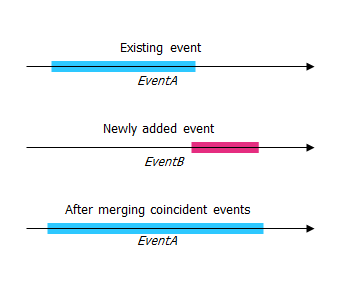
- 合并重合事件 - 当新事件的所有属性值与现有事件完全相同时,如果新事件在测量值方面与现有事件相邻或重叠,则将新事件合并到现有事件中,而且测量范围将相应扩大。
- 防止测量不在路径上 - 此数据验证选项可确保开始和结束测量的输入测量值落在所选路径上测量值的最小和最大范围内。
- 将事件保存到主要路径 - 将事件添加到具有并发路段的主要路线。 如果启用,对于所选路线上的任何并发路段,都可以选择将事件添加到每个并发部分的哪条路径。 当所选网络配置了优先级规则时,此选项可用。
- 停用重叠 - 系统调整现有事件的测量值以及开始和结束日期,以使新事件不会出现时间和度量值重叠。
- 单击下一步。
显示事件属性集的选项卡出现。 事件字段显示在 G1 属性组下。
注:
您可以使用复选框为属性集中的特定事件添加数据。 未选中的事件不会添加任何记录。 如下例所示,没有记录添加到 County_A 和 City_A 事件。
- 使用以下选项为新事件选择属性信息:
- 在属性集定义的表中键入新事件的属性信息。
- 单击复制属性值按钮
 并单击地图上的一条路径以从另一条路径复制事件属性。
Event Editor 使用默认属性集,位于编辑选项卡上。 可以修改属性集以创建自定义属性集或使用管理员配置的属性集。
注:
配置属性值表中的任何字段时,支持编码值属性域和范围属性域以及子类型。
- 使用以下选项可访问有关属性集的更多信息:
- 选中显示网络名称复选框以显示与所选事件图层关联的 LRS 网络。
- 由属性集定义的表中的属性列表可以来自多个事件图层。 如果要识别每个属性的源事件图层,请选中显示图层名称复选框。
- Checking the Go to the next measure upon save check box results in prepopulating the starting measure value using the ending measure value of the present section to continue the event creation process. For example, this will occur if events are created on the route using a From measure value of 0 miles and a To measure value of 0.289 miles. If you click Save with this option checked on the Attribute Set tab, the Add Linear Events widget is prepopulated with the value of 0.289 miles as the starting measure value for the new events.
- 单击保存。
新线性事件已创建并出现在地图中。 新添加的线事件保存后,将在右下角显示一条确认消息。
成功创建事件后,您有以下两个选项来继续表征路径:
- 单击新建编辑以清除微件中的所有输入条目并将默认值从地理数据库恢复到属性表。
- 单击下一编辑可以保留微件和属性表中的所有现有条目,以便于快速编辑相似的特征。