Mit der Location Referencing-Lizenz verfügbar.
Intersection offset
Characteristics of a route can be represented as a point event offset from an intersection. The reference offset data is translated to routes and measures for
storage.
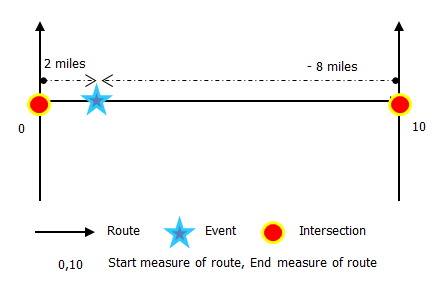
As shown in the example below, imagine the route has start and end measure values of 0 and 10 miles, respectively. The event shown in the figure can be located at a distance of 2 miles from the intersection on the left or at a distance of 8 miles from the intersection on the right. Since the direction of calibration of the route is from left to right, the offset distance is calculated in the reverse direction (from right to left). Hence, the offset distance in the second case is shown with a negative number. Alternatively, the start measure could have been located by an offset distance of 6 miles from the intersection on the left.
- Öffnen Sie Event Editor, und melden Sie sich bei Ihrer ArcGIS-Organisation an, wenn Sie dazu aufgefordert werden.
- Klicken Sie auf die Registerkarte Bearbeiten.
- In the Edit Events group, click the Point Events button
 .
.The Add Point Events widget appears.

If there are no editable point event layers, the widget is disabled.
- Klicken Sie auf den Dropdown-Pfeil Objekt-Layer, und wählen Sie einen Objekt-Layer für die Bearbeitung aus.
- Klicken Sie auf den Dropdown-Pfeil Netzwerk, und wählen Sie das Netzwerk aus, das als Messwertquelle für das neuen Objekt dienen soll.
- Das Widget akzeptiert ein LRS-Netzwerk als Quelle zur Identifizierung der Position beim Hinzufügen des neuen Punktobjekts. Wenn die Daten des neuen Punktobjekts in der Datenbank gespeichert werden, führt die App jedoch eine interne Übertragung der Messwerte durch, damit der Messwert immer in der linearen Referenzierungsmethode (LRM) des LRS-Netzwerks gespeichert wird, bei dem das Objekt registriert ist.
- Der Wert für Netzwerk kann ein veröffentlichter LRS-Netzwerk-Layer sein.
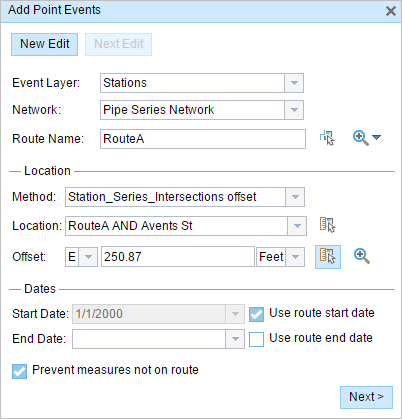
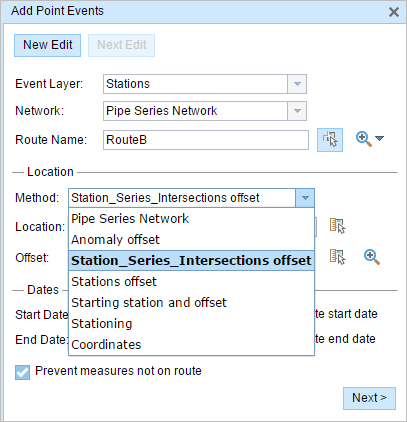
- In the Location section, click the Method drop-down arrow and choose Intersection Offset (Intersection layer name with the offset suffix).

All the intersection point layers that are published with the map service and are registered with the chosen network show up in the drop-down list.
- Choose the Location of the intersection using any one of these options:
- Type the intersection name in the Location text box.
- Click the Select a Location on the Map tool
 and choose an intersection point feature that participates in the layer selected for offsetting on the map.
 - Click the Location drop-down arrow and choose an intersection.
Only intersections that are part of the chosen route can be selected.
- Provide the Offset value for the reference offset using any one of these options:
- Choose the direction of the offset by clicking the Direction drop-down arrow, typing the offset value, and choosing the units.
- Type the value and select the units.
- Click the Select an Offset Location on the Map tool
 and pick a location along the route on the map.
A red x is placed at the offset location along the route on the map. This is the location of the Measure value for the event.
Hinweis:
- This value denotes the distance between the intersection and the proposed measure on the selected route.
- The direction is an optional selection.
- If no direction is selected, a positive offset value will place the measure location along the direction of calibration from the selected point feature.
- If no direction is selected, a negative offset value will place the measure location opposite the direction of calibration from the selected point feature.
- The new event will be associated with the route (route name) from the LRS Network that the event location intersects. In cases where the input location intersection may have more than one route in the registered LRS Network (overlapping routes), a dialog box prompts you to choose which route you prefer to associate with the event.
- If you type the Measure value, you can select the unit for that value using the drop-down arrow. The Measure value will be converted into the LRS units before saving the newly added events. For example, the LRS is in miles and you have entered 528 feet as the Measure value. The newly added events will have a Measure value of 0.1 miles because 528 feet equals 0.1 miles.
- Wählen Sie mit einem der folgenden Schritte das Datum aus, mit dem das Startdatum der Objekte definiert wird:
- Geben Sie das Startdatum im Textfeld Startdatum ein.
- Klicken Sie auf den Dropdown-Pfeil Startdatum, und wählen Sie das Startdatum aus.
- Aktivieren Sie das Kontrollkästchen Startdatum der Route verwenden.
Als Startdatum wird automatisch das aktuelle Datum ausgewählt. Sie können jedoch mit der Datumsauswahl ein anderes Datum auswählen.
Hinweis:
Wenn Sie die Event Editor-Instanz so konfiguriert haben, dass Datumsangaben vor dem Startdatum der Route nicht zulässig sind und unter Startdatum ein vor dem Startdatum der ausgewählten Route liegendes Datum eingeben, werden Sie mit einer Warnmeldung aufgefordert, ein Datum auszuwählen, das dem Startdatum der ausgewählten Route entspricht oder nach diesem Datum liegt.
- Wählen Sie mit einem der folgenden Schritte das Datum aus, mit dem das Enddatum der Objekte definiert wird:
- Geben Sie das Enddatum im Textfeld Enddatum ein.
- Klicken Sie auf den Dropdown-Pfeil Enddatum, und wählen Sie das Enddatum aus.
- Aktivieren Sie das Kontrollkästchen Enddatum der Route verwenden.
Das Enddatum ist optional. Wird dieses Datum nicht angegeben, bleibt das Objekt auch in Zukunft gültig.
- Das Kontrollkästchen Nicht auf der Route liegende Messwerte vermeiden ist standardmäßig aktiviert.
Nicht auf der Route liegende Messwerte vermeiden: Mit dieser Datenvalidierungsoption wird sichergestellt, dass die Eingabemesswerte für den Start- und Endmesswert innerhalb des Minimal- und Maximalbereichs der Messwerte auf der ausgewählten Route liegen.
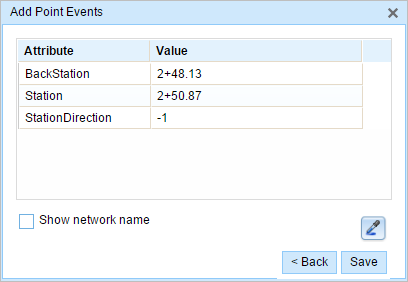
- Click Next to view the Attribute-Value table. This table contains all the attributes of the event layer. Fill out all the attribute information for the new event in this table. Check the Show network name check box to see which LRS Network is associated with the selected event layer.

Tipp:
Sie können auf die Schaltfläche Attributwerte kopieren
 und dann auf ein vorhandenes Punktobjekt aus demselben Objekt-Layer auf der Karte klicken, um Objektattribute von diesem Punkt zu kopieren.
 - Klicken Sie auf Speichern.
Nachdem das neu hinzugefügte Punktobjekt gespeichert wurde, wird unten rechts eine Bestätigungsmeldung angezeigt. Der neue Punkt wird erstellt und auf der Karte angezeigt.
Nachdem ein Punktobjekt erfolgreich erstellt wurde, stehen Ihnen die beiden folgenden Optionen zur Verfügung, um die Route weiter zu charakterisieren:
- Klicken Sie auf Neue Bearbeitung, um alle Eingabeeinträge im Widget zu löschen und die Standardwerte aus der Geodatabase in der Tabelle wiederherzustellen.
- Klicken Sie auf Nächste Bearbeitung, um alle vorhandenen Einträge im Widget und im Attribut-Set beizubehalten. Auf diese Weise lassen sich ähnliche Merkmale komfortabel und schnell bearbeiten.