Prepare to install ArcGIS Enterprise
Before you run ArcGIS Enterprise Builder, perform the following steps.
- Verify you do not have Portal for ArcGIS, ArcGIS Server, ArcGIS Data Store or Web Adaptors named portal or server installed on the machine.
- Verify that your machine has a supported operating system installed. For more information, see the system requirements.
- Verify that your machine has .NET Framework 4.5 or later installed. The .NET Extension Support Feature is automatically installed with ArcGIS Server and can be used to develop and deploy .NET Server Object Extensions (SOEs) and Server Object Interceptors (SOIs).
- Verify that your machine has at least 20 GB of free disk space.
- Verify that your machine has at least 16 GB of RAM.
- Obtain authorization files for both Portal for ArcGIS and ArcGIS Server. These files are required to complete the installation. The files can be in either .ECP or .PRVC format.
- Ensure that port 80 is enabled for HTTP communication.
- Create a domain certificate and enable HTTPS on your web server. See next section for details.
- Log in to the machine as a user with administrative privileges.
- Close all applications on your computer.
Create a domain certificate and enable HTTPS
Successful completion of the ArcGIS Enterprise configuration wizard requires HTTPS to be enabled in IIS on the machine where the base deployment is installed.
If HTTPS is not enabled, the configuration wizard will not complete and report the following error message:
The Web Adaptor URL https://mymachine.mydomain.com/server cannot be reached. Please check that HTTPS has been enabled for your web server. For instructions on enabling HTTPS, navigate to the Help Topic: Introducing ArcGIS Enterprise > ArcGIS Enterprise Builder > Plan a base deployment.
If you need assistance enabling HTTPS, please contact your IT administrator. They may already have access to a signed certificate purchased from a well-known certificate authority.
The following steps outline how to generate a domain signed certificate through IIS Manager. This requires that your organization be configured with a certificate authority through Active Directory. Please contact your IT administrator for further details.
Create a domain certificate in IIS
In IIS Manager, do the following to create a domain certificate:
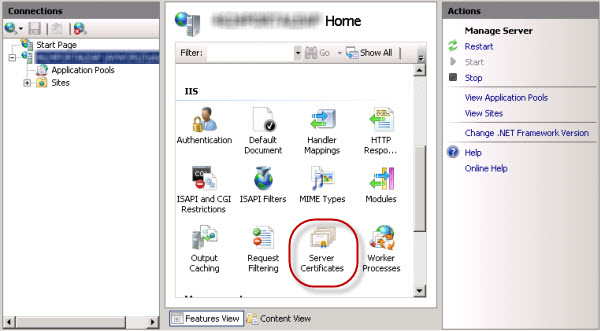
- In the Connections pane, select your server in the tree view and double-click Server Certificates.
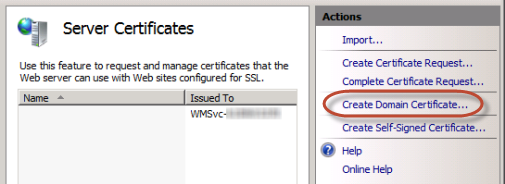
- In the Actions pane, click Create Domain Certificate.
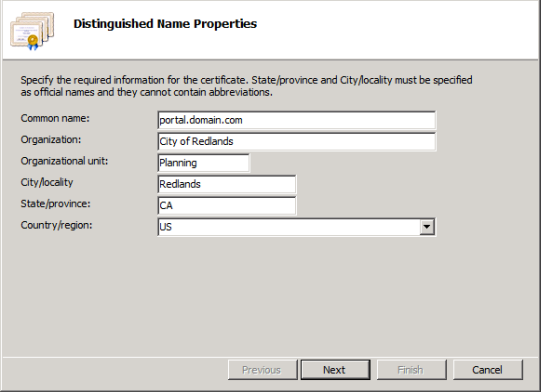
- On the Distinguished Name Properties dialog box, enter the required information for the certificate:
- For the Common name, enter the fully qualified domain name of the machine, for example, portal.domain.com.
- For the other properties, enter the information specific for your organization and location.
- Click Next.
- On the Online Certification Authority dialog box, click Select and choose the certification authority within your domain that will sign the certificate. If this option is unavailable, enter your domain certification authority in the Specify Online Certification Authority field, for example, City Of Redlands Enterprise Root\REDCASRV.empty.local. If you need help with this step, consult your system administrator.
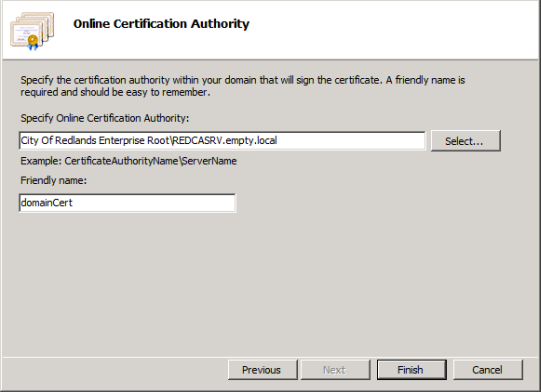
- Enter a user-friendly name for the domain certificate and click Finish.
Bind the domain certificate to HTTPS port 443
Once you've created a domain certificate, you'll need to bind it to the website that will host your base deployment's ArcGIS Web Adaptors. Binding refers to the process of configuring the certificate to use port 443 on the website. The instructions for binding a certificate with the website vary depending on the platform and version of your web server. For instructions, consult your system administrator or your web server's documentation. For example, the steps for binding a certificate in IIS are below.
In IIS Manager, do the following to bind a certificate to HTTPS port 443:
- Select your site in the tree view, and in the Actions pane, click Bindings.
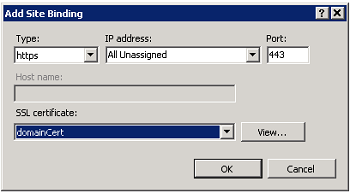
- If port 443 is not available in the Bindings list, click Add. From the Type drop-down list, select https. Leave the port at 443.
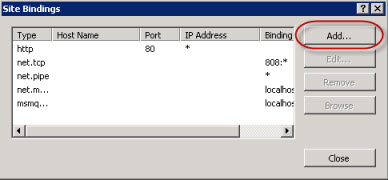
- If port 443 is listed, select the port from the list and click Edit.
- If port 443 is not available in the Bindings list, click Add. From the Type drop-down list, select https. Leave the port at 443.
- From the certificate drop-down list, select your certificate name.
- Click OK.
- Click OK.
You are now ready to proceed with installation steps for the base ArcGIS Enterprise deployment.