The notebook editor provides a sidebar where you can browse and search, and add layers, web tools, and big data file shares to your notebook. The layers can be hosted in your own organization, or they can be publicly available in ArcGIS Online or the ArcGIS Living Atlas of the World.
The notebook editor provides a sidebar where you can browse and search, add layers, and web tools to your notebook. The layers can be hosted in your own organization, or they can be publicly available in ArcGIS Online or the ArcGIS Living Atlas of the World.
Browse and search for content
To browse and search for content in the notebook editor, complete the following steps:
- On the top ribbon of the notebook editor, click the Add
button
 to open the content browser panel.
 Several tools are listed that you can use to find content.
- At the top of the panel, click the drop-down menu and select the location of displayed content. The options are as follows:
- My Content
- My Favorites
- My Groups
- My Organization
- Living Atlas
- ArcGIS Online
- Use the search text box to search for layers and web tools in the selected location.
Searching will match items with keywords in their title, tags, or summary.
- Below the search bar, click the Compact view button to view only the item titles of displayed content, or click the List view button to view item type, owner, date of last update, and any labels the item includes (authoritative, deprecated, or Esri-curated).
- Optionally filter displayed items by attribute, and sort the content by category.
The Filter and Sort options available depend on the content location you selected, though some options are always available, such as filtering by Item Type (layers or tools) and sorting by Title.
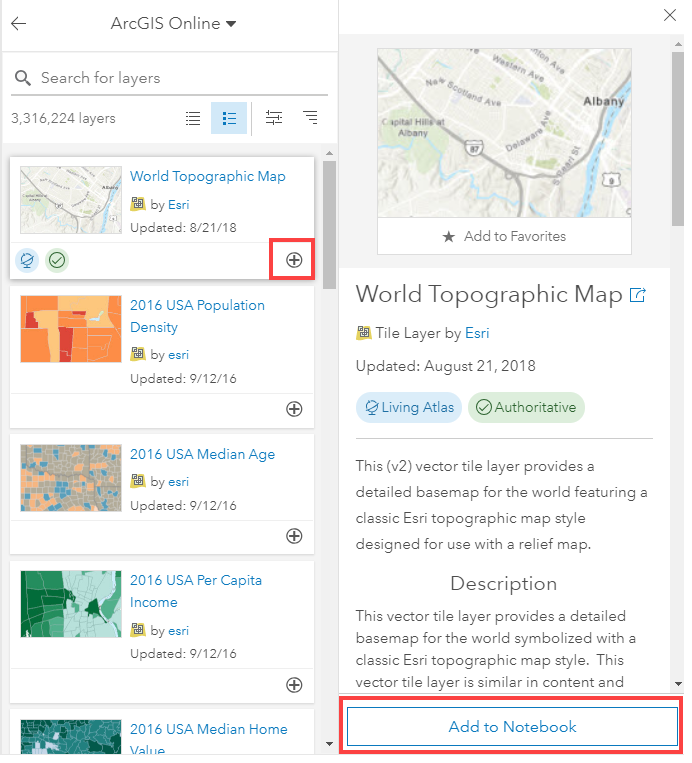
When you click an item in the panel, another sidebar opens with information about the item. In this sidebar, you can read the item summary, description, terms of use, and attribution. You can also see its view count, creation date, and sharing settings.
Add content to your notebook
To add an item from the content browser panel to your notebook, click the item's Add button or click Add to Notebook.

A new cell is created in your notebook below the currently selected cell. The item is listed with the information described in the subsections below.
Layers
If the item is a layer, the notebook assigns the layer default variable to the item and displays the item as the cell's output when the cell is run.
Tip:
Rename the layer variable something that uniquely identifies the item.
# Item Added From Toolbar
# Title: <layer title> | Type: <layer type> | Owner: <layer owner>
layer = gis.content.get("<item ID of layer>")
layer
Web tools
If the item is a web tool, the notebook imports the geoprocessing toolbox as a Python module that you can use with your content. If you intend to add multiple web tools to your notebook, rename the my_toolbox variable a unique identifier.
Tip:
Uncomment the last line to display the web tool's help documentation when the cell is run.
# Item Added From Toolbar
# Title: <tool title> | Type: <tool type> | Owner: <tool owner>
from arcgis.geoprocessing import import_toolbox
web_tool_item = gis.content.get("<item ID of tool>")
my_toolbox = import_toolbox(web_tool_item)
# help(my_toolbox)
Big data file shares
If the item is a big data file share, the notebook assigns the data default variable to the item and displays the item as the cell's output when the cell is run.
Tip:
Rename the data variable something that uniquely identifies the item.
# Item Added From Toolbar
# Title: <big data file share title> | Type: <item type> | Owner: <item owner>
data = gis.content.get("<item ID of layer>")
data