Directions widget
In this topic
The Directions widget provides a quick and efficient method of calculating turn-based directions between two or more locations. This widget uses both a network route service and geocoder service.
License:
The ArcGIS Online Network Analysis Services require an ArcGIS Online for Organizations subscription. If you choose to work with this by default, specify a valid user name and password for ArcGIS Online. Each successful request to the service incurs service credits taken from your subscription. In addition, if you have an ArcGIS Server Network Analysis service, you can also specify the URL.
License:
The ArcGIS Online Real-Time Traffic Map Services require an ArcGIS Online for Organizations subscription. If you choose to work with this, specify a valid user name and password for ArcGIS Online. Each successful request to the service incurs service credits taken from your subscription.
Tip:
If you want to share your secure service item with the public, for example, as part of a public web app, store the credentials with the item so the public is not required to log in to get to your app. Refer to ArcGIS Server web services
Configuring the Directions widget
To configure the Directions widget, click the edit icon  on the widget to open the configuration options dialog box.

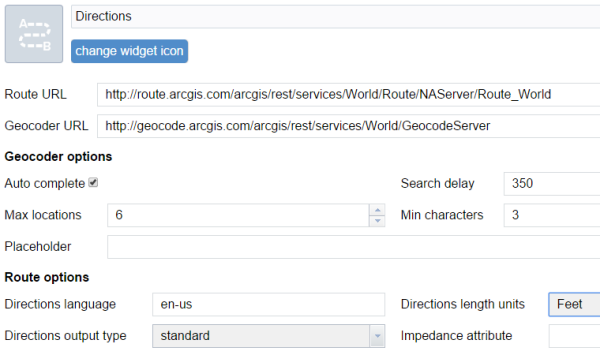
- By default, the Route and Geocoder URLs are from your ArcGIS Online organization or the Utility Services of the Portal for ArcGIS.
- Update the geocoder options. Default values populate from the services.
- Checking Auto complete allows the search text box to automatically attempt to fill in possible addresses by querying the geocoder service.
- The Search delay parameter controls how long the user interface waits after the last key is pressed to attempt to update the list of candidate locations.
- The Max locations controls the number of suggested locations returned from the geocoder service at a time.
- The minimum number of characters required to query for suggested locations is specified by the Min characters parameter.
- The Placeholder text displays in the address lookup text box when no text has been entered.
- Update the routing options. Default values populate from the services.
- The Directions language is the culture code (for example, en_US for American English, de_DE for German). Output is customized for the specified locale, if available.
- Control the verbosity of the directions by changing the Directions output type parameter.
- The Directions length units are the length units to use when computing directions.
- The Impedance attribute is the network attribute used for impedance. For example, set it to Time for quickest route and Length for shortest drive if the service has these attributes available. With an empty array, it defaults to the default of the service.
- Click OK to close the dialog box.
Using the Directions widget
Caution:
Using the ArcGIS Online Network Analysis Services consumes credits. Verify that you are signed in to your organization with privileges to perform network analysis.
- Click the directions icon to open the Directions widget.
- Enter the start and end destinations.
- You can type the addresses in the fields, which may autocomplete addresses and locations, depending on the configuration.
- You can add destinations by clicking
 icon to enable it, then clicking the map.
- Optionally, add more destinations by clicking Add destination. Each destination can also be dragged on the map.
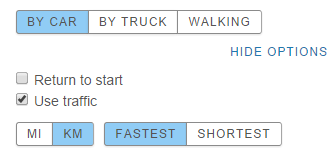
- Click Show options to display more options. Checking Return to start automatically calculates directions from the last destination to the first destination as part of the results. Checking Use traffic factors in real-time impedance from a traffic service when calculating the least-cost path between two destinations. Toggle between MI and KM to control the units used to report distances in the generated set of directions. Toggle between FASTEST and SHORTEST to choose your preferred route.

- Click Get Directions.
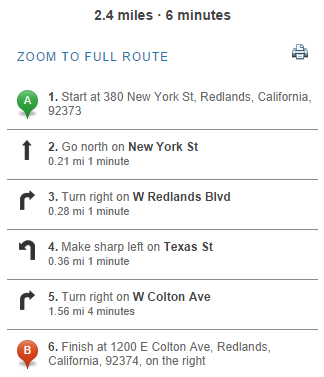
The map updates to display the route and directions display in the Directions widget.

Each turn in the directions list is interactive. Click a turn to zoom to the location on the map. The route leading to that turn also highlights on the map.

Clicking the print icon  opens the directions in a new window for printing.
To clear the current set of directions from the map, click Clear below the destinations list.