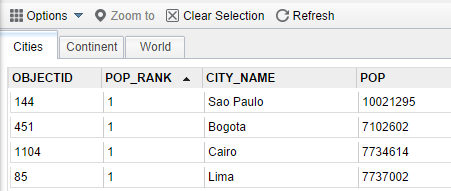
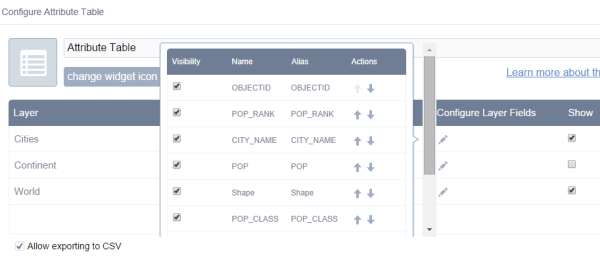
The Attribute Table widget displays a tabular view of operational layers' attributes. It displays at the bottom of your web application and can be opened, resized, or closed. When more than one layer's attributes display, multiple tabs automatically generate in the attribute panel allowing you to switch among the attribute tables. You can use the widget's configuration window to specify which layer or layers are included in the tabular view, which fields show, and if the tabular view can be exported.
Currently, layers from map services, feature services, and feature collections in the map are supported. The layers from map services and feature services require query capability to display in the table.

Configuring the Attribute Table widget
The Attribute Table widget is an off-panel widget.
- Hover the mouse pointer over the Attribute Table widget and click the small eye icon
 to show or hide this widget in your application.
 -
Hover the mouse pointer over the Attribute Table widget and click the small edit icon
 .
. The configuration window for this widget opens with a list of layers associated with the map.

- Under Show, turn off the layer you don't want to display in the table.
- Under Configure Layer Fields, click the edit icon
 next to the selected layer and uncheck the fields you don't want to display in the table.
 - Optionally, check the Allow to export to CSV check box if you allow users to export the attribute tables to CSV files.
- Optionally, check the Intially expend the widget check box to open the Attribute Table when the app starts.
- Optionally, check the Enable Filter by Map Extent by default check box if you want to use this tool.
- Click OK.
The widget setting window closes.
Caution:
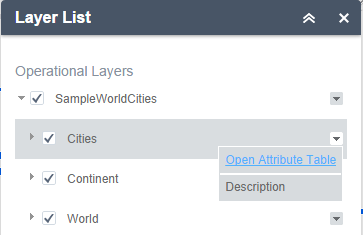
By default, all supported layers are listed in the table. If the service does not support query capability, the associated layer remains unchecked under Show. When you try to check it, a warning message displays and asks you to turn on the query capability of the service. In addition, the Open Attribute Table button on the Layer List menu is unavailable for the layers without query capability.
Note:
For Internet Explorer 8 and 9, you need to manually enter the .csv extension when you save the exported file. For Safari, you need to manually rename the exported file that is saved as Unknown by default.
Using the Attribute Table widget
- Options to turn on and off the attribute table are as follows:
- To turn it on, click the arrow button at the bottom of the map.

- To turn it off, click the arrow button at the top of the attribute table or click the X at the upper-right of the table.
- Go to the Layer List menu and click Open Attribute Table.

- To turn it on, click the arrow button at the bottom of the map.
- Select a record—Clicking a record in the table selects it and highlights the corresponding feature in the map with the color specified in the Attribute Table widget configuration window. Double clicking any fields in the selected record will zoom to the feature on the map. Press the Shift or Ctrl key to select multiple records.
- Clear selections—Clicking the Clear Selection button clears all selections.
- Zoom to selected features—Clicking Zoom to resets the map extent to center around selected features.
- Copy the field value---Double clicking the field value to highlight it, then right clicking it to cope the value.
- Refresh—Clicking Refresh refreshes the tables.
- Sort a field—Clicking a field heading sorts the records by this field.
Caution:
To sort on a field from the ArcGIS Server service, one of the following conditions must be met:
- The ArcGIS Server service has less features than the number of MaxRecordCount property defined in the service.
- If the ArcGIS Server service has more features than the number of MaxRecordCount, the ArcGIS Server version must be 10.3 or above, and properties for Supports OrderBy and Supports Pagination are set to true.
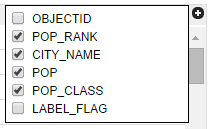
- Show or hide columns—Clicking the + icon on the right side of the Attribute Table panel opens the field visibility window. Check or uncheck the fields to set them to visible or invisible in the table.

- Number of selected records—Shown on the lower left of the table.
- Options are as follows:
- Show Selected Records—Only displays selected records.
- Show Related Records—Displays related records if a selected record has related table.
- Filter--Allows to filter records in the table.
- Filter by Map Extent—Only displays attributes for features within the current map extent.
- Show or Hide Columns—Equivalent to clicking the + icon on the right side of the panel to set visibility for individual fields.
- Export to CSV—Exports the attributes to a CSV file. If records are selected, only the selected records are exported. If no records are selected, all the records are exported. To support this function, the Export Data property must be enabled for the corresponding feature service.
Note:
For a feature layer, the maximum records exported to CSV depend on the maxRecordCount property set in the service when published.
Note:
The current version of Web AppBuilder for ArcGIS does not support attribute editing or feature deletion through the Attribute Table widget.