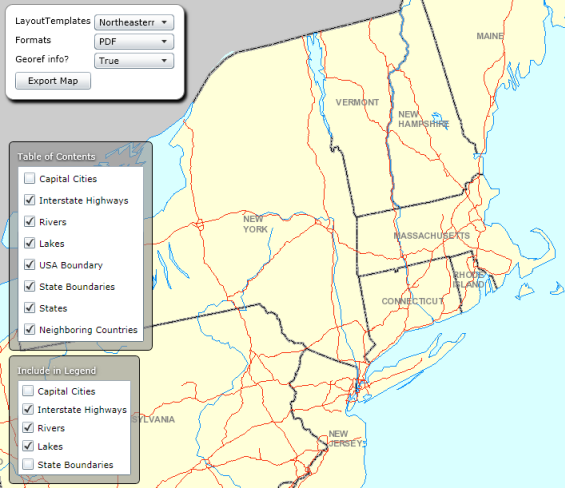
The illustration below shows a sample web GIS application using the ArcGIS API for JavaScript that you will create. In the web application, the end user will be able to:
- Navigate to an area of interest.
- Select a staged layout template.
- Select an output format.
- Choose whether or not to export georeferencing information to an output PDF file by passing in an extra parameter from the web application to the Print Task. (More information on this below.)
- Control which service sublayers are on/off in the map.
- Control which service sublayers are on/off in the legend in the output file. (That is, a layer can be on in the map and off in the legend.)
- Export the map to a printer-friendly format containing vector output for service layers.
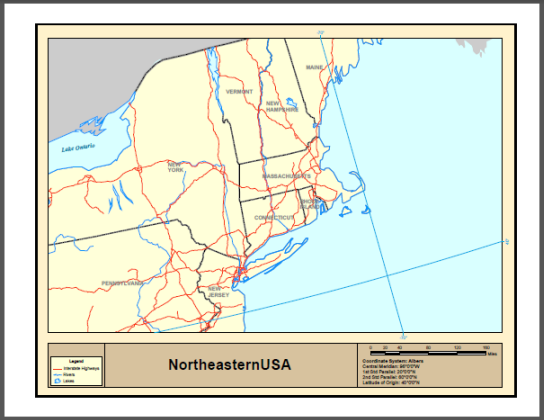
A sample output PDF is below. Note that layers that were turned off in the Table of Contents and Legend in the web application are reflected in the output.
The code behind the Export Map button uses the ArcGIS API for JavaScript Print Task, which is available starting with ArcGIS 10.1 for Desktop and ArcGIS 10.1 for Server. This tutorial will also show how to pass extra parameters into the Print Task, for example, whether or not to export georeferencing information to the output PDF file. The ability to pass extra parameters into the Print Task is useful as it allows you to collect any number of extra parameters from the web application. You will also create a Python script that will be published as a geoprocessing service that the Print Task will use. The Python script uses the ConvertWebMapToMapDocument function in the arcpy.mapping module which will insert the full state of the web map into a staged template map document. You will stage several templates from which the user can choose. Each template contains vector equivalents of all the possible layers in the map service. The staged templates can also contain other elements, such as a legend, dynamic text, and so on. The arcpy.mapping module also provides functionality to identify service layers and swap them out for layers that point to local data and to export to a variety of formats, for example, PDF.
To complete this tutorial, you should be familiar with the arcpy.mapping module, the ArcGIS API for JavaScript, ArcGIS for Desktop, and ArcGIS for Server.You should also become familiar with printing in the web application help topics:
This tutorial uses the MapTemplates and TemplateData folders in the ArcGIS for Desktop installation directory, usually located at C:\Program Files (x86)\ArcGIS\Desktop10.3. This tutorial assumes the map templates and template data are present and have not been modified. If this is not the case, you may need to reinstall ArcGIS for Desktop.
Copy the tutorial data
You will copy some of the the map templates in the ArcGIS for Desktop installation directory to a new folder. These will eventually be used as the staged map templates in the web application.
Before you do that, you need to make sure that a folder structure exists where ArcGIS for Server can see the template map documents and data that will be used in the web application. This tutorial assumes you have a folder that is registered with ArcGIS for Server. For more information on registering data with ArcGIS for Server, see:
Tip:
When using template map documents in the ConvertWebMapToMapDocument function, the best practice is to use data that is registered with ArcGIS for Server. If you choose to not use registered data, template map documents and data will be packaged and copied to the server. During packaging, data may be moved and re-sourced with relative paths to a folder structure that ConvertWebMapToMapDocument cannot resolve. For more information, see the ConvertWebMapToMapDocument help topic.
- Open a new, empty ArcMap session.
- In the Catalog window, navigate to your registered folder. Create a new folder in your registered folder called USA.
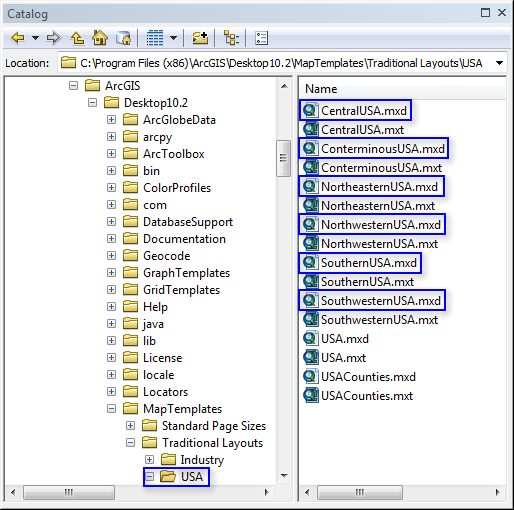
- In the Catalog window, navigate to the MapTemplates folder in the ArcGIS for Desktop installation directory. This is usually located at C:\Program Files (x86)\ArcGIS\Desktop10.3\MapTemplates. Further navigate down to the Traditional Layouts\USA folder.
- In the Catalog window, copy and paste the following files to the USA folder you created in a previous step: CentralUSA.mxd, ConterminousUSA.mxd, NortheasternUSA.mxd, NorthwesternUSA.mxd, SouthernUSA.mxd, and SouthwesternUSA.mxd.
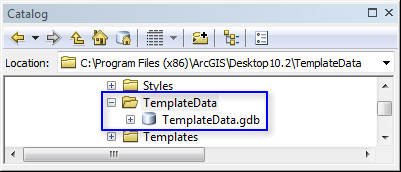
- In the Catalog window, navigate to the TemplateData folder in the ArcGIS for Desktop installation directory. This is usually located at C:\Program Files (x86)\ArcGIS\Desktop10.3\TemplateData.
- In the Catalog window, copy and paste TemplateData.gdb to the USA folder you created in a previous step.
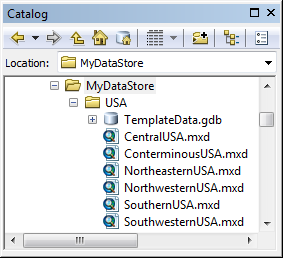
- The registered folder should look similar to this:
Note:
In the screen capture above, the registered folder is named MyDataStore. Your registered folder can be named anything.
Prepare the map documents to use as templates in the web application
The map documents need to be prepared for usage as templates in ConvertWebMapToMapDocument.
The map documents that are now in the registered folder need to be resourced to TemplateData.gdb, which is also in the registered folder. This can be accomplished through the ArcMap user interface or with a Python script. The latter approach will be used.
Note:
If you were authoring your own map document templates from scratch in the registered folder, these steps would not be required.
- Open the Python Window in ArcMap.
- Copy and paste the following script into the Python Window:
- In the Python Window, change the folderPath variable to be the path to the registered folder where the template MXDs reside. Remember to use the forward slash (/) in your path.
- In the Python Window, change the newPath variable to be the location of TemplateData.gdb within the registered folder. Remember to use the forward slash (/) in your path.
- The script should look like this:
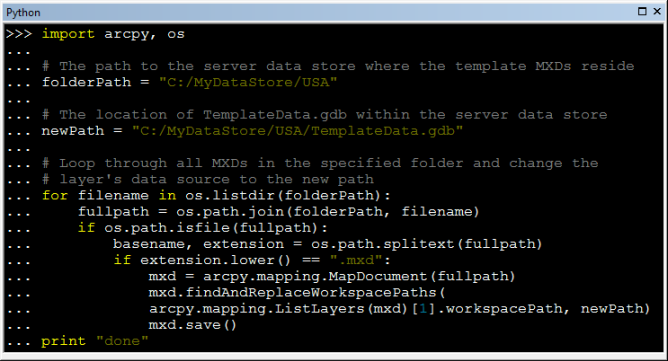
- Position the cursor to the right of the last line. Press the ENTER key twice to execute the script. Wait for the script to execute.
import arcpy, os

# The path to the registered folder where the template MXDs reside
folderPath = "C:/MyDataStore/USA"

# The location of TemplateData.gdb within the registered folder
newPath = "C:/MyDataStore/USA/TemplateData.gdb"

# Loop through all MXDs in the specified folder and change the layer's data source to the new path
for filename in os.listdir(folderPath):
    fullpath = os.path.join(folderPath, filename)
    if os.path.isfile(fullpath):
        basename, extension = os.path.splitext(fullpath)
        if extension.lower() == ".mxd":
            mxd = arcpy.mapping.MapDocument(fullpath)
            mxd.findAndReplaceWorkspacePaths(arcpy.mapping.ListLayers(mxd)[1].workspacePath, newPath)
            mxd.save()
print "done"The map documents are now ready to be used as templates in the web application.
Create a map service to be used in the web application
A map document needs to be prepared and published as the map service to be used in the web application. ConterminousUSA.mxd in the registered folder will be used as the map service. Before you publish it to your server, you need to prepare it for publishing.
- Open ConterminousUSA.mxd in ArcMap.
- By default, the map will open up in layout view. Switch to data view by selecting View > Data View in the ArcMap main menu.
- You will now turn off the Map Annotation Group in this map document. This map contains map graphics. Map graphics increase the memory footprint of a loaded document,
which leads to performance degradation. Due to these side effects,
map graphics are not supported in map services.
- Open the Conterminous United States data frame properties by right-clicking the data frame's name in the table of contents and clicking Properties.
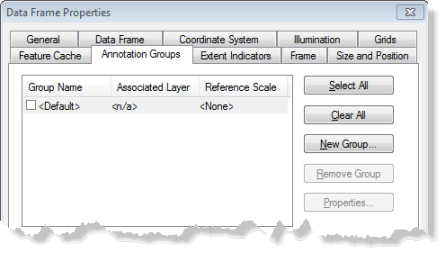
- Click the Annotation Groups tab.
- Uncheck the <Default> group. The Annotation Groups tab should now look like this:
- Click OK on the Data Frame Properties dialog box.
- This map uses basemap layers. Basemap layers will not publish to ArcGIS for Server. You will move the layers out of the basemap layer by ungrouping it.
- Right-click the Basemap layer in the table of contents and click Ungroup.
Note:
If you were authoring your own map document templates from scratch or were using existing map document templates that did not contain map graphics or basemap layers, these steps would not be required.
The map is now ready to be published to your server. If you are unfamiliar with the publishing process, please review how to publish a service.
- Click File > Share As > Service.
- Click Publish a service.
- Click Next.
- Choose a publish or admin connection to your ArcGIS for Server machine.
- Click Next.
- Create a new folder called USA.
- Click Continue.
- In the top right corner of the Service Editor dialog box, click Publish.
This will create the map service that will be used in the web application.
Create the Python script
You will create a Python script that will be used as the custom geoprocessing service.
The Python script in the custom geoprocessing service executes the ConvertWebMapToMapDocument function which converts a web map (in JSON format) that you intend to print or export to a map document. The arcpy.mapping script then loops through all the layers in the output map document, removing all layers except the vector layers that correspond to the service layers in the web map JSON. It then loops through all the layers in the legend, removing all legend layers except the vector layers that correspond to the service layers in the web map JSON legend. The script will also read extra parameters from the custom print task, in this case, whether or not to export georeferencing information to the output PDF file. The map document can then be exported to the format of your choice, for example, PDF.
- Open any Python IDE, such as IDLE (which comes with ArcGIS for Desktop).
- Copy and paste the following code into a new Python script.
- Change the templatePath variable to be the UNC path to the folder in your registered folder which contains the template map documents.
- Save the Python script. Name the script AdvancedHighQualityPrinting.py. Save it in a folder called WebApp within the registered folder.
import arcpy
import os
import uuid

# The template location in the registered folder (as UNC path)
templatePath = '//MyComputerName/MyDataStore/USA'

# Input WebMap json
Web_Map_as_JSON = arcpy.GetParameterAsText(0)

# Format for output
Format = arcpy.GetParameterAsText(1)
if Format == '#' or not Format:
    Format = "PDF"

# Input Layout template
Layout_Template = arcpy.GetParameterAsText(2)
if Layout_Template == '#' or not Layout_Template:
    Layout_Template = "NorthwesternUSA"

# Extra parameter - georef_info
Georef_info = arcpy.GetParameterAsText(3)
if Georef_info == '#' or not Georef_info:
    Georef_info = "False"

# Convert Georef_info string to boolean
if Georef_info.lower() == 'false':
    Georef_info_bol = False
elif Georef_info.lower() == 'true':
    Georef_info_bol = True

# Get the requested map document
templateMxd = os.path.join(templatePath, Layout_Template + '.mxd')

# Convert the WebMap to a map document
result = arcpy.mapping.ConvertWebMapToMapDocument(Web_Map_as_JSON, templateMxd)
mxd = result.mapDocument

# Reference the data frame that contains the webmap
# Note: ConvertWebMapToMapDocument renames the active dataframe in the template_mxd to "Webmap"
df = arcpy.mapping.ListDataFrames(mxd, 'Webmap')[0]

# Get a list of all service layer names in the map
serviceLayersNames = [slyr.name for slyr in arcpy.mapping.ListLayers(mxd, data_frame=df)
                      if slyr.isServiceLayer and slyr.visible and not slyr.isGroupLayer]

# Create a list of all possible vector layer names in the map that could have a
# corresponding service layer
vectorLayersNames = [vlyr.name for vlyr in arcpy.mapping.ListLayers(mxd, data_frame=df)
                     if not vlyr.isServiceLayer and not vlyr.isGroupLayer]

# Get a list of all vector layers that don't have a corresponding service layer
removeLayerNameList = [vlyrName for vlyrName in vectorLayersNames
                       if vlyrName not in serviceLayersNames]

# Remove all vector layers that don't have a corresponding service layer
for lyr in arcpy.mapping.ListLayers(mxd, data_frame=df):
    if not lyr.isGroupLayer \
    and not lyr.isServiceLayer \
    and lyr.name in removeLayerNameList \
    and lyr.name in vectorLayersNames:
        arcpy.mapping.RemoveLayer(df, lyr)

# Reference the legend in the map document
legend = arcpy.mapping.ListLayoutElements(mxd, "LEGEND_ELEMENT")[0]

# Get a list of service layers that are on in the legend because the incoming
# JSON can specify which service layers/sublayers are on/off in the legend
legendServiceLayerNames = [lslyr.name for lslyr in legend.listLegendItemLayers()
                           if lslyr.isServiceLayer and not lslyr.isGroupLayer]

# Remove vector layers from the legend where the corresponding service layer
# is also off in the legend
for lvlyr in legend.listLegendItemLayers():
    if not lvlyr.isServiceLayer \
    and lvlyr.name not in legendServiceLayerNames \
    and not lvlyr.isGroupLayer \
    and lvlyr.name in vectorLayersNames:
        legend.removeItem(lvlyr)

# Remove all service layers
# This will leave only vector layers that had corresponding service layers
for slyr in arcpy.mapping.ListLayers(mxd, data_frame=df):
    if slyr.isServiceLayer:
        arcpy.mapping.RemoveLayer(df, slyr)

# ConvertWebMapToMapDocument renames the active dataframe in the template_mxd to "Webmap".
# Lets rename it to something more meaningful.
df.name = Layout_Template

# Use the uuid module to generate a GUID as part of the output name
# This will ensure a unique output name
output = 'WebMap_{}.{}'.format(str(uuid.uuid1()), Format)
Output_File = os.path.join(arcpy.env.scratchFolder, output)

# Export the WebMap
if Format.lower() == 'pdf':
    arcpy.mapping.ExportToPDF(mxd, Output_File, georef_info=Georef_info_bol)
elif Format.lower() == 'png':
    arcpy.mapping.ExportToPNG(mxd, Output_File)

# Set the output parameter to be the output file of the server job
arcpy.SetParameterAsText(4, Output_File)

# Clean up - delete the map document reference
filePath = mxd.filePath
del mxd, result
os.remove(filePath)Note:
If the ArcGIS for Server, ArcGIS for Desktop, and the registered folder are all the same machine, then UNC paths to the registered folder are not required. Instead, absolute paths can be used.
The Python script is now ready to be added to a toolbox.
Create the toolbox
- In the Catalog window in ArcMap, navigate to the WebApp folder in the registered folder.
- Right-click the WebApp folder and click New > Toolbox. Name the toolbox AdvancedHighQualityPrinting.
- Right-click the AdvancedHighQualityPrinting toolbox and click Item Description.
- In the Item Description dialog box, populate in the Tags and Summary items with the text of your choice. Optionally, fill in other item descriptions.
- Click Save and exit the Item Description dialog box.
Create a Python script tool
Next, you will add the AdvancedHighQualityPrinting.py script to the AdvancedHighQualityPrinting toolbox.
- In the Catalog window, right-click the AdvancedHighQualityPrinting toolbox and click Add > Script.
- In the Add Script dialog box, enter AdvancedHighQualityPrinting for both the Name and the Label.
- Click Next.
- For the Script File, navigate to the WebApp folder in your registered folder and select AdvancedHighQualityPrinting.py.
- Click Next in the Add Script dialog box.
- Five parameters need to be added to the script tool.
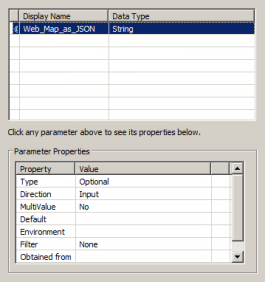
- The first parameter will be Web_Map_as_JSON. This parameter takes in a JSON representation of the state of the map to be exported as it
appears in the web application.
The properties should match the following screen capture:
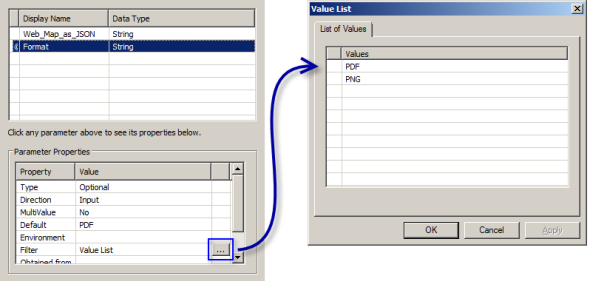
- The next parameter will be Format—the format in which the map image for printing will be delivered.
The properties should match the following screen capture:
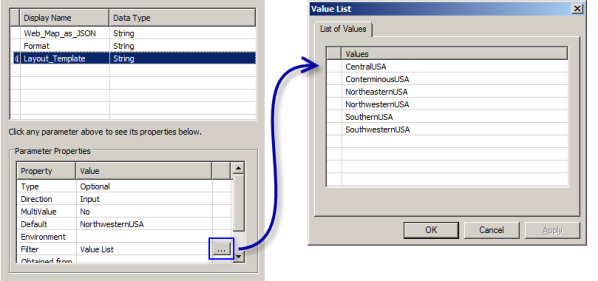
- The next parameter will be Layout_Template—the template map document that will be used. The properties should match the following screen capture:
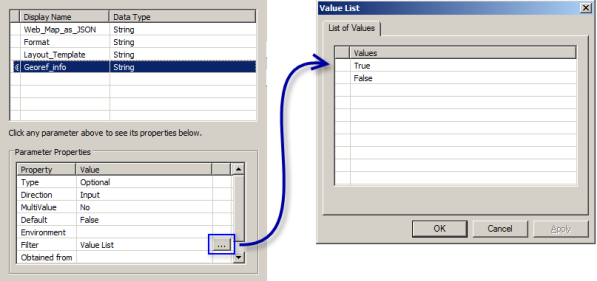
- The next parameter will be Georef_info—a string Boolean that enables the export of coordinate system information into the output PDF file. The properties should match the following screen capture:
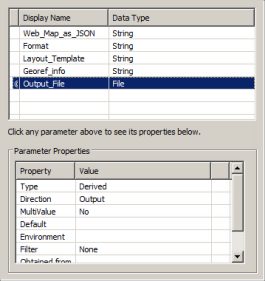
- The next parameter will be Output_File—the output file that will be created. The properties should match the following screen capture:
Caution:
The Web_Map_as_JSON, Format, Layout_Template, and Output_File parameter names must be spelled exactly as shown so they match the tool signature of the Print Task in the ArcGIS web APIs. For more information on the parameters, see Export Web Map. The Georef_info parameter is an extra parameter that will be passed to the Print Task and therefore has no naming convention to conform to.
- Click Finish on the Add Script dialog box.
- The first parameter will be Web_Map_as_JSON. This parameter takes in a JSON representation of the state of the map to be exported as it
appears in the web application.
The properties should match the following screen capture:
- Right-click the AdvancedHighQualityPrinting script tool and click Item Description.
- In the Item Description dialog box, populate the Tags and Summary items with text of your choice. Also populate the Dialog Explanation for all five parameters in the Syntax section of the Item Description dialog box. Optionally, fill in other item descriptions.
Execute the tool
The tool needs to be executed successfully to create a result in the Results window that can be published to ArcGIS for Server. This illustrates an interesting problem with testing scripts that use ConvertWebMapToMapDocument. In order to execute locally, it needs a valid webmap JSON. However, the ArcGIS API for JavaScript will provide the webmap JSON in the web application, but only after the script has been published. To get around this, you can use the test JSON that is in the ConvertWebMapToMapDocument help topic. Moreover, you can modify the JSON to contain elements that the tool is expecting and that will be similar to the JSON you will be getting from the web application. For this tutorial, the web application user will be turning service layers on/off in the map, as well as further turning layers on/off in the legend. Therefore, a test web map JSON string like this should be used:
{
    "operationalLayers": [
        {
            "url": "http://MyServer:6080/arcgis/rest/services/USA/ConterminousUSA/MapServer",
            "title": "MyDynamicService",
            "opacity": 1,
            "id": "MyDynamicService",
            "visibility": true,
            "visibleLayers": [
                0,
                2,
                3,
                4,
                5,
                6,
                7
            ]
        }
    ],
    "mapOptions": {
        "extent": {
            "xmin": -2200000,
            "ymin": 500000,
            "xmax": -1300000,
            "ymax": 1300000,
            "spatialReference": {
                "wkid": 102008
            }
        },
        "scale": 5000000,
        "rotation": 0
    },
    "layoutOptions": {
        "copyrightText": "",
        "authorText": "",
        "legendOptions": {
            "operationalLayers": [
                {
                    "id": "MyDynamicService",
                    "subLayerIds": [
                        0,
                        2,
                        5
                    ]
                }
            ]
        }
    }
}
Note that the visibleLayers element has layer 1 off. This means that layer one in the map service will not be present in the output. Also note the subLayerIDs in the legendOptions. Only layers 0, 2, and 5 will be on in the legend. This is similar to the JSON that will be returned from the web application. For more information, see the WebMap JSON Specifications.
When running the script tool, the JSON string can be copied and pasted into the Web_Map_as_JSON input parameter. However, the line breaks must be removed in order for the string to be valid input. The JSON string with line breaks removed is below:
{"operationalLayers":[{"url":"http://MyServer:6080/arcgis/rest/services/USA/ConterminousUSA/MapServer","title":"MyDynamicService","opacity":1,"id":"MyDynamicService","visibility":true,"visibleLayers":[0,2,3,4,5,6,7]}],"mapOptions":{"extent":{"xmin":-2200000,"ymin":500000,"xmax":-1300000,"ymax":1300000,"spatialReference":{"wkid":102008}},"scale":5000000,"rotation":0},"layoutOptions":{"copyrightText":"","authorText":"","legendOptions":{"operationalLayers":[{"id":"MyDynamicService","subLayerIds":[0,2,5]}]}}}You also need to change the name of the server (MyServer:6080, above) to that of your ArcGIS for Server server.
Tip:
For publishing purposes, you can choose to leave the Web_Map_as_JSON input parameter blank as the ArcGIS API for JavaScript will provide the web map JSON in the web application. You can leave the Web_Map_as_JSON input parameter blank provided the Python script was written in such a way as to not fail with blank input. For example, the script doesn't look for web map layers by name. If the script fails on the server due to an error in the script, it will have to be fixed locally, then republished to the server. Therefore, it is good practice to ensure that the script works locally before publishing by testing with a valid web map JSON string or using a debug map document that contains all the elements that would be in the web map JSON. For this tutorial we will provide a valid JSON string.
- In the Catalog window, right-click the AdvancedHighQualityPrinting script tool and click Open.
- For the Web_Map_as_JSON input parameter, copy and paste the JSON string with line breaks removed from the single line code block above to the Web_Map_as_JSON parameter. Don't forget to change the name of the server to match your server. The AdvancedHighQualityPrinting script tool dialog box should look this:
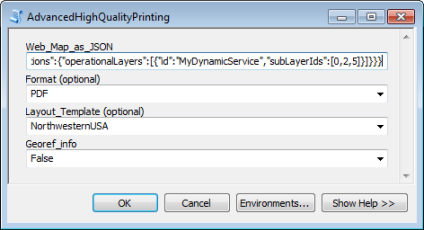
- Accept all the default values for the other parameters and click OK.
- Open the Results window.
- Double-click Output_File, highlighted below, to see the output PDF.
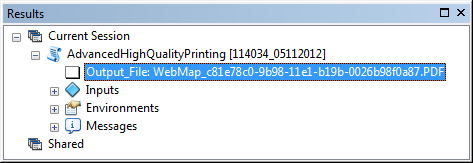
This will open the PDF. As specified in the web map JSON, the PDF should have layer one turned off in the map; and only layers 0, 2, and 5 should be on in the legend.
Publish the result
The result is now ready to be published as a geoprocessing service. If you are unfamiliar with publishing geoprocessing services, see:
- In the Results window, right-click the AdvancedHighQualityPrinting result and click Share As > Geoprocessing Service.
- Click Publish a service.
- Click Next.
- Choose a publish or admin connection to your ArcGIS for Server machine.
- Click Next.
- Use the existing folder called USA.
- Click Continue.
- In the top right corner of the Service Editor dialog box, click Publish.
- After the script tool successfully publishes, it is a good practice to test the geoprocessing service in ArcMap using a GIS server connection to your ArcGIS for Server. You can see the result of the geoprocessing service in the Geoprocessing Results window.
The geoprocessing service is now ready to be used in the ArcGIS web APIs.
ArcGIS API for JavaScript sample code
Use the following sample code to build your web application.
In the ArcGIS API for JavaScript code sample below, change the URL to the map service and geoprocessing service that you created in the previous steps to match your server name. They are referenced on these lines:var dynUrl = "http://MyServer:6080/arcgis/rest/services/USA/ConterminousUSA/MapServer";var printUrl = "http://MyServer:6080/arcgis/rest/services/USA/AdvancedHighQualityPrinting/GPServer/AdvancedHighQualityPrinting";
Code for AdvancedHighQualityPrinting.html:
<!DOCTYPE HTML PUBLIC "-//W3C//DTD HTML 4.01//EN" "http://www.w3.org/TR/html4/strict.dtd">
<html>
<head>
<meta http-equiv="Content-Type" content="text/html; charset=utf-8"/>
<meta http-equiv="X-UA-Compatible" content="IE=7,IE=9" />
<meta name="viewport" content="initial-scale=1, maximum-scale=1,user-scalable=no"/>
<link rel="stylesheet" type="text/css" href="http://serverapi.arcgisonline.com/jsapi/arcgis/3.0/js/dojo/dijit/themes/claro/claro.css">
<script src="http://serverapi.arcgisonline.com/jsapi/arcgis/3.0/"></script>
<script type="text/javascript" language="Javascript">
dojo.require("esri.map");
dojo.require("esri.tasks.PrintTask");
dojo.require("dijit.form.Button");
dojo.require("dijit.form.CheckBox");
dojo.require("dijit.form.ComboBox");
var layer, map, visible = [];
var printTask, params;
function init() {
var startExtent = new esri.geometry.Extent({
"xmin" : -2260000,
"ymin" : -1500000,
"xmax" : 2250000,
"ymax" : 1220000,
"spatialReference" : {
"wkid" : 102008
}
});
map = new esri.Map("map", {
extent : startExtent
});
var dynUrl = "http://MyServer:6080/arcgis/rest/services/USA/ConterminousUSA/MapServer";
layer = new esri.layers.ArcGISDynamicMapServiceLayer(dynUrl, {
"id" : "ConterminousUSA"
});
if (layer.loaded) {
buildLayerList(layer);
} else {
dojo.connect(layer, "onLoad", buildLayerList);
}
var printUrl = "http://MyServer:6080/arcgis/rest/services/USA/AdvancedHighQualityPrinting/GPServer/AdvancedHighQualityPrinting";
printTask = new esri.tasks.PrintTask(printUrl, {
async : true
});
params = new esri.tasks.PrintParameters();
params.map = map;
}
function buildLayerList(layer) {
var items = dojo.map(layer.layerInfos, function(info, index) {
if (info.defaultVisibility) {
visible.push(info.id);
}
return "<input type='checkbox' class='list_item' checked='" + (info.defaultVisibility ? "checked" : "") + "' id='" + info.id + "' onclick='updateLayerVisibility();' /><label for='" + info.id + "'>" + info.name + "</label>";
});
dojo.byId("layer_list").innerHTML = items.join();
layer.setVisibleLayers(visible);
map.addLayer(layer);
}
function updateLayerVisibility() {
var inputs = dojo.query(".list_item"), input;
visible = [];
dojo.forEach(inputs, function(input) {
if (input.checked) {
visible.push(input.id);
}
});
//if there aren't any layers visible set the array to be -1
if (visible.length === 0) {
visible.push(-1);
}
layer.setVisibleLayers(visible);
}
function print() {
var layout = dojo.byId("layout");
var index = layout.selectedIndex;
var selectedValue_layout = layout.options[index].value;
var format = dojo.byId("format");
var index = format.selectedIndex;
var selectedValue_format = format.options[index].value;
var georef_info = dojo.byId("georef_info");
var index = georef_info.selectedIndex;
var selectedValue_georef_info = georef_info.options[index].value;
var legendLayer = new esri.tasks.LegendLayer();
legendLayer.layerId = "ConterminousUSA";
legendLayer.subLayerIds = [];
if (CapitalCities.checked == true) {
legendLayer.subLayerIds.push(0);
}
if (InterstateHighways.checked == true) {
legendLayer.subLayerIds.push(1);
}
if (Rivers.checked == true) {
legendLayer.subLayerIds.push(2);
}
if (Lakes.checked == true) {
legendLayer.subLayerIds.push(3);
}
if (StateBoundaries.checked == true) {
legendLayer.subLayerIds.push(4);
}
params.template = {
layout : selectedValue_layout,
format : selectedValue_format,
layoutOptions : {
legendLayers : [legendLayer]
}
};
params.extraParameters = {
Georef_info : selectedValue_georef_info
};
printTask.execute(params, printComplete);
}
function printComplete(result) {
window.open(result.url);
}
dojo.addOnLoad(init);
</script>
</head>
<body class="claro">
<div id="map" style="width:1000px; height:600px; border:1px solid #000;"></div>
<br />
Layout Template:
<select id="layout" >
<OPTION value="CentralUSA">CentralUSA</OPTION>
<OPTION value="ConterminuousUSA">ConterminuousUSA</OPTION>
<OPTION value="NortheasternUSA">NortheasternUSA</OPTION>
<OPTION value="NorthwesternUSA">NorthwesternUSA</OPTION>
<OPTION value="SouthernUSA">SouthernUSA</OPTION>
<OPTION value="SouthwesternUSA">SouthwesternUSA</OPTION>
</select>
Format:
<select id="format">
<OPTION value="PDF">PDF</OPTION>
<OPTION value="PNG">PNG</OPTION>
</select>
Include Georef info?
<select id="georef_info">
<OPTION value="True">True</OPTION>
<OPTION value="False">False</OPTION>
</select>
<br />
<br />
Table of Contents:
<br />
<span id="layer_list"></span>
<br />
<br />
Include in Legend:
<br />
<label>
<input type="checkbox" name="CapitalCities" id="CapitalCities" checked="checked">
Capital Cities</label>
<label>
<input type="checkbox" name="InterstateHighways" id="InterstateHighways" checked="checked">
Interstate Highways</label>
<label>
<input type="checkbox" name="Rivers" id="Rivers" checked="checked">
Rivers</label>
<label>
<input type="checkbox" name="Lakes" id="Lakes" checked="checked">
Lakes</label>
<label>
<input type="checkbox" name="StateBoundaries" id="StateBoundaries" checked="checked">
State Boundaries</label>
<br />
<br />
<input type="button" id="print" value="Print" onclick="print();"/>
</body>
</html>Run the web application
Run the web application that you created in the previous step. Consult the ArcGIS API for JavaScript documentation for instructions on running web applications, if necessary. A screen capture of the web application is below. Note that Capital Cities is turned off in the Table of Contents. Also note that State Boundaries is turned off in Include in Legend.

After clicking the Export Map button, an output file will automatically pop up after a moment. The illustration below shows a sample printer-friendly output PDF. Note that layers that were turned off in the Table of Contents and Include in Legend in the web application are reflected in the output. Moreover, the PDF uses vector data that was staged in the layout templates instead of an image of service layers. The output file will also contain other elements that were staged in the template map documents: a legend, data frame and coordinate system dynamic text, and a scale bar. If the user selected the Georef info parameter to be True, then the output PDF will also contain georeferencing information which can be viewed in Adobe Reader using the Geospatial Location Tool.

This concludes the advanced web map printing/exporting with arcpy.mapping tutorial. For a basic web map printing tutorial, see the basic web map printing/exporting tutorial.