Available with Network Analyst license.
Folder | DriveTimePolygons |
Purpose | Creates drive-time (or drive-distance) polygons around input points for the given drive-time values |
Service | DriveTimePolygonsService (geoprocessing service) |
Geoprocessing task | Calculate Drive-Time Polygons |
Inputs |
|
Outputs | One polygon corresponding to each input drive-time or drive-distance value for each facility |
Data | Uses a street network dataset for the San Francisco area provided in the ToolData folder |
Extensions | |
Of note | Demonstrates the basic steps required to set up and use a server task for generating service areas (These steps are similar to setting up a vehicle routing problem service or a find nearest service using the Solve Vehicle Routing Problem or Find Closest Facilities geoprocessing tools, respectively.) |
Corresponding folder
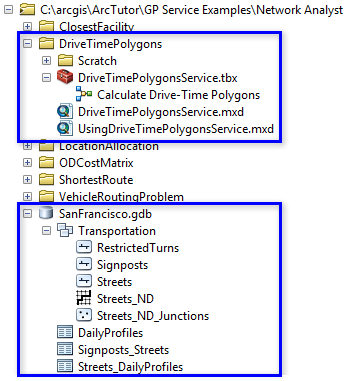
The data for this tutorial can be downloaded from ArcGIS.com. Extract the data to C:\arcgis\ArcTutor. The model and some corresponding data are stored at C:\arcgis\ArcTutor\GP Service Examples\Network Analyst\DriveTimePolygons. The network dataset that is referenced by the network analysis layer in the model is stored in the SanFrancisco geodatabase found in C:\arcgis\ArcTutor\GP Service Examples\Network Analyst\DriveTimePolygons.
About the Calculate Drive-Time Polygons task
The primary purpose of the Calculate Drive-Time Polygons task is to create drive-time polygons around user-specified points. A drive-time polygon is a region that encompasses all accessible streets that lie within a specified drive time from that point. Drive-time polygons can be used to evaluate the accessibility of a point with respect to some other features. For example, one-, two-, and three-minute drive-time polygons around a grocery store can be used to determine which people are most likely to shop at the store.
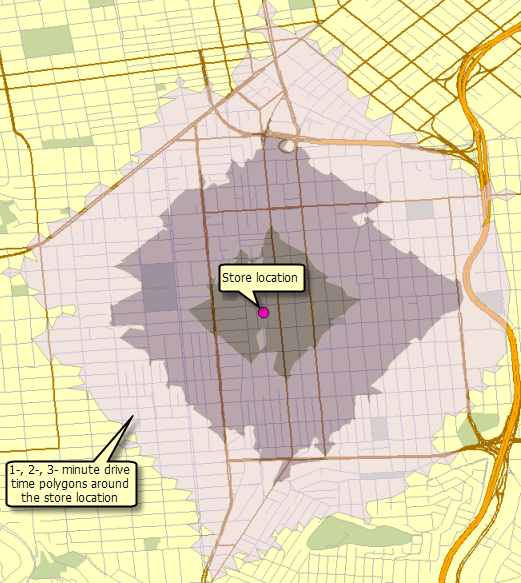
There are two geoprocessing tools for creating service areas: Make Service Area Layer and Generate Service Areas. This example uses Generate Service Areas because it is designed to facilitate the creation of service area services and optimize the solver's performance in a server environment. Another benefit of Generate Service Areas is that it offers throttling parameters, which let you limit server processing and bandwidth usage by limiting the size of service area problems requested by clients. For example, this example sets the Maximum Facilities parameter to 10 so that the server will automatically reject any requests to solve a service area problem with more than 10 facilities.
Data
The network dataset for this example is located at C:\arcgis\ArcTutor\GP Service Examples\Network Analyst\SanFrancisco.gdb and the map documents, toolbox, and other supplementary data are stored at C:\arcgis\ArcTutor\GP Service Examples\Network Analyst\DriveTimePolygons.
Network dataset
The Network Analyst folder contains a file geodatabase, SanFrancisco.gdb. Within the Transportation feature dataset is a network dataset, Streets_ND. This network dataset models the street network for the San Francisco area. It provides several network attributes, including TravelTime, which indicates the time it takes to travel each street segment in minutes, and Meters, which indicates the length of each street segment.
Toolbox and map documents
The toolbox for the geoprocessing service is DriveTimePolygonsService.tbx.
The two map documents, DriveTimePolygonsService.mxd and UsingDriveTimePolygonsService.mxd, are included to remove secondary steps from this workflow topic, such as adding layers, fitting map extents around the study area, and so on.
Model
Model overview
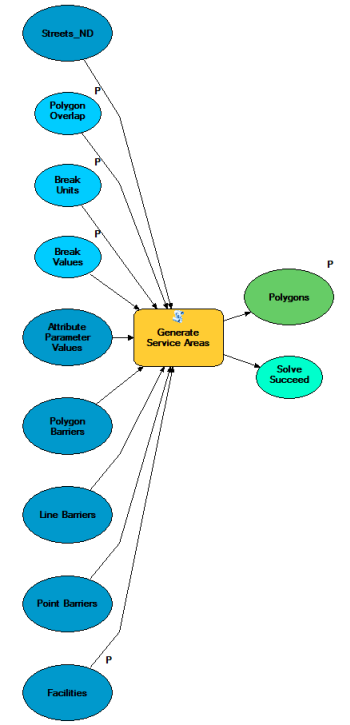
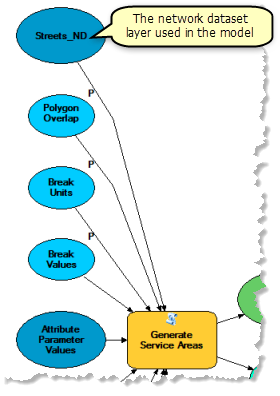
The Calculate Drive-Time Polygons model, found in the DriveTimePolygonsService toolbox, is illustrated below. There are four input variables:
- Input Facilities are the centers of the drive-time polygons to be generated. (In network analysis, a facility is any fixed location on the network, such as a building or your current location.)
- Break Values is a space-separated list of drive-time or drive-distance values.
- Break Units specifies the units of Break Values and determines whether drive-time or drive-distance polygons are generated. Drive-time polygons are generated when a time unit is chosen; drive-distance polygons are generated for length units.
- Polygon Overlap specifies whether each break value is generated from the facility (DISKS) or from the end of the last break (RINGS). This variable only affects the output for service areas that have multiple breaks per facility.
The Generate Service Areas tool in this model creates a service area network analysis layer, adds the user-digitized points as facilities, performs a solve operation, and outputs drive-time polygons.
| Element | Type | Description |
|---|---|---|
Facilities | Feature set (points), input parameter | Point features around which the drive-time polygons are determined |
Break Values | String, input parameter | Space-separated list of drive-time or drive-distance values |
Break Units | String, input parameter | The units for Break Values |
Polygon Overlap Type | String, input parameter | Specifies whether to create concentric service area polygons as disks or rings when multiple break values are present |
|
Polygon Barriers |
Feature Set (polygons) |
Polygon features that prohibit traversal on or scale the cost of the network edges they cover |
|
Line Barriers |
Feature Set (lines) |
Line features that prohibit traversal on or scale the cost of the network edges they cover |
|
Point Barriers |
Feature Set (points) |
Point features that add cost to or prohibit traversal through a point on the network |
Streets_ND | Network dataset layer | The network dataset layer on which the service areas are calculated |
|
Attribute Parameter Values |
Record set |
Parameter values for parameterized network attributes |
Tool | Creates and solves a service area analysis | |
SolveSucceeded | Boolean | The derived output that indicates whether the solve was successful |
Polygons | Feature layer, output parameter | The output polygons layer representing the service areas |
Workflow Overview
The general workflow for publishing a service area solver as a geoprocessing service is the following:
- Add Generate Service Areas to ModelBuilder.
- Decide which parameters you want clients to be able to set values for, then expose them as model parameters.
- Document the parameters in the model's Item Description dialog box.
- Run the model once in ArcMap.
- From the Results window in ArcMap, publish the model as a geoprocessing service.
Using the network dataset layer
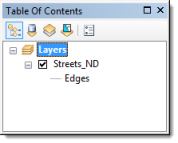
The network dataset for the San Francisco area is added to the DriveTimePolygonsService map document as a network dataset layer (Streets_ND). This layer is used in the model as an input variable for the Generate Service Areas tool. Using a network layer greatly improves the overall model execution time since a connection to the network dataset is kept open by the network dataset layer. Otherwise, if the network dataset is referenced by the path to its disk location, a connection to the network dataset is made each time the model executes, which reduces the performance of the geoprocessing service created using the model.
Model processes
The Generate Service Areas tool creates a service area Network Analyst (NA) layer that stores the analysis properties, references the Streets_ND network dataset layer used for the analysis, and stores the input facilities and the output polygons. The network dataset has a network cost attribute called TravelTime, which specifies the travel time required to traverse each street segment. Similarly, it has a cost attribute called Meters, which specifies the length of each street segment. One of these two cost attributes is referenced in the analysis to generate either drive-time or drive-distance polygons. The cost attribute that is referenced depends on whether the Break Units variable is set to a time or distance unit: time units cause the TravelTime attribute to be used, whereas distance units cause the Meters attribute to be used. The tool handles any unit conversions that may be necessary.
The default break values are read from the Break Values variable as a space-separated list of values.
For this service, the NO_MERGE option was used to create overlapping polygons that do not merge for each facility.
The Facilities parameter is a feature set data type so that the model can interactively accept user-digitized points as facilities.
The tool calculates the service area based on the options specified in the input parameters and generates the drive-time polygons. The calculated polygons are written to the output polygons layer. 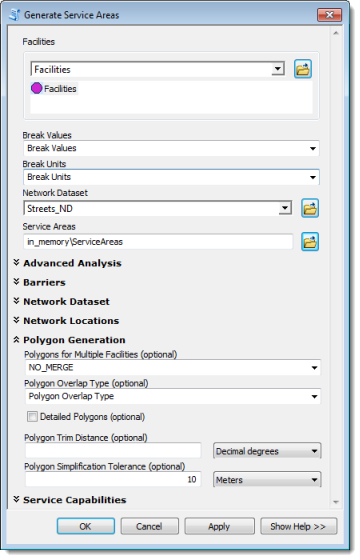
Service Capabilities
The parameters in the Service Capabilities section of the tool dialog box are designed to limit processing and storage requirements of client requests. They trigger certain behaviors. For example, since the Maximum Facilities parameter for this model is set to 10, the resultant service will check to see how many facilities the user has created. If there are 10 or fewer facilities, the service areas will be generated; however, if there are more than 10, the service will immediately terminate.
All the other service capability parameters work in a similar fashion, except Force Hierarchy beyond Break Time Value and Force Hierarchy beyond Break Distance Value. These last two parameters are disabled, because this San Fancisco network dataset doesn't have a hierarchy attribute. If it did, and the Use Hierarchy in Analysis parameter wasn't checked, you could force the service area to become a hierarchical service area when larger break values are passed in. This is beneficial because hierarchical service areas, though less accurate, require far less processing than nonhierarchical ones.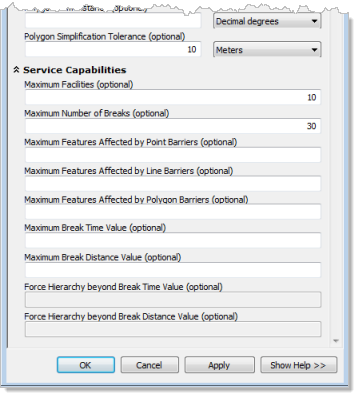
Item description
By documenting the Item Description of the geoprocessing model, you are also documenting the resultant service and its parameters because the publishing wizard copies the text to the item description of the service. Describing, or documenting, the service is required and helps users understand how to successfully interact with the service and generate service areas. The model for this example is documented; you can inspect it by right-clicking the geoprocessing model in the Catalog window and choosing Item Description.
Publishing
The geoprocessing service is published as described in the steps below.
- Open DriveTimePolygonsService.mxd. The default location for the tutorial data is C:\arcgis\ArcTutor\GP Service Examples\Network Analyst\DriveTimePolygons.
- Run the Calculate Drive-Time Polygons geoprocessing model.
- In the Catalog window, expand DriveTimePolygonsService.tbx, then double-click the Calculate Drive-Time Polygons tool.
- In the Calculate Drive-Time Polygons tool dialog box, click the symbol next to Facilities, then click on the map to add a facility.
- Click OK to generate service areas.
- Open the Results window by clicking Geoprocessing > Results.
- In the Results window, expand Current Session.
- Right-click CalculateDriveTimePolygons (which is followed by the time and date that the model ran) and choose Share As > Geoprocessing Service.
- In the Share as Service dialog box, click Next.
- Choose an ArcGIS Server connection with publisher capabilities from the drop-down list or make a connection using the button to the right of the drop-down list.
- Click Next.
- Choose to publish the service to the root folder or specify a different folder and click Continue.
The Service Editor dialog box appears. The text from the geoprocessing model's item description is copied to describe the service. It is displayed for editing in the Item Description section of the dialog box as well as in the sections immediately above it (Facilities, Break Values, and so on).
- Click Parameters, which is in the left panel of the Service Editor dialog box, and choose Warning from the Message Level drop-down list.
Any error or warning messages encountered while running the model as part of a service will be reported to the client.
- Click Analyze
 to see any warning or error messages in the Publisher window.
Unless you have set up a data store, you will receive a warning that data will be copied to the server. You may receive other messages as well. Warnings can be ignored; errors cannot. Right-click any error messages in the Publisher window for help on how to address them.
- Click Publish
 on the Service Editor dialog box.
A dialog box may appear immediately to inform you that Streets_ND will be copied to the server. After the service publishes successfully, the Succeeded dialog box appears.
- Click OK.
Using
- Open UsingDriveTimePolygonsService.mxd.
Notice that this map shows an ArcGIS Online basemap layer and is zoomed to San Francisco.
- Create a user connection to ArcGIS Server from the Catalog window if one does not exist.
- Expand the user connection, then expand the DriveTimePolygonsService.tbx toolbox.
- Open the Calculate Drive-Time Polygons tool by double-clicking it.
- Add a point to create a facility location.
- Specify 2 3 4 for drive-time values and click OK to run the task.
ArcGIS for Server receives the request; solves the analysis; and returns a layer, Polygons, which contains the resulting service area.
- Check the Polygons layer to make it visible.
Take the opportunity to examine the result of the task in the Results window.
Optionally, run the analysis again but add more than 10 facilities to see if the service capabilities block the request.