Folder | Watershed |
Purpose | Using the ArcGIS Spatial Analyst, this basic service computes a watershed polygon. |
Services | StoweBasemap (map service), StoweWaterSheds (geoprocessing service). |
Geoprocessing tasks | Create Watershed Polygon |
Inputs | User digitizes a point in the study area. |
Outputs | Polygon of computed watershed and a snapped pour point. |
Data | This example uses digital elevation data (raster) and other data found in the ArcGIS Spatial Analyst tutorial. |
Extensions | ArcGIS Spatial Analyst. |
Corresponding folder
The data for this example can be downloaded from ArcGIS.com. Once downloaded, extract the zip file to C:\arcgis\ArcTutor\. The GP Service Examples\Watershed folder contains the completed model and data. This example will copy all of the data to the ArcGIS Server machine during publishing.
Set up GIS Server connections
You will need to set up a publish or administrator connection to your GIS Server in order to publish and use your geoprocessing service. You can optionally set up a user connection which will allow you to only use your geoprocessing services.
- In the Catalog window, navigate to the GIS Server node and double-click Add ArcGIS Server.
- Choose Administer GIS Server and click Next.
- Enter the URL for your GIS Server, for example, http://myserver:6080/arcgis/. Provide a user name and password and click Finish. You now have a connection to your GIS Server under the GIS Servers node of your Catalog window.
Data familiarization
Data
The data that provides input for the models is in c:\arcgis\ArcTutor\GP Service Examples\Watershed. The data is for the town of Stowe, Vermont. The contents of this location are shown below:

- dem_fill is the result of executing the Fill tool using elevation as input.
- Hillshade is the result of executing the Hillshade tool using dem_fill as input.
- flowdir is the result of executing the Flow Direction tool using dem_fill as input.
- accumulation is the result of executing the Flow Accumulation tool using flowdir as input.
Basemap
Open the basemap, StoweBasemap.mxd, located in C:\arcgis\ArcTutor\GP Service Examples\Watershed. The map contains three layers: Landuse (landuse raster), Hillshade (hillshade raster), and Roads (Stowe.gdb/roads feature class).

The hillshade layer is drawn with a transparency of 55 percent. To change the transparency, right-click the hillshade layer, choose Properties, click the Display tab, then change the transparency.
The map service will provide a reference for using your geoprocessing service. Publish the StoweBasemap map document to your server.
- Within ArcMap, choose File > Share As > Service from the main menu.
- In the first panel, choose Publish a service and click Next.
- Select the administrator connection you made previously.
- Accept the suggested default service name of StoweBasemap and click Next.
- Accept the suggested default to publish to the existing root folder and click Continue.
- Press the Publish
 button to publish the service.
You can test the StoweBasemap service by starting ArcMap with a blank document, navigating to your GIS Server and adding the StoweBasemap map service. Enable the connection made previously by double-clicking it. Find the StoweBasemap service and drag it into your map window.
Model
Open the StoweHydro map document. This map document provides a reference to the raster layers, which the model requires.
The model in this example, Create Watershed Polygon, is found inside the StoweWatersheds toolbox. Edit the model and examine the tools and input that make up the model.

The Flow Accumulation and Flow Direction variables are raster layers within the map document. The Pour Point variable is a feature set with symbology and attributes set inside the feature template of the PourPoint layer file.
Execute and publish the model
Execute the tool once to ensure it works correctly. Once it executes on your local desktop, publish the result to your GIS Server.
Run the model
In order to create a geoprocessing service, you must run your tool to create a result in the Results window.
- In the Catalog window, navigate to the StoweWaterSheds toolbox and expand it. Double-click the Create Watershed Polygon model. The Create Watershed Polygon tool dialog box opens.
- Using the Pour Point parameter control, digitize a point on the map.
- Run the tool by clicking OK.
- The output watershed will be added to the map.
- If the Results window is not already open, choose Geoprocessing > Results from the ArcMap main menu to open it.
Publish the result
With a successful result in the Results window, publish the service.
- In the Results window, right-click the Create WaterShed Polygon result and choose Share As > Geoprocessing Service. This will start the Share As Service wizard.
- In the first panel, choose Publish a service and click Next.
- Select the publisher or administrator connection you made at the start of this exercise.
- Provide a name for the service, such as StoweWaterSheds, and click Next.
- Accept the suggested default to publish to the existing root folder and click Continue.
- The Service Editor will appear; press the
 Analyze button. You should not encounter any errors, only warnings that the data will be copied to the server during the publish process. You can safely ignore these messages.
 - Select the Parameters tab from the left side of the Service Editor.
- Enable full messages by setting the Message Level to Info.
- Because the Create Watershed Polygon task executes quickly and returns a small polygon, set the Execution Mode to Synchronous.

- Click the Preview
 button to see how the tool dialog box will appear when the Create Watershed Polygon task is used in ArcMap.
 - Click the Publish button to create and start the service.
Use the service
- Start ArcMap with a blank document.
- Add the StoweBasemap map service to the ArcMap table of contents from your GIS Server user connection.
- Expand the StoweWaterSheds geoprocessing service from the GIS Server user connection, and double-click the Create Watershed Polygon task to open its tool dialog box.
- Add a point to the Create Watershed Polygon task using the feature set control.
- Click OK to run the task.
After the task completes, the table of contents has the two output layers, as illustrated below:

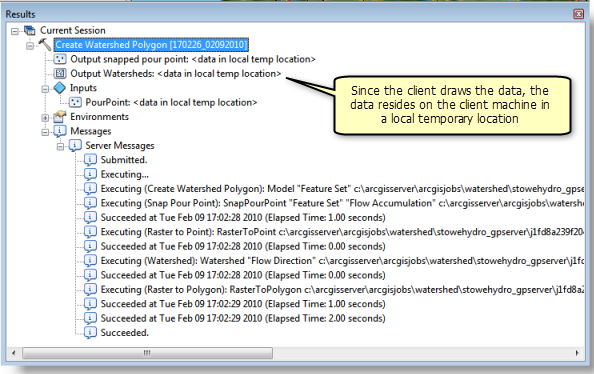
- Examine the results of the task in the Results window, as illustrated below: