ArcGIS Server includes Python 2.7 for Windows 64 bit. At ArcGIS Enterprise 10.5 and later, the conda environment is included with ArcGIS Server. The conda environment is based on Python 3.
The Python installation of ArcGIS Server includes packages such as numpy and matplotlib. However, if you want to install additional custom Python packages, follow the steps below.
Services published from ArcGIS Pro
Similar to ArcGIS Pro, ArcGIS Server uses conda to manage Python environments. To clone and activate an existing Python environment, follow the steps below.
Note:
The steps below are for geoprocessing services published from ArcGIS Pro or the arcpy module based on your ArcGIS Pro conda environment. For more information about the Python environment in ArcGIS Pro, see Python in ArcGIS Pro. It is recommended that you clone the default Python environment to make updates. Only one Python environment at a time can be activated for ArcGIS Server.
If this is your first time deploying third-party Python packages on an ArcGIS Server machine, follow these steps:
- Log in to your ArcGIS Server machine and open the Command Prompt as an administrator.
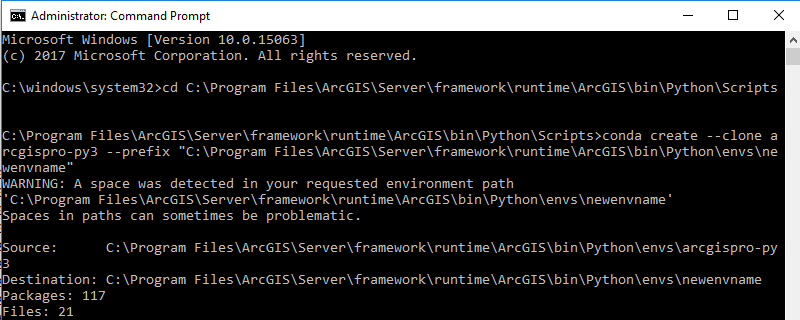
- Browse to <install>\ArcGIS\Server\framework\runtime\ArcGIS\bin\Python\Scripts.
- Clone the server's default Python environment with a new environment name (newenvname) in the ArcGIS Server installation's Python environment directory with the command.conda create --clone arcgispro-py3 --prefix "<install>\ArcGIS\Server\framework\runtime\ArcGIS\bin\Python\envs\newenvname". Replace the prefix with your installation directory and the new environment name.

- To activate the cloned environment, run proswap newenvname.
- Update the registry keys if you don't log in to the ArcGIS Server machine as the ArcGIS Server account.
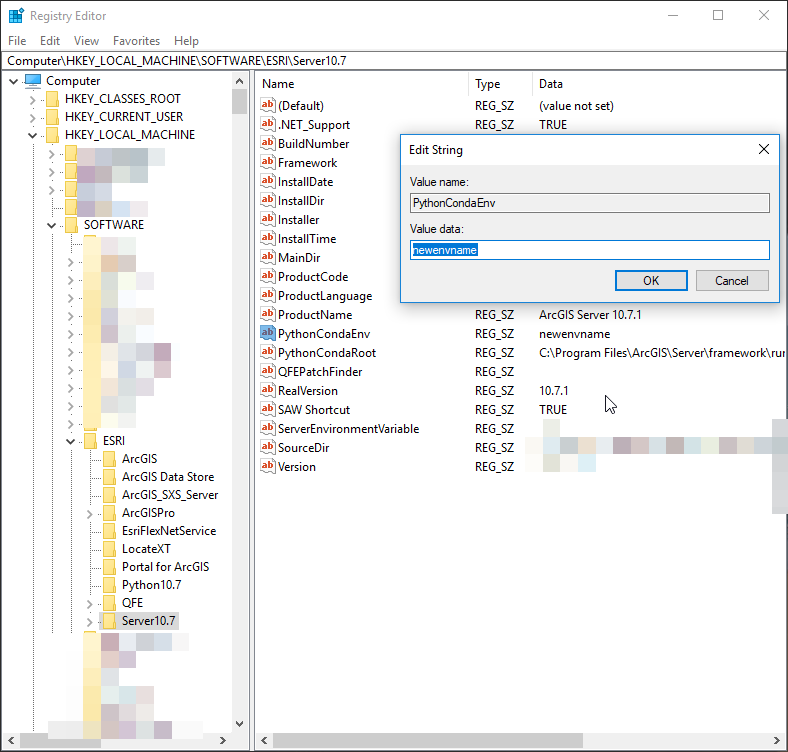
- If there is a PythonCondaEnv key in the Computer\HKEY_USERS\SID for ArcGIS Server Account\Software\ESRI\Server10.7 registry, delete that key. To determine the Security Identifier (SID) of the ArcGIS Server account, go to Computer\HKEY_LOCAL_MACHINE\SYSTEM\CurrentControlSet\Control\hivelist or Computer\HKEY_LOCAL_MACHINE\SOFTWARE\Microsoft\Windows NT\CurrentVersion\ProfileList.
- In the Computer\HKEY_LOCAL_MACHINE\SOFTWARE\ESRI\Server10.7 registry, update the value of the PythonCondaEnv key to the newenvname you just specified.

- Install the third-party Python packages by running conda install. Only use pip install if conda install is not available. Make sure the packages are installed in the correct environment.

- Restart the ArcGIS Server service on the Windows Task Manager Services tab or Windows Services. It will take a few minutes before all services are back online.
For additional information about using and working with conda, see the introduction to conda.
To add additional packages to the existing conda environment, follow these steps:
- Log in to your ArcGIS Server machine.
- From the start menu, open Python 3 Command Prompt. It may be in the ArcGIS Server folder, depending on your operating system.
- Run conda install for the packages that need to be deployed. Only use pip install if conda install is not available.
- Restart the geoprocessing service in ArcGIS Server Manager.
- Optionally restart the ArcGIS Server service on the Windows Task Manager Services tab. It will take a few minutes before all services are back online.
Services published from ArcGIS Desktop
Note:
The following steps are for geoprocessing services published from ArcMap and the arcpy module based on Python 2.7.
- Download the Windows 64-bit version of the package.
- Browse to your download location.
- Double-click the .msi or .exe file to install the package.
Custom packages are typically installed in the C:\Python27\ArcGISx6410.7\lib\site-packages directory.
Testing custom Python packages for services published from ArcGIS Desktop
To test that the package installed properly, write a Python script that imports the package you installed, and run the script. If you are unfamiliar with running stand-alone scripts, follow the steps below.
- Open the terminal window.
- Run the server's Python 2.7 with the script as an argument, for example, <ArcGISServer_InstallDir>/arcgis/server/tools/python ~/projectX/mytestscript.py.
Note:
The Python libraries installed by an ArcGIS Server (Linux) installation are Windows 64-bit Python. Therefore, you should always use the Windows path separator (\) for stand-alone Python scripts when accessing data and other Python modules. Also, be aware that there is a Z:\ directory that is mapped to the Linux system's /. In a Python script, you can access data and other Python modules using Z:\ mapping. For example, data in /myuser/myproject/data can be accessed using z:\myuser\myproject\data.
This does not apply to Python scripts you publish from ArcGIS Desktop, because that publishing process converts all paths to the correct format.