Disponible con licencia de Location Referencing.
The redline is a markup feature in the geodatabase that stores information about the proposed changes in the linear referencing system (LRS). The ArcGIS Event Editor web app can propose changes to the LRS through the Redline widget using redline routes.
LRS editors can then apply the redline as an official change to the LRS using ArcGIS Pipeline Referencing. The Redline Routes widget can be used to create, edit, and attach files to the redline routes. You can preconfigure redline activity types such as create route, extend route, realign route, realign concurrent route, calibrate route, retire route, reassign route, and so on.
For more information on redline routes, see the following:
To enable web redlining of routes using Event Editor, you should author a web map using ArcGIS Pro and include a redline feature class.
For detailed Event Editor web map authoring and configuration instructions, see the following:
- Configuring the ArcGIS Event Editor web app
- Authoring a web map for the ArcGIS Event Editor
- ArcGIS Event Editor deployment guide
Nota:
Attribute fields in the redline feature class for which the Event Editor web app user is unable to provide data must be made nullable. This makes the data content for those fields optional.
The web app can be configured to automatically detect the redline layer using the name of any operational layers that you have configured in the web map. The redline layer name must have the same as the redline feature class name (including prefix) to autodetect the redline layer.
Items to ensure before you start
Before you deploy redline route capability in the Event Editor app, ensure the following requirements are met:
- Feature access and linear referencing capabilities are enabled.
- The redline feature class has the m- and z-values disabled.
- Symbology is defined for the Activity Type field.
- The redline layer has a feature template defined.
Enabling feature access and linear referencing capabilities
If you're including the redline layer in the same map service as your network and event layers, in the Share As Web Layer pane, General tab, check the Feature check box under Map Image before publishing.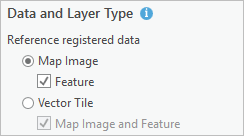
Nota:
Event Editor supports Esri web maps, which can have only one linear referencing-capable map service.
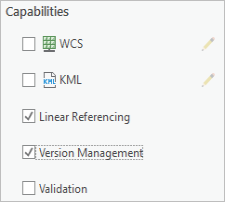
You must also check the Version Management and Linear Referencing capabilities in the Share As Web Layer pane, Configuration tab, before publishing.
Defining symbology for the Activity Type field
Set up the symbology for the redline feature class's Activity Types.
- Open the project file that contains the redline layer you want to configure.
- Choose the redline layer in the Contents pane of your map.
- In the Feature Layer section on the ArcGIS Pro ribbon, click the Appearance tab.
- In the Appearance tab, click the Symbology drop-down menu and choose Unique Values.
The Symbology pane appears.
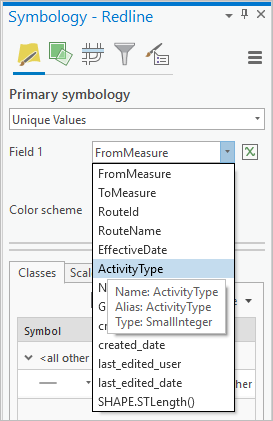
- Choose Activity Type in the Field drop-down menu.
- Choose the line symbology for each of the redline activity types by double-clicking the symbol for a row and updating its formatting.
The Format Line Symbol pane appears after double-clicking the symbol for a row.
- After configuring symbology for an activity type in the Format Line Symbol pane, click Return to primary symbology page until all of the activity type symbology is defined.
Deploying redline routes
Use the following steps to deploy redline routes for Event Editor:
Defining a feature template for the redline layer
The feature template for the redline layer is based on the feature symbology.
You can create new feature templates for your redline layer in ArcGIS Pro using the following steps.
- Open the Manage Templates pane using one of the following methods:
- On the Edit tab, in the lower right corner of the Features group, click the Manage Templates dialog box launcher
 .
. - In the Create Features pane, click Manage Templates
 .
.
The Manage Templates pane appears.
- On the Edit tab, in the lower right corner of the Features group, click the Manage Templates dialog box launcher
- Right-click the redline layer, and click Create all templates
 on the context menu.
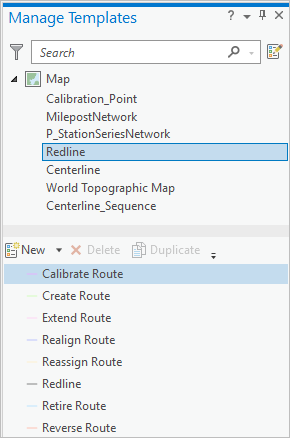
All feature templates for the map or layer are automatically generated and named to match the layer name or a unique symbol value.
Configuring redline activity types
You can configure redline activities using the following steps:
- Open the project file that contains the redline layer you want to configure.
- In the Catalog pane, browse to the redline feature class in your database.
- Right-click the redline feature class and choose Data Design > Domains.
The Domains pane appears in the Domains tab.
- On the Domains pane, click the dActivityType row.

The preconfigured activity types are listed on the right. You can edit the activity types in this section.
- Click Save on the Domains tab after making any edits.
Enabling redline attachments
You can configure redlines to contain attachments using the following steps:
- Open the project file that contains the redline layer you want to configure.
- Open the Catalog pane and browse to the redline feature class in your database.
- Right-click the redline feature class and click Manage.
The Feature Class Properties dialog box appears with the Manage tab active.
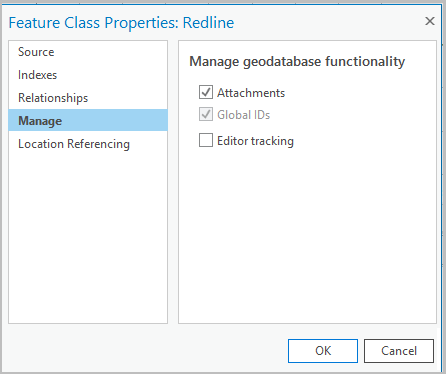
- With the Manage tab active, check the Attachments check box.
- Click OK.
The Redline_ATTACH and Redline_ATTACHREL tables are added to the geodatabase.
- Right-click the Redline_ATTACH table in the Catalog pane and choose Open Table to add an attachment.
The Redline_ATTACH table appears in a pane in the Table tab.
You can add one attachment per row.
- Click Save on the Table tab to save any attachment that you add.