Integrate the Geoportal with a Content Management System
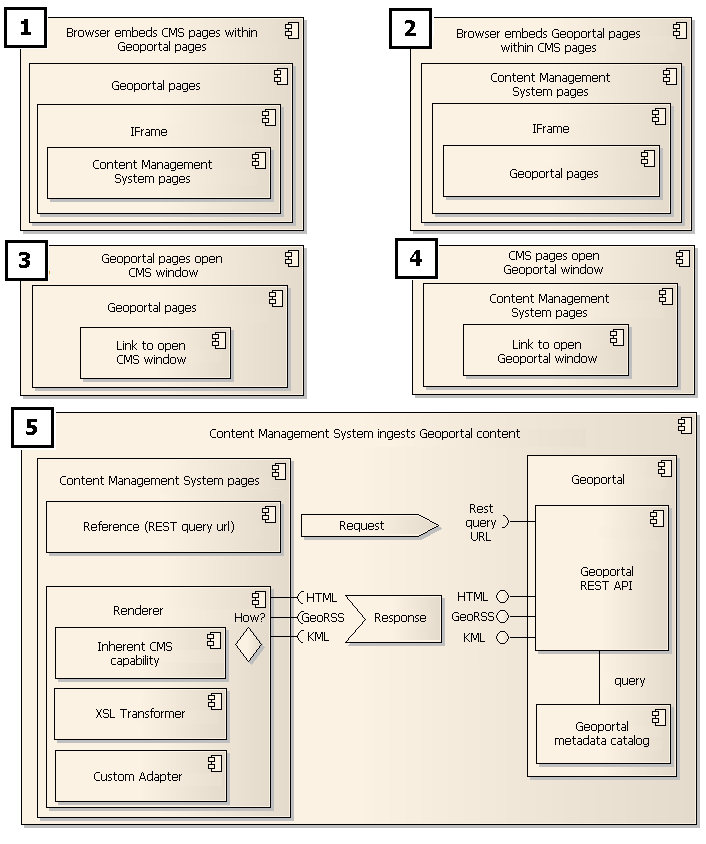
A Content Management System (CMS) is software that allows users to enter and change content on a website. There are a number of CMS available, and the Geoportal can be integrated within a CMS, or a CMS can be integrated within the Geoportal as a new tab. A CMS is not a requirement of the Geoportal, but integrating one can give a more directed view of the content of the geographic metadata catalog. CMS pages can highlight sets of geographic data and services that are applicable to certain user groups or topics. Several options are available for CMS integration, as illustrated in the figure below: 
- Option 1 - A browser can embed CMS web pages within Geoportal web pages through an HTML <iframe> tag. A typical approach would involve adding a tab to the Geoportal user interface that references a CMS starting page.
- Option 2 - Conversely, a browser can embed Geoportal web pages within CMS web pages through an HTML <iframe> tag. A typical approach would involve adding a tab to the CMS user interface that references a Geoportal starting page.
- Option 3 - Geoportal web pages could simply launch the CMS in a separate window by adding an HTML <a> tag to the Geoportal user interface.
- Option 4 - CMS web pages could simply launch the Geoportal in a separate window by adding an HTML <a> tag to the CMS user interface.
- Option 5 - The CMS could also ingest targeted content through the Geoportal Rest API. The Rest API allows for the submission of catalog query requests through a simple URL, and can return the results of the query in HTML, HTML fragment (no <html> header tag), GeoRSS, KML, or JSON format. As an example:
http://host:port/[GeoportalApplicationName]?searchText=maps&f=georss&max=100
This example search would be executed against the term maps and a GeoRSS response would be returned with a maximum of 100 records. The CMS would then render the response.
Using JSPWiki with Geoportal GeoRSS feeds
In this example, you will install JSP Wiki from the JSP Wiki site. After installing JSP Wiki, you will need to install the Rss Viewer plugin. Remember to restart your geoportal web application after installing the plugin jar files. Steps to create JSP Wiki page to fetch Geoportal RSS feeds are below:
- Install JSP Wiki.
- Create a new page in JSP Wiki into which you will insert GeoRSS feeds.
- Go to the edit mode of the page, and paste the string below into it. This change will insert GeoRSS feeds from your Geoportal. In the string, the url attribute should reference the REST result string for the search you want to display on the wiki page. For example, if you want the wiki page to display wildfire-related resources, the url parameter would look like the one in the example below. The parameters such as "detail", "ttl", "date", and "maxitems" are parameters defined by the plugin, and can be adjusted according to the syntax documentation on the Rss Viewer plugin page:
[{fr.univ.reunion.iremia.rss.RssViewer url='http://yourGeoportalserver/geoportal/rest/find/document?searchText=wildfire' detail='1' ttl='120' date='1' maxitems='20'}] - You can define more complex search results by using the REST syntax to specify extent, topic categories, dates, and more.
- Save the wiki page, exit the edit mode, and you will see a page displaying results corresponding to the search criteria you specified with the RssViewer url.
Using JSPWiki with Geoportal REST API
It is also possible to display your REST results using the Geoportal REST API. In this example, you will need to install an xslt-plugin.jar, and publish an xsl called IdentityTransform.xsl so that JSPWiki may have access to the xsl file. Steps are below:
- Install JSP Wiki.
- Install the JSP Wiki xslt_plugin.jar:
- Go to the Attach tab on the website, and copy the xslt_plugin.jar file into your \\JSPwiki\WEB-INF\lib folder.
- Add the following entry to your jspwiki.properties file in the Plugin search paths section:
#############################################################################
#
#  Plugin search paths.
#
#  Define here the packages you want to use for searching plugins,
#  separated with commas.
#  For example, use the following command to add "org.myorganisation.jspwiki.myplugins"
#  and "com.foobar.myplugins" to the search path.
#
#  The default path is "com.ecyrd.jspwiki.plugins", and it will be always
#  the last item on the path.  This allows you to override JSPWiki default
#  plugins.  Note that you are only adding to the path, not replacing it (ie.
#  the default path is never removed.)
#
#  jspwiki.plugin.searchPath = org.myorganisation.jspwiki.myplugins,com.foobar.myplugins
#
jspwiki.plugin.searchPath =net.panonet.XSLTPlugin
- Create the IdentityTransform.xsl file, and save it to your JSPWiki folder. You can name the file whatever you want, as long as you reference it in your JSPWiki. The text for the file is:
<?xml version="1.0" encoding="UTF-8"?> <xsl:stylesheet version="1.0" xmlns:xsl="http://www.w3.org/1999/XSL/Transform" xmlns:fo="http://www.w3.org/1999/XSL/Format"> <xsl:output method="text"/> <xsl:template match="/"> <xsl:for-each select="//item"> <div> <xsl:text><a </xsl:text> href="<xsl:value-of select="link/@href"/>" target="_blank"<xsl:text> ></xsl:text> <xsl:text><h4></xsl:text> <xsl:value-of select="title"/> <xsl:text></h4></xsl:text> <xsl:text></a></xsl:text> <p> <xsl:value-of select="description"/> </p> <xsl:text><br></xsl:text> </div> </xsl:for-each> </xsl:template> </xsl:stylesheet>
- Now you will create a new JSP wiki page, and integrate the Geoportal REST API results within it.
- Create the JSP wiki page.
- Go to the edit mode of the page.
- Paste the string below into it. The xml= parameter will need to have the URL of your search result page for the Geoportal REST API results, and the xsl= parameter will need to reference the URL to your published IdentityTransform.xsl.
[{INSERT net.panonet.XSLTPlugin WHERE xml='{url to document (or search result page) of Geoportal REST API}', xsl='{url to IdentityTransform.xsl}'}]For example:Wildfire Metadata[{INSERT net.panonet.XSLTPlugin WHERE xml='http:// yourGeoportalServer /geoportal/rest/find/document?searchText=wildfire*', xsl='C:/Tomcat/webapps/JSPWiki/channelPage.xsl'}]
- Save the page, exit the edit mode, and you will see search results in the page that correspond to the REST url you input to the XSLTPlugin.