Location Referencing ライセンスで利用可能です。
The redline is a markup feature in the geodatabase that stores information about the proposed changes in the linear referencing system (LRS). Event Editor web app can propose changes to the LRS through the Redline widget using redline routes. LRS editors can then apply the redline as an official change to the LRS using ArcGIS Pipeline Referencing. The Redline Routes widget can be used to create, edit, and attach files to the redline routes. You can preconfigure redline activity types such as create route, extend route, realign route, realign concurrent route, calibrate route, retire route, reassign route, and so on.
For more information on redline routes, see the following:
To enable web redlining of routes using Event Editor, you should author a web map using ArcMap and include a redline feature class. You can achieve this in one of the following ways:
- Include the redline layer in the same map service along with your routes and event layers.
- Create a separate map service for the redline.
注意:
The redline layer name must match the feature class name, including the prefix. By default, when a layer is added to a map, the alias is used; however, the web layer name needs to match the feature class name.
For detailed Event Editor web map authoring and configuration instructions, see the following:
- Configuring the Event Editor web app
- Authoring a web map for the Event Editor
- Event Editor deployment guide
備考:
In the redline feature class, those attribute fields for which the Event Editor web app user may be unable to provide data must be made nullable. Doing so will make the data content for those fields optional.
The web app can be configured to automatically detect the redline layer using the name of any operational layers that you have configured in the web map. The redline layer name must have the same as the redline feature class name (including prefix) to autodetect the redline layer.
Items to confirm before you start
Before you deploy redline route capability in Event Editor, ensure the following requirements are met:
- Feature access and linear referencing capabilities are enabled.
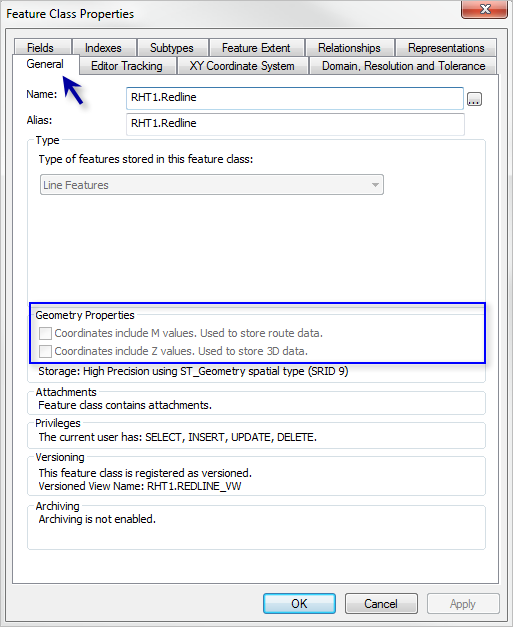
- The redline feature class has the m- and z-values disabled.
- Symbology is defined for the Activity Type field.
- The redline layer has a feature template defined.
Enabling feature access and linear referencing capabilities
- If you're including the redline layer in the same map service as your network and event layers, make sure to enable the Feature Access and Linear Referencing capabilities when publishing the map service using ArcGIS Pipeline Referencing for Server.
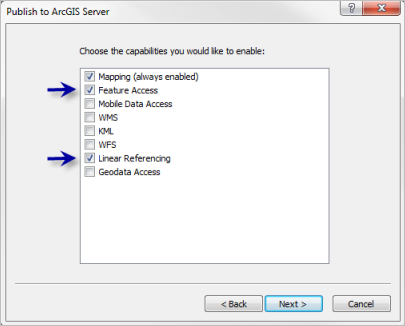
- If you're publishing the redline layer separately, make sure to enable only the Feature Access capability when publishing the map service using Pipeline Referencing for Server.
備考:
Event Editor supports Esri web maps, which can have only one linear referencing-capable map service.
Disabling m- and z-values for the redline feature class
The redline feature class should have the capability to store disabled m- and z-values. To validate this, perform the following steps:
- ArcCatalog を起動します。
- Browse to the redline feature class in your geodatabase.
- Right-click the redline feature class and click Properties.
The Feature Class Properties widget appears.
- Click the General tab.
- Confirm that both check boxes in the Geometry Properties section are unchecked.
Defining symbology for the Activity Type field
Set up the symbology for the redline feature class's activity types.
- Open the .mxd file that contains the redline layer.
- Right-click the redline layer in the table of contents and click Properties.
- Click the Symbology tab.
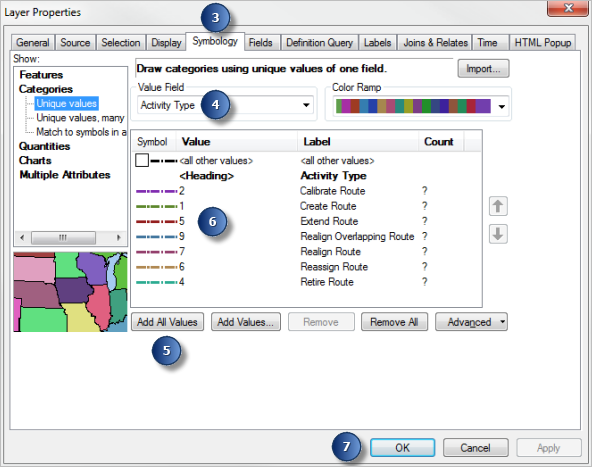
- Choose Activity Type in the Value Field list.
- Click Add All Values.
- Choose line symbology for various redline activity types.
- [OK] をクリックします。
Defining a feature template for the redline layer
The feature template for the redline layer should be based on the feature symbology.
編集セッションを開始していないときは、マップ内のどのレイヤーについてでも新しいフィーチャ テンプレートを作成できます。テンプレート オーガナイザを開いて、このウィザードを実行するには、[コンテンツ] ウィンドウでレイヤーを右クリックし、[フィーチャ編集] をポイントして [フィーチャ テンプレートの整理] をクリックします。
- [フィーチャ作成] ウィンドウで、[テンプレートの整理]
 をクリックします。
 - [フィーチャ テンプレートの整理] ダイアログ ボックスで [新規テンプレート]
 をクリックします。
 - 新規テンプレートを作成する対象のレイヤーをオンにします。
- [次へ] をクリックします。
- サブタイプがあるレイヤー、またはカテゴリによってシンボル表示されているレイヤーに対しては、テンプレートを作成する対象のクラスを選択します。
- [完了] をクリックします。
備考:
レイヤーが単一のシンボルとしてシンボル表示される場合、ウィザードは 1 つのステップで終了します。
Deploying redline routes
Use the following steps to deploy redline routes for Event Editor:
- Configuring redline activity types
- Configuring a separate redline service
- Enabling redline attachments
Configuring redline activity types
You can configure redline activities using the following steps:
- ArcMap を起動します。
- Open the Catalog window and browse to the redline feature class in your database.
- Right-click the redline feature class and click Properties.
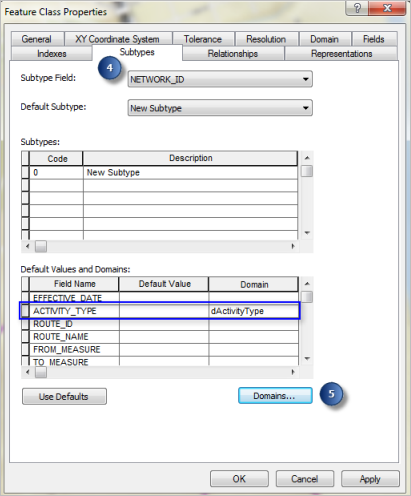
- Click the Subtypes tab.
備考:
The domain assigned to the ACTIVITY_TYPE field is dActivityType.
- Click Domains.
- On the Workspace Domains widget, click the dActivityType domain name.
You'll see preconfigured activity types in the form of coded domains for redlines in the Coded Values section. You can edit the activity types in this section.
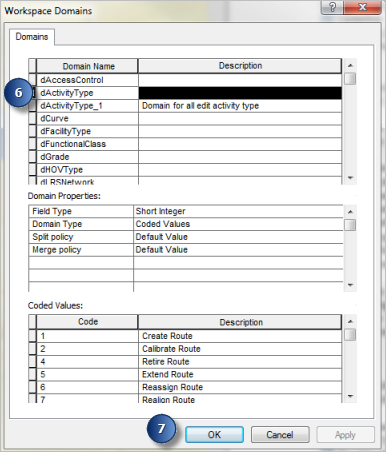
- Click Apply and click OK to close the Workspace Domains widget to save the edits.
Configuring a separate redline service
If you don't want to enable feature access to all your LRS event layers, you can publish your redline layer separately so that it is the only layer that is editable.
備考:
If you publish the redline layer in a separate service from the other LRS layers, you need to publish using the same geodatabase version as the LRS map service.
- Publish a map service with the Feature Access capability that only contains the redline layer.
- Open the web map .json file in a text editor.
- Add an additional operational layer to the .json file for the redline map service that you just published.
{
  "operationalLayers": [
  {
  "id": "LRS_map_service",
  "title": "LRS map",
  "url": "https://<servername.domain>.com/server/rest/services/EventEditorLRSService/MapServer"
  },
  {
  "id": "Redline Layer",
  "title": "LRS map",
  "url": "https://<servername.domain>.com/server/rest/services/EventEditorRedlineService/MapServer"
  }
 ],
Learn more about the web map .json file and web map specifications for the Map Service Layer
備考:
If you're using Portal for ArcGIS or ArcGIS Online and you save Event Editor as a web map, both your LRS layers and your separate redline layer will be automatically added to the web map.
Enabling redline attachments
You can enable redlines to contain attachments using the following steps:
- ArcMap を起動します。
- Open the Catalog window and browse to the redline feature class in your database.
- Right-click the redline feature class and click Attachments > Create Attachments.
Attachments are enabled for redlines.