Location Referencing ライセンスで利用可能です。
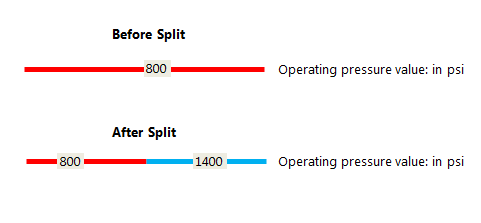
The Split Events tool is used to split a line event into two adjoining events. You can edit the attributes of the split events before selecting the location to split. On successful implementation, the resulting split events get new event IDs, and the input event retires.
備考:
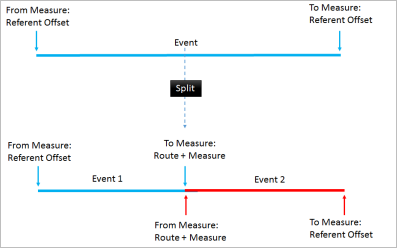
If a line event that uses the referent offsets method to get the start and end measure values is split into two adjoining events, the resulting split events get new event IDs, and the original event retires. The first event will retain the referent offset method value for the start measure value, but will use the route and measure method to get the new end measure value. The second event will use the route and measure method to get the start measure value and will use the referent offset method value as its end measure value.


- Event Editor を開き、サイン インが要求されたら、ArcGIS 組織にサイン インします。
- [編集] タブをクリックします。
- In the Edit Events group, click the Split Events button
 .
.The Split Events widget appears.
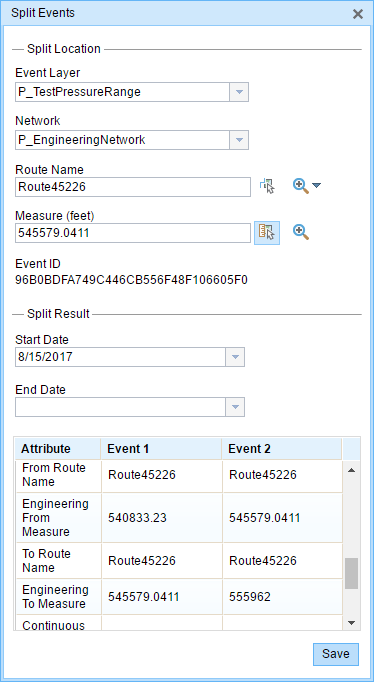
- In the Split Location section, choose an event layer on which to work by clicking the Event Layer drop-down arrow.

- The LRM to which the event is registered is automatically specified under the Network option, but you can choose the LRM by clicking the drop-down arrow.
- Type a route name in the Route Name text box on which the new event measure will be based.
- Click the Select From Measure on the Map button
 to select a point on an event from the selected route.
The event will be split into two events on either side of the point. Alternatively, you can type a measure value in the text box. The event underlying the measure value of the route will be split into two.
The records/attributes of the split event appear in the Split Result area.
- [開始日] と [終了日] カレンダー コントロールをクリックし、イベントの開始日と終了日を選択します。
開始日のデフォルト設定は当日の日付ですが、日付ピッカーを使用して別の日付を選択することもできます。 終了日は任意で設定します。
- 白色のフィールドを編集できます。
The gray fields are disabled and not editable.
備考:
コード値、範囲ドメイン、サブタイプは、属性値テーブルのフィールドに対して構成されている場合にサポートされます。
- Click Save to split the records.
編集されたイベントが保存されると、右下に確認メッセージが表示されます。
ヒント:
[マップ上でルートを選択] ボタン  をクリックし、マップ上のルートを選択することもできます。
Editing with conflict prevention enabled
When conflict prevention is enabled, you can split an event after acquiring locks under these conditions:
- No one has a lock on the event layer in any versions of the feature service for the route on which the events will be located.
- You already have an event lock on the event layer in which you're currently working.
- You already have a lock on the route on which the event resides in the same version in which you're currently working.
- You already have a lock on the concurrent route of another network in the same version in which you're currently working.
- You can edit an event layer if other events along the same route have locks acquired by different people in different versions.
When conflict prevention is enabled, you can't split an event under these conditions:
- The event layer is already locked by another person for the route on which the event is located.
- The event layer is already locked by you for the route on which the event is located but in a different version.
- The route on which the event resides is already locked by another person.
- The route on which the event resides is already locked by you but in a different version.
- The concurrent route on another network is already locked by you in another version or by a different person in a different version.