Location Referencing ライセンスで利用可能です。
During pipe replacement, the events that were part of the replaced pipe can be left as is, retired, or retired and replaced using the Event Replacement widget.
The Event Replacement widget provides an interface to replace events in the database. You can also use referent offset data and stationing to add events to routes. The referent offset data is translated to routes and measures for storage.
Before performing event replacement, use the Configure Event Replacement widget to configure the events that can be retired, replaced, or left as is. For more information, see Configuring event replacement.
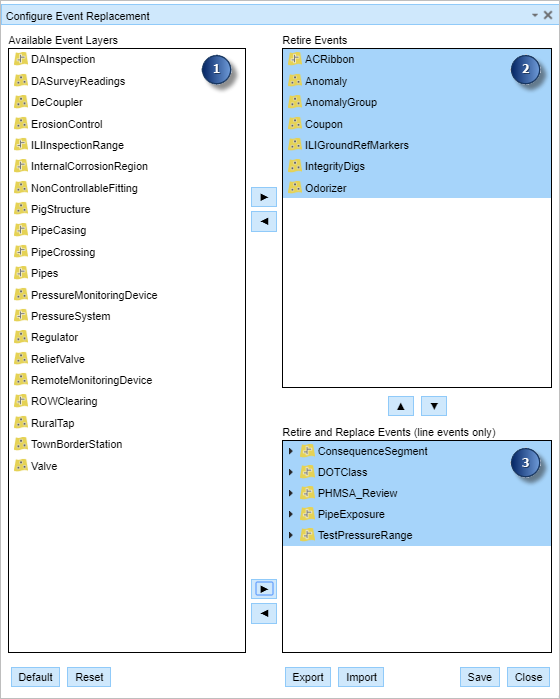
For this workflow example, you’ll use the event replacement configuration shown in the following image:

All line events and point events available in the map service are listed in the Available Event Layers list before configuration.
The following are the three event replacement outcomes for events in the map service:
- The events in the Available Event Layers list (section 1 in the previous image) will be left as is.
- The events in the Retire Events list (section 2 in the previous image) will be retired using the date provided in the Event Replacement widget. Retirement is valid for both point and line events.
- The events in the Retire and Replace Events list (section 3 in the previous image) will be retired and created anew using the dates provided in the Event Replacement widget. Only line events can be retired and replaced.
メモ:
The events in the three sections of the Configure Event Replacement widget are exclusive.
Use the following steps to replace events:
- ArcGIS Event Editor を開き、サイン インが要求されたら、ArcGIS 組織にサイン インします。
- [編集] タブをクリックします。
- In the Edit Events group, click the Event Replacement button
 .
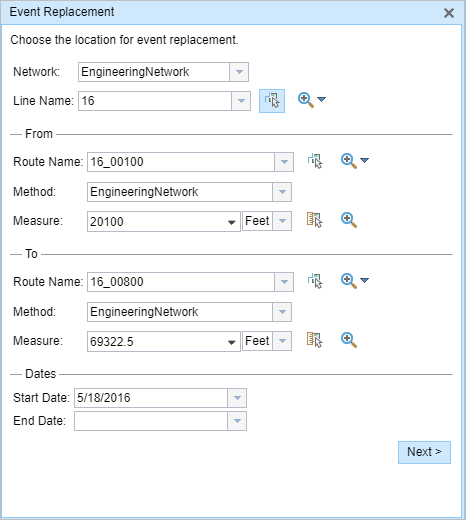
.The Event Replacement widget appears.

- Click the Network drop-down arrow and choose the network that will serve as a source LRM for defining the input measures for the events that will be retired or replaced.
メモ:
The network is an LRS Network published as a layer in ArcGIS Event Editor. You can specify the LRS Network to be used as the LRM for defining the start and end measures of the new linear event or for the events to be retired. ArcGIS Event Editor also accepts measures in a network other than the one with which the linear event layer is associated.
- Choose the name of the line feature on which the events will be located in the Line Name text box.
Click the Select a Line on the Map tool
 and select the line from the map.
ヒント:
If the selected line is not in the active view of the map, click the Zoom to the route extent or center on the route start or end point on the Map button
 to refresh the map display to zoom in to the entire extent of the selected line.
The line is highlighted in light blue. The arrow at the end shows the direction of calibration of the line.
- In the Route Name text box, use one of the following to choose the route where the replacement’s From measure value will be located:
- Type the route's name.
- Click the Select a Route on the Map button
 to select the From measure value along the route on the map.
メモ:
Only routes that are part of the selected line will appear.
- In the From section, click the Method drop-down arrow and choose the first option (with the suffix Network).
メモ:
You can use a combination of any of the following methods to locate the From measure and To measure. For example, you can use the Select a Location on the Map tool to choose the From measure value, and use the reference offset from an intersection to define the To Measure value along the route on the map.
The methods to locate the From and To measures are the same as those available for the Add Line Events and Add Point Events widgets.
Methods for locating the measures
Method Description Additional feature classes needed in the map service Additional information Route and measure
The measure is located based on the measure values from the chosen route.
None
Intersection offset
The measure is located at an offset distance from an intersection at a chosen route.
Intersection layer registered with the chosen network.
Point offset
The measure is located at an offset distance from a point event located at a chosen route
Point event registered with the chosen network.
Creating a starting station, then offset
A temporary engineering station is created on a route with a station value. The measure is located at an offset distance (using a station value) from the station.
None
Adding linear events by creating a starting station and then offset
Identifying a starting station, then offset
A starting or base station is identified from the stationing points on the map. The start or end of the event is located at an offset distance (using a station value) from the base station.
Stationing event registered with the chosen network.
Adding linear events by identifying a starting station and then offset
Adding linear events by coordinate location
The measure is located at an offset distance from a coordinate location
None
Length
Only available to locate the To measure value. The measure is located at an offset distance from the From measure location.
None
Adding linear events using an offset from the From measure location
- Choose the From measure for the event replacement along the route using any of the following options:
- Type the value in the Measure text box.
- Click the Select a Location on the Map button
 to select the From measure value along the route on the map.
 - Click the Measure drop-down arrow to select either Use the Route Start or Use the Route End as the From measure value for the event.
ヒント:
If you type the From measure value, you can choose the unit for that value using the drop-down arrow. The From measure value will be converted to LRS units before saving the newly added events. For example, the LRS is in miles and you typed 5280 feet as the From measure value. The newly added events will have a From measure value of 1 mile, because 5280 feet equals 1 mile.
A green plus symbol appears at the selected location on the map.
- In the Route Name text box, use one of the following to choose the route where the replacement’s To measure value will be located:
- Type the route's name
- Click the Select a Route on the Map button
 to select the To measure value along the route on the map.
- Choose the To method by clicking the Method drop-down arrow.
メモ:
Refer to the Methods for locating the measures table in step 7 to determine which To section method to use with the From section method.
- Choose the To measure for the event replacement along the route using any of the following options:
- Type the value in the Measure text box.
- Click the Select a Location on the Map button
 to select the To measure value along the route on the map.
 - Click the Measure drop-down arrow to select either Use the Route Start or Use the Route End as the To measure value for the event.
A red cross symbol appears at the selected location on the map.
メモ:
The events located between the From measure and To measure will be as follows:
- Retired—The events in the Retire Events list (section 2 in the example event replacement configuration image)
- Retired and re-created—The events in the Retire and Replace Events list (section 3 in the example event replacement configuration image)
- Use one of the following to choose the date that will define the start date of the events that are replaced.
- Click the Start Date drop-down arrow to choose the start date using a calendar.
- Type the date in the Start Date text box.
メモ:
The start date will be used as follows:
- Retirement Date—For events in the Retire Events list (section 2 in the example event replacement configuration image)
- Retirement Date—For events in the Retire and Replace Events list (section 3 in the example event replacement configuration image)
- Start Date—For the replacement events in the Retire and Replace Events list (section 3 in the example event replacement configuration image)
- Choose the date that will define the end date of the events that are replaced.
- Click the End Date drop-down arrow to choose the end date using a calendar.
- Type the date in the End Date text box.
メモ:
The end date will be used as the end date for the replacement events in the Retire and Replace list (section 3 in the example event replacement configuration image).
- Click Next.
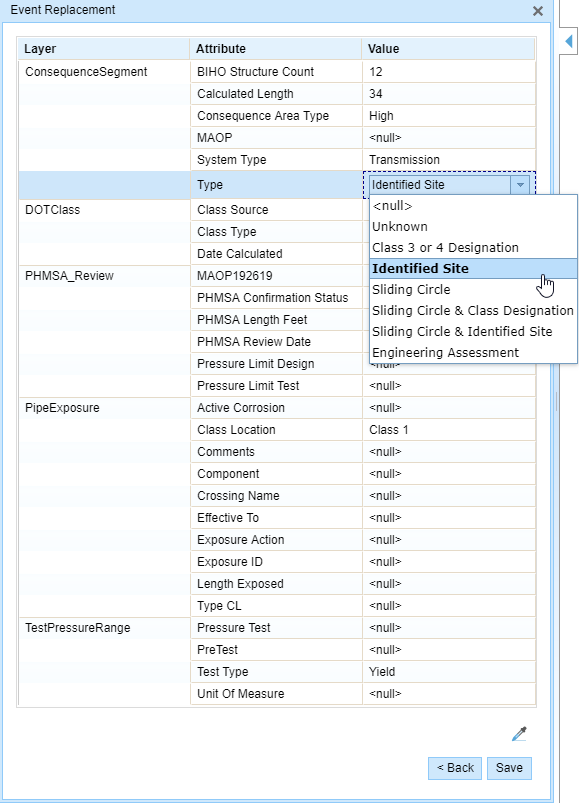
The tab showing the attribute fields for the replacement events appears.

Event Replacement attributes are editable. メモ:
The Save button appears instead of Next if there are no events configured to replace. Clicking Save will retire the events for the chosen route measures and time.
If no events are configured to retire or retire and replace, a message appears indicating there's nothing to retire or replace when you click Save.
For more information, see Configuring event replacement.
- Type the attribute information for the new events in the tables defined by attribute sets.
ヒント:
[属性値をコピー] ツール
 を使用し、別のルートからイベント属性をコピーします。 ツールを使用して、マップ上のルートをクリックし、イベント属性をコピーします。
 - Click Save on the Attribute tab to complete the event replacement for the specified route or route segment.
- The events in the Retire Events list (section 2 in the example event replacement configuration image) are retired.
- The events in the Retire and Replace Events list (section 3 in the example event replacement configuration image) are retired, created anew, and displayed on the map.
Editing with conflict prevention enabled
When conflict prevention is enabled, you can edit events after acquiring locks for event layers present in the Configure Event Replacement widget under these conditions:
- No one has a lock on the event layers in the Configure Event Replacement widget in any version of the feature service for the route on which the events will be located.
- You already have an event lock on event layers in the Configure Event Replacement widget in the same version of the feature service in which you're currently working.
When conflict prevention is enabled, you can't edit the events present in the Configure Event Replacement widget under these conditions:
- Some or all of the event layers present in the Configure Event Replacement widget are already locked by a different person for the route on which the event will be located.
- Some or all of the event layers present in the Configure Event Replacement widget are already locked by you but in a different version.
- The route on which the event will be located is already locked by a different person.
- The route on which the event will be located is already locked by you but in a different version.