Formatting the report structure
Roadway Reporter allows you to format the output of your report by allowing you to change column headers and column order for the Adobe PDF and CSV file output formats. In addition, for PDF reports, there are a number of additional formatting options including page orientation, adding a header, footer, page number, date, font face and size for text, width and orientation of columns, and whether or not to include table borders and alternating row colors.
- On the Report Fields page, type a title for the report in the Report Title text box.
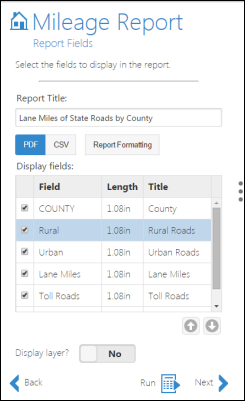
Report fields - Click on the appropriate PDF or CSV file output.
Примечание:
If a report is output to a CSV file, you can open your output in Excel and do further formatting to your report.
- Edit the column headers of the summary fields by double-clicking the cell under the Title column.
- You can edit the length of the summary columns by double-clicking the cell under the Length column.
- You can change the order of the fields in the report using the arrows in conjunction with selecting the desired row to move the order up or down.
- Click Report Formatting to format the report.
- This is an optional step. If you do not format the report, default format selections will be used.
- Formatting is only valid when you choose PDF as an output.
Configuring report format
Report formats can be configured for mileage and segment reports when you choose PDF as an output. The graphic below is an example of a mileage report that has been produced using Roadway Reporter. In this example, -the title, subtitle, header, footer, page number, date and time stamp, font, notes, and alternating row colors are configured.
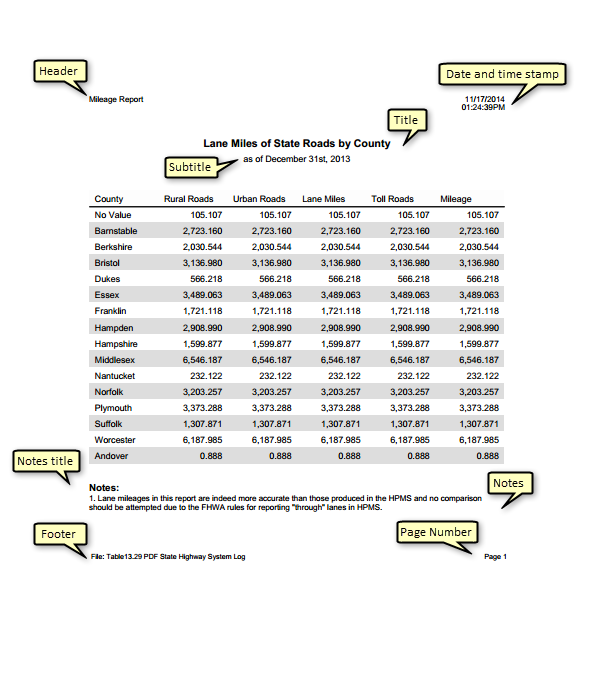
The following can be configured for reports in Roadway Reporter:
Title
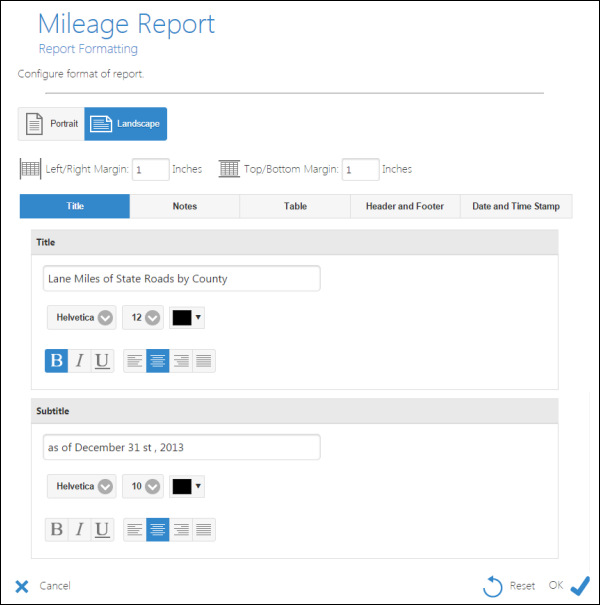
- Click the Title tab.
- Browse to the Title subsection. Use the text field to add or edit the title of your report.
- Use the drop-down arrow to select a font and font size.
By default, the font is set to Helvetica and the font size is 12.
- Use the drop-down arrow to select a color from the color picker and click Choose.
- Select the font style.
By default, the style is set to bold.
- Select the alignment of your content.
By default, the alignment is set to center.
- Browse to the Subtitle subsection. Use the text field to edit the subsection.
- Follow steps 2 to 7 to select font, style, size, color, and alignment.
Notes
- Click the Notes tab.
- Specify the placement of your note.
- Start of the report—Your note will be placed at the beginning of the report.
- End of the report—Your note will be placed at the end of the report.
- Browse to the Title subsection. Use the text field to add or edit the title of your note.
- Use the drop-down arrow to select a font and font size.
By default, the font is set to Helvetica and the font size is 11.
- Use the drop-down arrow to select a color from the color picker and click Choose.
- Select the font style.
- Select the alignment of your content.
- Browse to the Notes subsection and add a note in the text field.
- Use steps 4 to 7 to select font, style, size, color, and alignment.
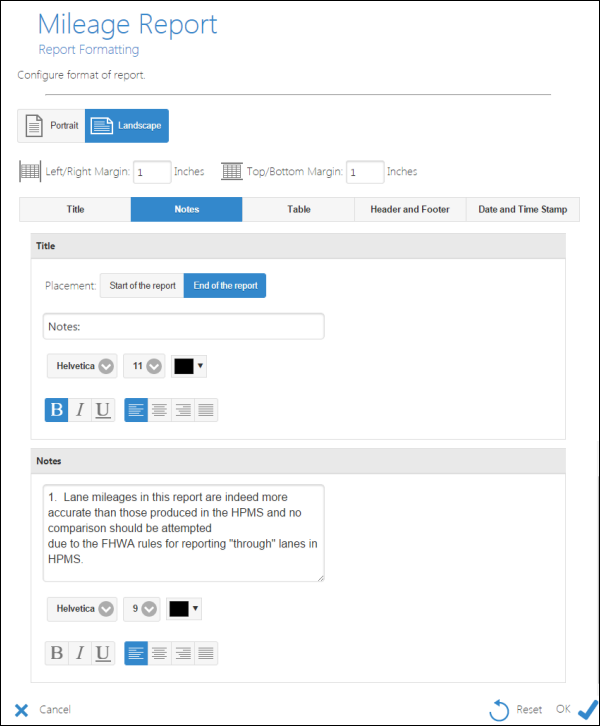
Add notes to the report,
Table
- Select the Table.
- Browse to the Summary Fields subsection.
- Use the drop-down arrow to select a font and font size.
By default, the font is set to Helvetica and the font size is 10.
- Use the drop-down arrow to select a color from the color picker and click Choose to specify a font color.
- Select the font style.
- Select the alignment of your content.
- Use the drop-down arrow to select a color from the color picker and click Choose to specify the Background Color.
- Optionally select Yes if you'd like to place a thicker line to the right.
- Browse to the Column Headers subsection.
- Use steps 3 to 7 to select font, style, size, color, and alignment.
- Browse to the Table subsection.
- Use steps 3 to 7 to select font, style, size, color, and alignment.
- Specify a preference for borders:
- All Borders—Adds borders to all columns and rows in your report.
- No Border—Does not add borders to the columns and rows in your report.
- If you'd like to enable alternate shades in rows, use the slider to select Yes.
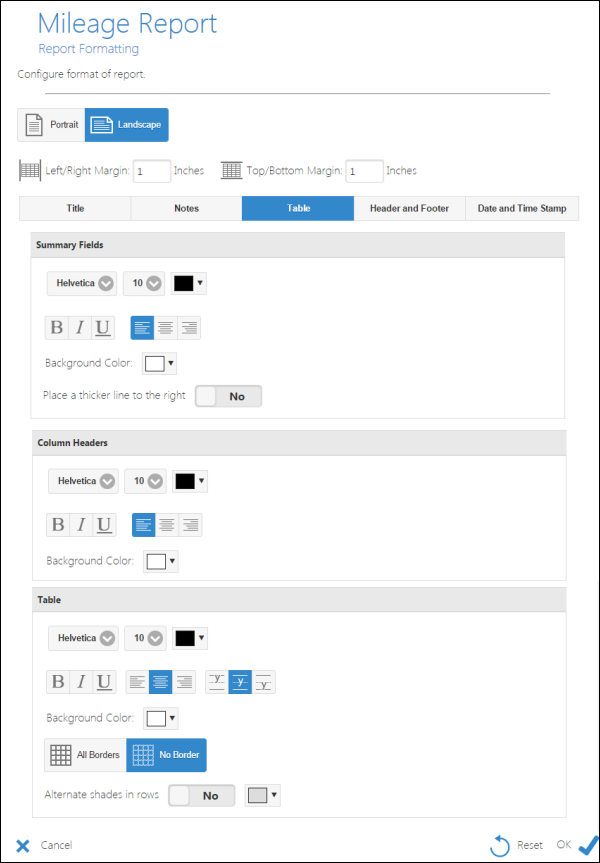
Format the table.
Header and Footer
- Select the Header and Footer tab.
- Browse to the Header subsection.
- Use the drop-down arrow to select a font and font size.
By default, the font is set to Helvetica and the font size is 9.
- Use the drop-down arrow to select a color from the color picker and click Choose to specify a font color.
- Select the font style.
- Select the alignment of your content.
- Optionally add a date and time stamp by using the slider to select Yes.
- Optionally add page numbers by using the slider to select Yes. Specify a format for page numbers:
- 1
- Page 1
- Page 1/10
- Browse to the Footer subsection.
- Use steps 3 to 8 to select font, style, size, color, alignment, date and time stamp, and page numbers.
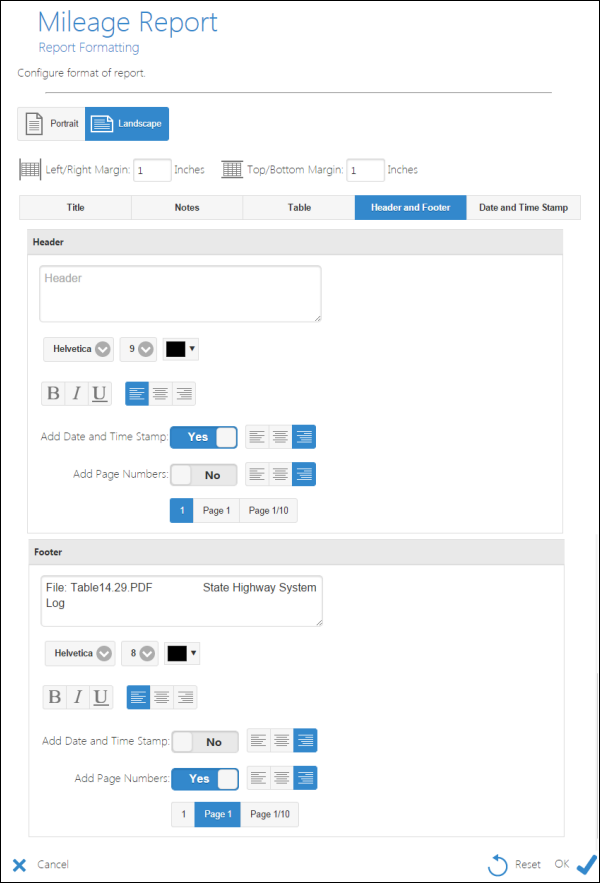
Add header and footer.
Date and Time Stamp
- Select the Date and Time Stamp tab.
- Select a place in the body:
- None—No date and time stamp will be added to the report.
- Start of the report—The date and time stamp will be added to the start of the report.
- End of the report—The date and time stamp will be added to the end of the report.
- Use the drop-down arrow to specify the font and the font size of the date and time stamp.
- Use the drop-down arrow to select a color from the color picker and click Choose to specify a font color.
- Select the font style.
- Select the alignment of your content.
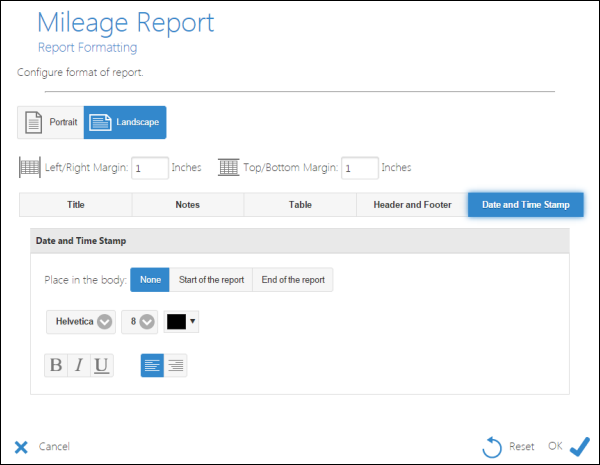
Add the date and time stamp.
Once you have finished, click OK to save the report formatting or click Reset to restore default settings.