Derive New Locations is used to create new features based on a query. A query is made up of one or more expressions. There are two types of expressions: attribute and spatial.
Note:
The main difference between the Find Existing Locations tool and the Derive New Locations tool is that the result of Derive New Locations can contain partial features.
- In both tools, the attribute expression where and the spatial expressions completely within and completely contains return the same result. This is because these expressions return entire features.
- When intersects or within a Distance of is used, Derive New Locations creates new features in the output result layer.
An example of an attribute expression is the name of a National Park must be Yellowstone (where Name = 'Yellowstone NP'). An example of a spatial expression is that the National Park boundary must intersect with features in a layer of lynx habitat (National Parks intersects Lynx Habitat). The result of this spatial expression is shown in the graphic below.
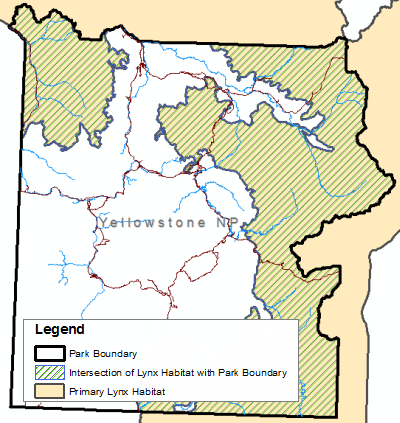
After you build your query, click Run Analysis. Your result layer will contain newly derived features that meet the conditions of your query.
Building expressions
To build an expression, click the Add Expression button to open the Add Expression dialog box.
Attribute expressions
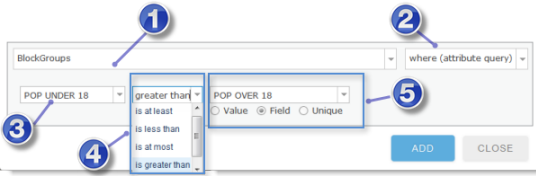
 | Layers you can use in the expression are listed here. All layers in the table of contents will be available. |
 | This is the expression type. For attribute expressions, choose where (attribute query). |
 | Choose the field you want to query against from the list. |
 | Choose an operator for the expression. |
 |
|
Note:
- If any of your layers has a filter applied, only those features that meet the filter expression will be used in the analysis.
Spatial expressions
Spatial expressions are created by choosing expression types such as completely within or intersects (the complete list can be found below).
When you choose a spatial expression type, the Add Expression dialog box changes depending on the expression type you choose.

 | The first layer. |
 | The spatial expression type. See below for details about each of the spatial expression types. |
 | The second layer. These are the other layers in your map. |
Example of a completed query
Here is an example query borrowed from the book The Esri Guide to GIS Analysis. In this example, the goal is to derive new areas that would be prime locations for mountain lion habitat based on a series of criteria. The criteria for prime mountain lion habitat is:
- Mountain lions prefer steep terrain.
- Terrain must be covered by forest.
- Location must be within 2,500 feet of a stream.
- Location must be at least 2,500 feet from highways.
Below is an illustration of the Derive New Locations query based on the above criteria using layers named Vegetation, Slope, Streams and Highways: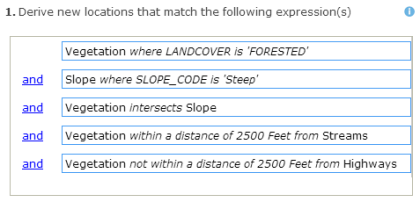
Notes:
- The order of the expressions does affect the result of the analysis.
- You can group and ungroup expressions by clicking the group and ungroup buttons
 . In order to create groups, select two or more expressions and click the group button. More information about groups can be found below.
 - Clicking
 switches the operator to
  . Clicking
  switches the operator to
  .
.
Spatial expression types
A spatial expression establishes a relationship between two layers. If you need to establish a spatial relationship between features in the same layer (for example, you want to select vacant parcels within a distance of industrial parcels), copy the parcels layer and add it to your map so you have two layers using the same parcel features.
Within a distance of / Not within a distance of

The within a distance relationship uses the straight-line distance between features in the first layer to those in the second layer.
- Within a distance of—New features are derived from the portion of the feature in the first layer that are within the specified distance of a feature in the second layer; for example, only those portions of parcels within 100 meters of a river will be included in the output.
- Not within a distance of— New features are derived for the portions of features in the first layer that are not within a distance of another feature; for example, parcels within 100 meters of a river will not be included in the output. You can think of this relationship as is farther away than.
Note:
- Distances are calculated between the closest parts of features. In the example above, where vegetation had to be within 2,500 feet of the streams, new areas are created for the portions of the vegetation layer that are within 2,500 feet.

Completely contains / Does not completely contain

A feature in the first layer passes this test if it completely surrounds a feature in the second layer. No portion of the contained feature can be outside the containing feature; however, the contained feature is allowed to touch the containing feature (that is, share a common point along its boundary).
- Completely contains—If a feature in the first layer contains a feature in the second layer, the feature in the first layer is included in the output.
- Does not completely contain—If a feature in the first layer contains a feature in the second layer, the feature in the first layer is excluded from the output.
Examples:
- You have a layer of parcels (the first layer) and another layer of points representing wells (the second layer), and you want to find parcels that contain wells. You would use completely contains to find parcels containing wells.
- You have a layer of parcels and a layer of points representing toxic waste sites. You want to find parcels that do not contain toxic waste sites. You would use does not completely contain to find parcels that do not contain toxic waste sites.
Note:
- You can use the contains relationship with points and lines. For example, you have a layer of street centerlines (lines) and a layer of manhole covers (points), and you want to find streets that contain a manhole cover. You could use completely contains to find streets that contain manhole covers, but in order for a line to contain a point, the point must be exactly on the line (that is, in GIS terms, they are snapped to each other). If there is any doubt about this, use the within a distance of relationship with a suitable distance value.
Completely within / Not completely within

A feature in the first layer passes this test if it is completely surrounded by a feature in the second layer. The entire feature in the first layer must be within the containing feature; however, the two features are allowed to touch (that is, share a common point along its boundary).
- Completely within—If a feature in the first layer is completely within a feature in the second layer, the feature in the first layer is included in the output.
- Not completely within—If a feature in the first layer is completely within a feature in the second layer, the feature in the first layer is excluded from the output.
Examples:
- You have a layer of houses for sale (points) and a layer containing a particular school district, and you want to only find houses that are completely within the school district.
- You have a layer of vacant parcels (the first layer) and another layer of city boundaries (the second layer). Your task is to find vacant parcels that are outside city boundaries. You would use not completely within to find parcels not within (that is, are outside) any city boundary.
Note:
- You can use the within relationship for points and lines, just as you can with the contains relationship. For example, your first layer contains points representing manhole covers and you want to find the manholes that are on street centerlines (as opposed to parking lots or other non-street features). You could use completely within to find manhole points within street centerlines, but in order for a point to contain a line, the point must be exactly on the line (that is, in GIS terms, they are snapped to each other). If there is any doubt about this, use the within a distance of relationship with a suitable distance value.
Intersects / Does not intersect

A feature in the first layer passes the intersect test if it overlaps any part of a feature in the second layer, including touches (where features share a common point).
- Intersects—If a feature in the first layer intersects a feature in the second layer, only the portions of the features that overlap will be included in the output.
- Does not intersect—If a feature in the first layer intersects a feature in the second layer, the portions of the feature that overlap are excluded from the output.
Examples:
- You have a layer of parcels and a layer of 100-year flood zones. You want to find the total area of parcels that lie within the flood zones. You would use intersects to derive new areas for all parcels that overlap the flood zone.
- You have a layer of parcels and a layer of 100-year flood zones. To find the total area of parcels outside of the 100-year flood zone, you would use does not intersect.
Grouping
Two or more consecutive expressions can be grouped together using the group button  . Select the expressions to group by pressing the Shift key and clicking expressions.
Here's an example where grouping is needed:
- You have a point layer of sites containing toxic chemicals. Each point has an attribute, CHEMICAL, containing the name of the toxic chemical known to exist at the site.
- You want to find toxic sites containing Mercury or Selenium that are near a river.
- You also want to find toxic sites containing Benzene or Lead that are near a park.
In the above example, two sets of features are created from the same toxic sites layer: toxic sites near parks and toxic sites near rivers. These two sets are distinct from each other.
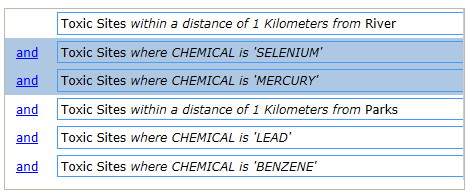
Since the set of toxic sites near a river is distinct from the toxic sites near a park, you would want to use grouping to construct the query. Figure 1 shows the initial query without any grouping or modification of logical operators (they are all  ). This query would result in toxic sites within a kilometer of both a park and a river. This isn't the goal—desired result is one set of toxic sites within a kilometer of a river and another distinct set within a kilometer of a park.
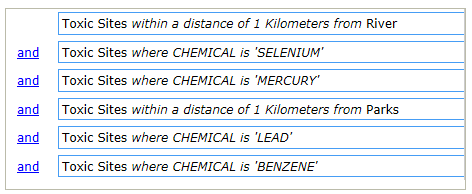
To construct a query that meets the criteria outlined above, groups need to be created. Each group forms a subquery whose results are combined with the previous expression.
Start by selecting the first two attribute expressions, as shown in Figure 2.
After selecting the two attribute expressions, click the group button  . The group becomes indented, as shown in Figure 3.
Select the second group of attribute expressions, as shown in Figure 3.
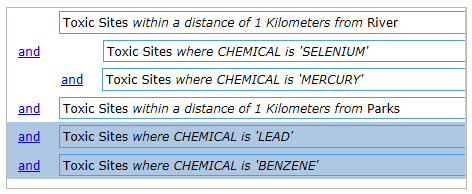
After selecting the second group, click the group button.
Finally, select the second group of attribute expressions and the spatial expression to which they belong, as shown in Figure 4.
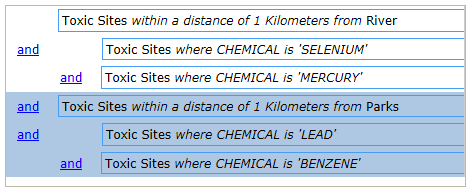
Click the group button and the query becomes indented, as shown in Figure 5. The final step is to switch  to
to  , as shown in Figure 5.
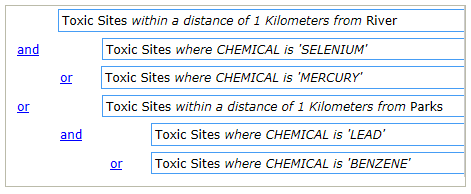
The query shown in Figure 5 will yield the desired result.
- Toxic Sites with LEAD or BENZENE are found and these features are subset by finding those within one kilometer of Parks.
- Next, Toxic Sites with SELENIUM or MERCURY are found and these features are subset by finding those within one kilometer of the River.
- Finally, the two sets of features are combined using a logical
 .
.
Grouping expressions is only necessary when you need to create two or more distinct sets of features from the same layer. One way to think of grouping is that without grouping you would have to execute Find Existing Locations twice, once to find sites near rivers and again to find sites near parks, and then use the Merge tool to combine the two results.
You can click the text button  to view a textual representation of the query. The textual representation uses parentheses to denote groups.