The Print widget connects the web app with a printing service to allow the current map to print.
Configure the Print widget
This widget can be set to open automatically when
an app starts. To enable this feature, click the Open this widget automatically when
the app starts button  on the widget, which turns it dark
green.
- Hover over the widget and click the Configure this widget button
 to open the configuration properties dialog box.
 - PDF (georeferenced)
- PNG32
- PNG8
- JPG
- GIF
- EPS
- SVG
- SVGZ
- A3 Landscape
- A3 Portrait
- A4 Landscape
- A4 Portrait
- Letter ANSI A Landscape
- Letter ANSI A Portrait
- Tabloid ANSI B Landscape
- Tabloid ANSI B Portrait
- MAP_ONLY
- Click OK to save the configuration and close the window.

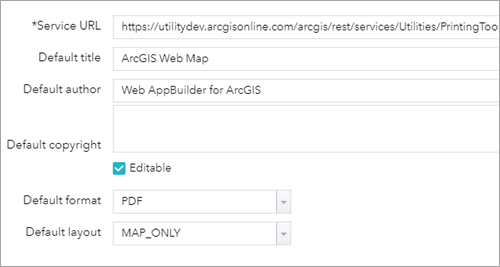
Service URL defaults to the ArcGIS Enterprise or ArcGIS Online print service, such as the following example:https://webadaptorhost.domain.com/webadaptorname/rest/services/Utilities/PrintingTools/GPServer/Export%20Web%20Map%20Task
An alternate service can be used to provide custom layouts. See Tutorial: Publishing additional services for printing for instructions on publishing your own web printing service. For your print service to work with the Print widget, you must set its Execution Mode parameter to Synchronous.
The Default Title, Default Author, and Default Copyright properties are submitted directly to the print service for display in the printed layout. Uncheck the Editable option if the copyright information is not allowed to be overridden.
Tip:
These properties are ignored if Default Layout is set to MAP_ONLY.
Default Format controls the preselected format in the list of options on the Print widget. You have the following options:
Default Layout controls the preselected layout in the list of options on the Print widget. Default options available on the ArcGIS Online service are as follows (your custom service may provide additional values):
Use the Print widget
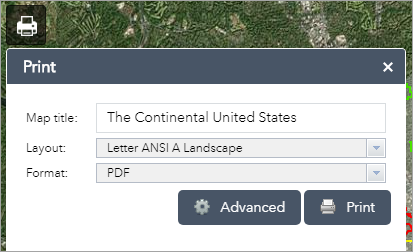
- Click the print icon to open the Print widget.

- Type a title for the map in the Map Title text box.
- Select the applicable Layout and Format for the exported map.
Note:
The MAP_ONLY format prints only the map, omitting any marginal information from the output.
Note:
The Print widget may not print the legend for the layers using the new styles, such as Heat Map, from the February 2015 update of ArcGIS Online, This is a known issue.
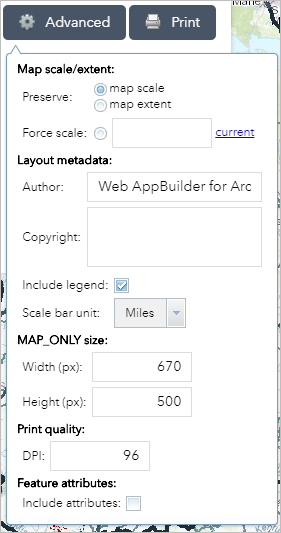
- Click Advanced to open a menu with advanced print options.

The Map scale/extent section defines the method that the print service will use to calculate the printed extent of the map. Preserving map scale causes the printed map to maintain its scale while recalculating the extent around the existing center point. Preserving map extent causes the scale to adjust to fit the current map extent onto the printed map. You can also force a specific scale by checking the Force scale option and providing a scale. Click current to populate the value with the present scale of the map.
The Layout metadata section allows you to override the default values set by the configuration. Enter values for the Author and Copyright properties to provide current information to the print service. Check the Include legend check box to display the legend on the printed map.
Note:
The Print widget supports custom text elements in the printing service published from ArcGIS Server 10.4. The layout options display based on the template's metadata.
If the MAP_ONLY format is selected, you can provide dimensions for the Width and Height properties in pixels. Otherwise, these values are ignored.
The Print quality section allows you to update the resolution of the printed map. Provide an updated value for the DPI (dots per inch) in the text box.
Note:
The widget supports custom text element as layout metadata if the custom task is named Get Layout Templates Info.
- After all options have been set with the applicable values, click Print to submit all information to the print service.
A progress bar displays next to the executing task.

- Upon completion of the print job, a link to the print output displays. Click the task to open the file in a new window.

- Click Clear Prints to clear the print history.
Note:
The date and time format on the print out is based on where the user is located.