The redline is a markup feature in the geodatabase that stores information about the proposed changes in the linear referencing system (LRS). Event Editor can propose changes to the LRS through the Redline widget using redline routes. LRS editors can then apply the redline as an official change to the LRS using Roads and Highways for Desktop. The Redline Routes widget can be used to create, edit, and attach files to the redline routes. You can preconfigure redline activity types such as create route, extend route, realign route, realign concurrent route, calibrate route, retire route, reassign route, and so on.
For more information on redline routes, see the following:
To enable web redlining of routes using Event Editor, you should author a web map using ArcMap and include a redline feature class. You can achieve this in one of the following ways:
- Include the redline layer in the same map service along with your routes and event layers.
- Create a separate map service for the redline.
Caution:
The layer name of the redline needs to match the feature class name, including the prefix. By default, when a layer is added to a map, the alias is used; however, the web layer name needs to match the feature class name.
For detailed instructions on authoring a web map and configuring Event Editor, see the following:
- Configuring the Event Editor web application
- Authoring a web map for the Event Editor
- Event Editor deployment guide
Note:
In the redline feature class, the attribute fields for which the Event Editor application user may not be able to provide data must be made nullable. Doing so will make the data content for those fields optional.
The application can be configured to automatically detect the redline layer using the name of any operational layers that you have configured in the web map. The redline layer name must be the same as the redline feature class name (including prefix) to autodetect the redline layer.
Items to confirm before you start
Before you deploy redline route capability in Event Editor, check that the following are true:
- Feature access and linear referencing capabilities are enabled.
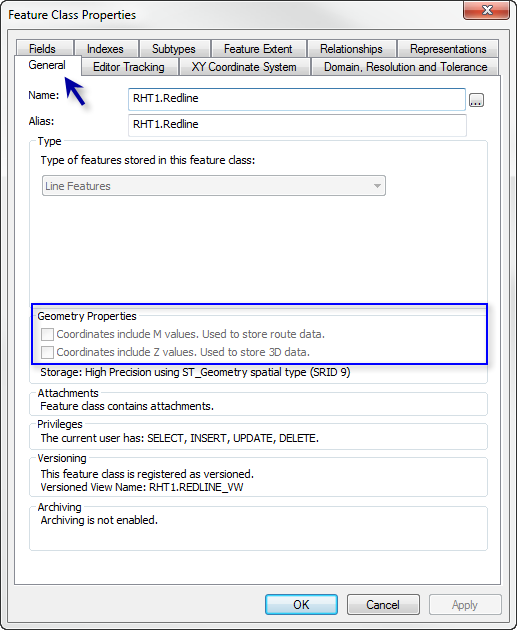
- The redline feature class has the m- and z-values disabled.
- Symbology is defined for the Activity Type field.
- The redline layer has a feature template defined.
Enabling feature access and linear referencing capabilities
- If you're including the redline layer in the same map service as your network and event layers, make sure to enable the Feature Access and Linear Referencing capabilities when publishing the map service using ArcGIS Server.
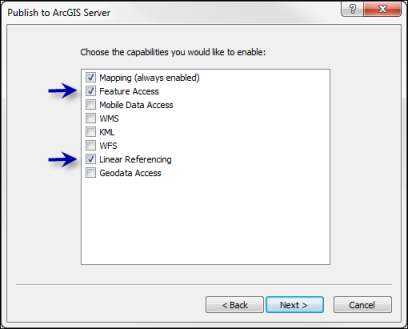
- If you're publishing the redline layer separately, make sure to enable only the Feature Access capability when publishing the map service using ArcGIS Server.
Note:
Event Editor supports Esri web maps, which can have only one linear referencing-capable map service.
Disabling m- and z-values for the redline feature class
The redline feature class should have the capability to store disabled m- and z-values. To validate this, perform the following steps:
- Start ArcCatalog.
- Browse to the redline feature class in your database.
- Right-click the redline feature class and click Properties.
- Click the General tab.
- Confirm that both check boxes in the Geometry Properties area are unchecked.
Defining symbology for the Activity Type field
The symbology for the redline feature class's activity types should be set up.
- Open the .mxd file that contains the redline layer.
- Right-click the redline layer in the table of contents and click Properties.
- Click the Symbology tab.
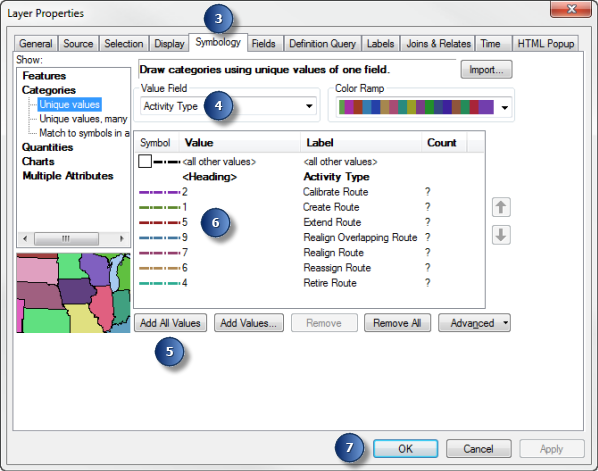
- Choose Activity Type in the Value Field list.
- Click Add All Values.
- Choose line symbology for various redline activity types.
- Click OK.
Defining a feature template for the redline layer
The feature template for the redline layer should be based on the feature symbology.
When you are not in an edit session, you can create new feature templates for any layer in your map. To open the template organizer and access the wizard, right-click a layer in the table of contents, point to Edit Features, and click Organize Feature Templates.
- Click Organize Templates
 on the Create Features window.
 - Click New Template
 on the Organize Feature Templates dialog box.
 - Check the layers for which you want to create new templates.
- Click Next.
- If any of the layers have subtypes or are symbolized by categories, choose the classes for which to create templates.
- Click Finish.
Note:
If the layer is symbolized as a single symbol, the wizard is completed in one step.
Deploying redline routes
Use the following steps to deploy redline routes for Event Editor.
- Configuring redline activity types
- Configuring a separate redline service
- Enabling redline attachments
Configuring redline activity types
You can configure redline activities by using the following steps:
- Start ArcMap.
- Open the Catalog window and browse to the redline feature class in your database.
- Right-click the redline feature class and click Properties.
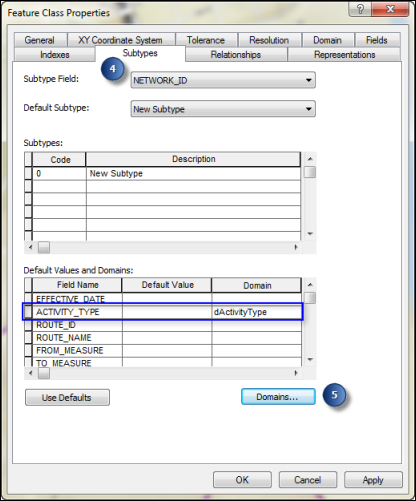
- Click the Subtypes tab.
- Click Domains.
- On the Workspace Domains dialog box, click the dActivityType domain name.
You'll see preconfigured activity types in the form of coded domains for redlines in the Coded Values section. You can edit the activity types in this section.
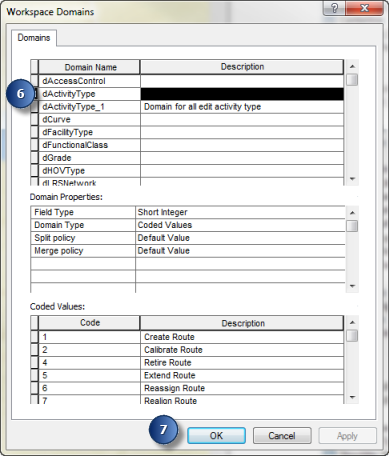
- Click Apply and click OK to close the Workspace Domains dialog box to save the edits.
Configuring a separate redline service
If you don't want to enable feature access to all your LRS event layers, you can publish your redline layer separately so that it is the only layer that is editable.
Note:
If you publish the redline layer in a separate service from the other LRS layers, you need to publish using the same geodatabase version as the LRS map service.
- Publish a map service with the Feature Access capability that only contains the redline layer.
- Open the web map .json file in a text editor.
- Add an additional operational layer to the .json file for the redline map service that you just published.
{
  "operationalLayers": [
  {
  "id": "LRS_map_service",
  "title": "LRS map",
  "url": "https://<servername.domain>.com/server/rest/services/EventEditorLRSService/MapServer"
  },
  {
  "id": "Redline Layer",
  "title": "LRS map",
  "url": "https://<servername.domain>.com/server/rest/services/EventEditorRedlineService/MapServer"
  }
 ],
For additional information about the web map .json file, see the web map specifications for Map Service Layer.
Note:
If you're using Portal for ArcGIS or ArcGIS Online and you save Event Editor as a web map, both your LRS layers and your separate redline layer will be automatically added to the web map.
Enabling redline attachments
You can enable redlines to contain attachments using the following steps:
- Start ArcMap.
- Open the Catalog window and browse to the redline feature class in your database.
- Right-click the redline feature class and click Attachments > Create Attachments.
Attachments are enabled for redlines.