Supported browsers and devices
Roadway Reporter is supported on the following browsers and devices:
- Chrome
- Firefox
- Internet Explorer 9+
- Safari
- iPad using Safari
- Android Marshmallow using Chrome
Note:
The Find My Location button will only work when accessing Roadway Reporter through HTTPS.
Prerequisites
- A Portal for ArcGIS on-site deployment or an ArcGIS Online for organizations account to support storage of user-created Roadway Report configurations.
- A Windows-based ArcGIS Server deployment to deploy Esri Roads and Highways for Server.
- A web server, such as Internet Information Server (IIS), to deploy the Roadway Reporter web application.
Deploying Roadway Reporter
To deploy Roadway Reporter and a supporting dataset, follow the steps below:
- Install Esri Roads and Highways for Server and Roadway Reporter.
Roadway Reporter requires an additional license. Use the Software Authorization Wizard to provide the authorization key after installing Esri Roads and Highways for Server and Roadway Reporter. For more information, see Installing Location Referencing, which includes Esri Roads and Highways for Server.
- Create a map document (.mxd) in ArcMap with the routes, internal event layers, intersections (for road log report only) and external event layers (for road log report only) using Esri Roads and Highways for Desktop.
A typical map document for Roadway Reporter contains networks, event layers, and intersection layers. Optionally, you can add polygon layers such as administrative boundaries that can be used to select the routes for which the report will be generated.
- Publish the Generate Report geoprocessing service to your instance of ArcGIS Server.
For more information, see Publishing the Generate Report tool to a service.
- Publish the map document with ArcGIS Server and enable the Esri Roads and Highways for Server linear referencing capability.
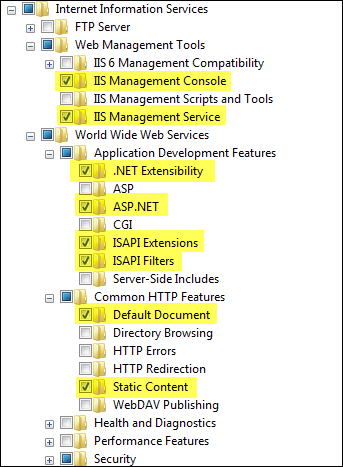
- Make sure IIS (Internet Information Services) is enabled. Also make sure all the .NET/ASP.NET features are enabled. This can be done with the Windows Server Manager console.
Following is the example of the Windows dialog box and features that may look different based on your operating system. The highlighted features are required to be enabled on your machine.

- Using Windows Explorer, browse to and copy the contents of <Installation location>\LocationReferencing\Server<Server Version>\Web\RoadsandHighways\RoadwayReporter into the web folder of the web server.
For example, in Internet Information Services (IIS), the web folder may be located at C:\inetpub\wwwroot\RoadwayReporter.
Note:
The actual location of the IIS wwwroot directory could differ on your server machine. Use the IIS Management Console to get the location of the IIS wwwroot directory.
- Author a web map that includes the map service created in the previous step and the appropriate basemaps.
- Open the configuration (config.json) file within the RoadwayReporter web folder and modify it to use the web map and geoprocessing services created from previous steps.
- Configure the Portal for ArcGIS or ArcGIS for Organization accounts to save report configurations.
You can enable security for Roadway Reporter to secure the map services being used within the Roadway Reporter web application. For more information, see Configuring security for Roadway Reporter and Configuring Portal for ArcGIS for Roadway Reporter.