Use a geodata service and a connected replica
In this topic
- Prepare on-premises data for replication
- Start an
ArcGIS Server on Amazon Web Services instance - Connect to your ArcGIS Server instance
- Register geodatabases and publish a geodata service
- Replicate through the geodata service using the Create Replica wizard
- Edit data in the on-premises geodatabase
- Synchronize edits
If you have data in an enterprise geodatabase on-site, you might want to replicate some of that data to an enterprise geodatabase in the cloud. To do so, you can use the workflow described in this topic.
The geodata geodatabase that the ArcGIS Server Cloud Builder on Amazon Web Services application creates is intended for use in a replicated data workflow. When you register the geodata database as a replicated data store with ArcGIS for Server, you can create a geodata service. Next, replicate data from your on-premises geodatabase to the geodata service. After edits are made, you can then synchronize through the geodata service.
In most cases, you will want to edit your on-premises geodatabase while leaving the data in your geodatabase in the cloud read-only to the users who access it through the Internet. To do that, you would create a one-way replica; edits made to the on-premises geodatabase are synchronized with the geodatabase in the ArcGIS Server on Amazon Web Services instance through the geodata service. However, you could also have an editable feature service that makes changes to the geodatabase in the ArcGIS Server on Amazon Web Services instance. In that case, you would create a two-way replica; edits made in either geodatabase get synchronized to the other geodatabase through the geodata service.
Prepare on-premises data for replication
Before you can replicate data, it must meet specific requirements:
- All spatial data must be stored in a high-precision spatial reference.
- The parent and child replica geodatabases should be at the same release, though it is possible to use an ArcGIS 10, 10.1, 10.2, 10.2.1, or 10.2.2 geodatabase for the parent and an ArcGIS 10.3 geodatabase to host the child. However, if you use two-way replication, be sure you do not add data or make any edits that introduce functionality to the child replica that is not supported in the parent replica's geodatabase.
- The owner of the data to be replicated must perform the following steps:
- Grant write access on the data to the user who will create the replica.
- Register as versioned the data to be included in the replica.
The data must be fully versioned; it cannot be versioned with the option to move edits to base.
- Add a global ID column to each dataset that will be part of the replica.
Start an ArcGIS Server on Amazon Web Services instance
If you have not done so already, launch an instance of ArcGIS for Server. See Build an ArcGIS site on Amazon Web Services for instructions. Be sure to specify a key pair and choose to include an enterprise geodatabase when setting up the site. The geodatabase can be on the same instance as ArcGIS for Server or its own separate instance.
Instances created through the ArcGIS Server Cloud Builder on Amazon Web Services application automatically have a geodatabase—geodata—intended for use as a replica geodatabase.
Connect to your ArcGIS Server instance
Create a GIS server publisher connection from ArcGIS for Desktop to your ArcGIS Server on Amazon Web Services instance. See Making a publisher connection to ArcGIS Server in ArcGIS for Desktop for instructions.
Register geodatabases and publish a geodata service
Register the geodata geodatabase as a replicated data store and create a geodata service. This is done from the Server Properties dialog box of the GIS server connection you created in ArcGIS for Desktop.
- Right-click the GIS server connection and click Server Properties.
The ArcGIS Server Properties dialog box opens.
- Click the plus button (+) next to Registered Databases on the Data Store tab.
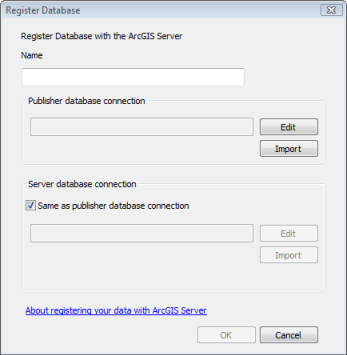
The Register Database dialog box opens.

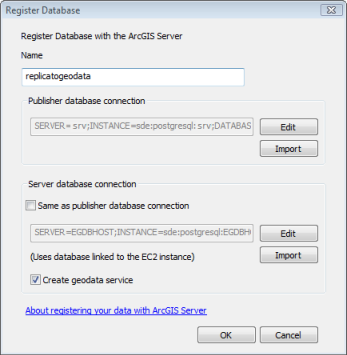
- Type a name for the data store in the Name text box.
This name will be used for the registered database list and the geodata service.
- Click Import next to the Publisher database connection text box.
- Browse to the location of the database connection file of your on-premises geodatabase and click Select.
The Publisher database connection text box is populated with the connection information for your on-premises geodatabase.
- Uncheck Same as publisher database connection.
When connecting to an ArcGIS Server on Amazon Web Services instance, Server database connection will be populated with the connection to your geodata geodatabase on Amazon EC2 automatically.
- Check Create geodata service.
- Click OK to register your databases and create a geodata service.
Your newly registered database appears in the Registered Databases list.
- Click OK to close the ArcGIS Server Properties dialog box.
- Double-click or refresh your ArcGIS Server connection to confirm that the geodata service was created.

Replicate through the geodata service using the Create Replica wizard
The geodata geodatabase in your ArcGIS Server on Amazon Web Services instance must contain replicas of the data you want to keep synchronized with your on-premises data. To replicate the data to the geodata registered database, use the Create Replica wizard in ArcMap.
- Start ArcMap.
- Add to the map the data from your on-premises enterprise geodatabase that you want to replicate to your geodatabase in Amazon EC2.
If you only want one area of the data to be published, zoom to the extent of that area or draw a box on the map that includes all the data you want to replicate. Otherwise, you can replicate all the data or specify an extent envelope when you replicate the data.
- Open the Distributed Geodatabase toolbar.
Open the toolbar by clicking Customize > Toolbars > Distributed Geodatabase.
- Click the Create Replica button
 on the Distributed Geodatabase toolbar.
 - Choose what type of replica to create.
- If you will be pushing edits only from your on-premises geodatabase to your geodatabase in Amazon EC2, choose One way replica, leave Parent to child selected, then click Next.
- If you will be pushing edits from your on-premises geodatabase and will allow users to edit the data in your geodatabase in Amazon EC2, choose Two way replica and click Next.
- Click Next.
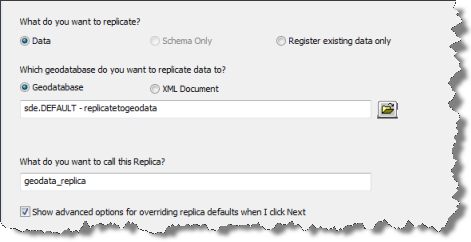
- Choose Data and Geodatabase to replicate your data to the geodatabase.
- Click the Open button
 , navigate to your geodata service, then click OK.
 - Type a name for your replica.
- Check Show advanced options for overriding replica defaults when I click Next.
- Click Next.
- Choose which replication model to use.
- If the data you are replicating participates in geodatabase functionality, such as geometric networks, topologies, or relationship classes, click Full Model. (This is the default model.)
- If your data does not use any geodatabase functionality and you do not need the data in the child replica to be versioned, choose Simple Model.
- Click Next.
- Choose the extent of the data to replicate.
- If you want only the data that appears in the current map extent, choose The current display extent. (This is the default data extent to replicate.)
- If you want the full extent of the data in the ArcMap table of contents, choose The full extent of the data.
- If you drew a graphic around the data in the map and want to replicate only the data that is inside that graphic, choose The boundary of the currently selected graphic.
- If you want a specific extent, choose The following extent and type the values of the extent you want.
- Check the Include box for the data you want to replicate.
- If there are relationship classes in the data, you have the option to include or exclude the related data. By default, related data is replicated. If you don't want to include it, uncheck Replicate related data.
- Click Next.
- If you included related data, define how related objects are added to the replica—either with a forward direction (data added to the origin class is added to the destination class) or reverse direction (data added to the destination class is added to the origin class).
- Click Next.
- You can click Summary to see all the information you provided for creating the replica. Click OK to close the summary when you have finished reviewing it, or click Back if you need to make any changes.
- If no changes are needed, click Finish.

Tip:
If you are using all the default settings, you can uncheck Show advanced options for overriding replica defaults when I click Next.
The data is replicated through the service to the geodata geodatabase.
Edit data in the on-premises geodatabase
Edit data in your on-premises enterprise geodatabase as you normally would. If you edit in other geodatabase versions, changes must be posted to the parent version if you want those edits to be synchronized with the child replica.
Synchronize edits
You can synchronize after a set of edits or synchronize on a specific schedule, for example, at the end of each day. Once the edits you want to synchronize are completed and have been posted to the parent version, you can use the Synchronize Changes button on the Distributed Geodatabase toolbar or script synchronization through your geodata service.
When you synchronize data, you must connect as the same database user that created the replica or as the geodatabase administrator.
For more information on synchronization, see Synchronizing connected replicas in the ArcGIS help.
Synchronize in ArcMap
In this workflow, you have a map open that contains the replicated data that has been edited.
- Open the Distributed Geodatabase toolbar
Open the toolbar by clicking Customize > Toolbars > Distributed Geodatabase.
- Click the Synchronize Changes button
 on the Distributed Geodatabase toolbar.
 The Synchronize Changes Wizard dialog box opens.
- When you confirm the information on the wizard, click Finish to start the synchronization.
Script synchronization
You can write a script to synchronize your geodatabases. See How to synchronize a replica in a connected environment in the ArcObjects SDK for the Microsoft .NET Framework for a sample script.