Real-time data can be received in a number of data formats (text, JSON, GeoJSON, and so on) over many types of protocols (HTTP, WebSocket, TCP, and so on). Validating and exploring event data (or GeoEvents) directly in GeoEvent Manager, prior to writing those GeoEvents to a feature layer for viewing in a web map, for example, can be especially useful. GeoEvent Sampler is a utility in the service designer of GeoEvent Manager that samples a fixed number of GeoEvents as they are routed through elements (inputs, outputs, filters, and processors) of a published GeoEvent Service. The sampled GeoEvents can be viewed as prettified JSON or delimited text in the sampler window. Sampling GeoEvents can provide earlier and greater insight into real-time event data and can assist in designing, validating, and troubleshooting different routes in a GeoEvent Service.
Unlike GeoEvent Logger and GeoEvent Simulator, which are Windows applications installed with GeoEvent Server, GeoEvent Sampler is a utility in the service designer in GeoEvent Manager. You can access GeoEvent Sampler from a new or existing GeoEvent Service by turning on the utility at the bottom of the service designer. The following image and table illustrate and describe the key functionality provided by GeoEvent Sampler:

| Parameter or function | Description |
|---|---|
| 1—Enable and Disable | The Enable and Disable options start and stop GeoEvent Sampler on a selected route between two elements of a published GeoEvent Service. GeoEvent Sampler is disabled by default and must be enabled to sample GeoEvents on a selected route.
For details regarding enabling GeoEvent Sampler, see the Enable GeoEvent Sampler section below. |
| 2—Select Route | The name of the selected route in a GeoEvent Service. Event data is displayed in the sampler window for the selected route only. Any route between an input, output, filter, or processor element can be selected in a published GeoEvent Service. The name of the selected route is displayed as the concatenation of the connected element names. Examples of route names include the following:
Nota:The name of the selected route is displayed when GeoEvent Sampler is enabled and a route between two elements in a GeoEvent Service is selected. |
| 3—GeoEvent Sampler utility | Click the toggle button to show or hide GeoEvent Sampler in the service designer. The GeoEvent Sampler utility is shown by default. For details regarding enabling GeoEvent Sampler, see the Enable GeoEvent Sampler section below. |
| 4—Refresh | Use Refresh to clear the currently sampled GeoEvents and sample another set from the selected route. After a refresh, another set of GeoEvents is sampled up to the value specified in the Sample Size setting. For example, if Sample Size is set to 10 and a refresh occurs, the current GeoEvents are cleared and another sample of 10 appears in the sampler window. If two routes are being compared, clicking Refresh clears the GeoEvents for each route and each route is sampled again. For details regarding comparing two routes, see the Compare GeoEvents from two routes section below. |
| 5—Clear | Use Clear to remove sampled GeoEvents from the sampler window. After the samples are removed, GeoEvents continue to be sampled from the selected route up to the value specified in the Sample Size setting. For example, if Sample Size is set to 10 and Clear is used after three GeoEvents are sampled, the sampler removes the three GeoEvents and continues to sample for the remaining seven GeoEvents. If two routes are being compared, Clear is available for each route. For details regarding comparing two routes, see the Compare GeoEvents from two routes section below. Nota:The option to clear the sampler window or windows is only available after at least one GeoEvent is sampled. |
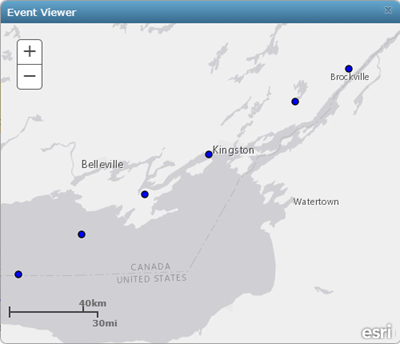
| 6—View in Event Viewer | Use View in Event Viewer to visualize the geometry of the sampled GeoEvents in a web map viewer. The Event Viewer window only displays the geometry of sampled GeoEvents currently displayed in the sampler window. When the Event Viewer window is open, no newly sampled GeoEvents are displayed. Open the Event Viewer window after the appropriate number of GeoEvents are sampled and available in the sampler window. Nota:You can view sampled GeoEvents in the Event Viewer window only when the GeoEvents have a geometry whose field is tagged GEOMETRY in its GeoEvent Definition. Additionally, sampled GeoEvents must be in the JSON data type format; viewing as text is not supported. |
| 7—Copy to Clipboard | Use Copy to Clipboard to copy the GeoEvents currently displayed in the sampler window to the system clipboard. The copied GeoEvents can be pasted to a separate text file or text editor for storage or further review. If two routes are being compared, Copy to Clipboard is available for each route. For details regarding comparing two routes, see the Compare GeoEvents from two routes section below. Nota:GeoEvents are copied in the data type format defined in the Data Type setting (either Text or JSON). The data type format can be changed in Settings. |
| 8—Settings | Access the settings for sampling GeoEvents, including Data Type and Sample Size.
|
| 9—Sampler window | The GeoEvents sampled from a selected route appear in the sampler window. Sampled GeoEvents display as either JSON or text depending on the data type format specified in the Data Type setting. |
| 10—Event counter | The event counter displays the number of GeoEvents sampled on a selected route. The number of GeoEvents sampled will not exceed the value specified in the Sample Size setting. For example, a count of 3/10 means 3 GeoEvents, out of a maximum of 10, have been sampled. Nota:The event counter resets to 0 when a new route is selected or if sampling is refreshed. |
Enable GeoEvent Sampler
GeoEvents can be sampled and displayed in real time from a route (or connection) between an input, output, filter, or processor element in a published GeoEvent Service. To get started with GeoEvent Sampler, open GeoEvent Manager and either create a GeoEvent Service or open an existing GeoEvent Service. For details regarding creating a GeoEvent Service, see Create a GeoEvent Service.
To access and enable GeoEvent Sampler in the service designer, complete the following steps:
- Open a published GeoEvent Service and ensure that it is receiving GeoEvents.
- To open GeoEvent Sampler, click
 at the bottom of the service designer.
 - Click settings
 to open the Settings pane for GeoEvent Sampler and specify the Data Type and Sample Size values. The default data type is JSON and the default sample size is 10.
 - Click Enable
 to start GeoEvent Sampler.
Nota:
You can also start GeoEvent Sampler by right-clicking a route between two elements in a published GeoEvent Service and choosing Sample Route. GeoEvent Sampler opens and sampling of GeoEvents begins on the selected route.
Sample GeoEvents
To sample GeoEvents, select a route between an input, output, filter, or processor element while GeoEvent Sampler is open and enabled.
To sample GeoEvents from a route in a GeoEvent Service, create a GeoEvent Service or open an existing published GeoEvent Service, ensure that it is actively receiving GeoEvents, and complete the following steps:
- Ensure that GeoEvent Sampler is open in the service designer and is enabled.
- Click a route in the published GeoEvent Service to begin sampling GeoEvents on that route.

- Optionally, click Copy to Clipboard
 to copy the current sample of GeoEvents from the sampler window.
 - Optionally, click Clear
 to remove the current sample of GeoEvents from the sampler window.
 - Optionally, click Refresh
 to sample the selected route again.
Nota:
You can also start GeoEvent Sampler by right-clicking a route and choosing Sample Route from the menu. GeoEvent Sampler opens, is enabled, and begins sampling GeoEvents from the selected route.
Visualize sampled GeoEvents
The primary purpose of GeoEvent Sampler is to provide a sample of GeoEvents as text or JSON in real time as they are processed in a published GeoEvent Service. GeoEvent Sampler includes Event Viewer, which is a web map viewer that can be used to visualize and verify the geometry of processed GeoEvents.
To visualize sampled GeoEvents in the Event Viewer window, create a GeoEvent Service or open an existing, published GeoEvent Service, ensure that it is actively receiving GeoEvents, and complete the following steps:
- Ensure that GeoEvent Sampler is open in the service designer and is enabled.
- Click settings
 and confirm that Data Type is set to JSON.
 - Click a route in the published GeoEvent Service to begin sampling GeoEvents on the selected route.
- After a sample of GeoEvents is displayed as JSON in the sampler window, click View in Event Viewer
 to view the GeoEvents in the Event Viewer window.
 - Explore the sampled GeoEvents in the Event Viewer window.

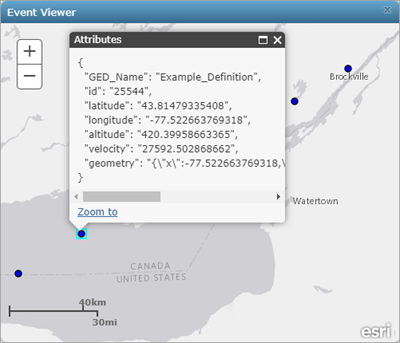
- In the Event Viewer window, click a GeoEvent.
A pop-up appears with the attribute information.

Nota:
Optionally, right-click a route and from the menu, choose Sample Route to begin sampling GeoEvents.
Nota:
Event Viewer only supports sampling JSON formatted GeoEvents that contain a geometry field tagged as GEOMETRY in the corresponding GeoEvent Definition. If the sampled GeoEvents are formatted as text and do not have a GEOMETRY field, the View in Event Viewer button is unavailable.
Compare GeoEvents from two routes
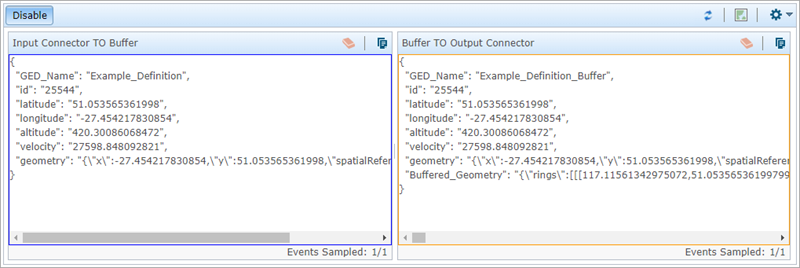
You can perform GeoEvent sampling on two routes at the same time. Sampling two routes can be useful to compare and validate changes on related real-time data. For example, a GeoEvent emitted by a Buffer Creator Processor can be expected to have a different geometry (polygon) from its original source geometry (point). By sampling GeoEvents from the routes going to and from the processor, you can confirm that GeoEvents are not only received by the Buffer Creator Processor, they are buffered by the processor as well.
To compare sampled GeoEvents from two routes, create a GeoEvent Service or open an existing, published GeoEvent Service, ensure that it is actively receiving GeoEvents, and complete the following steps:
- Ensure that GeoEvent Sampler is open in the service designer and is enabled.
- Click a route in a GeoEvent Service to begin sampling GeoEvents on the first selected route.

Nota:
Optionally, right-click a route and from the menu, choose Sample Route to start sampling the first route.
- With the first route selected, right-click a second route and choose Compare Route.

Nota:
Compare Route is only available once the first route is selected. Routes sharing the same source element—whether an input, output, filter, or processor—cannot be compared.The second selected route is a different color (orange), indicating that GeoEvent sampling will be performed on the two selected routes.

With the two routes selected, two sampler windows appear in GeoEvent Sampler, allowing you to compare the two routes. The left sampler window (blue) returns the sampled GeoEvents from the first selected route, and the right window (orange) returns the sampled GeoEvents from the second selected route.

GeoEvent sampling can only be performed on one or two routes. When comparing two routes, changing the settings, refreshing, and opening the Event Viewer window applies to both sampler windows. Clearing and copying the data to the clipboard can be done independently and apply to the sampler window where the tool is used.
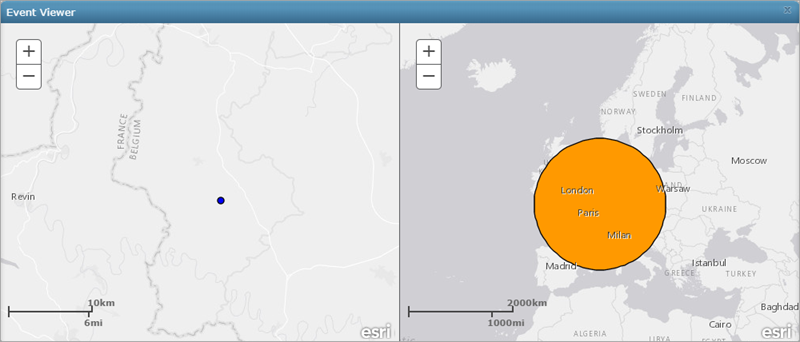
- Click to view the GeoEvents from each route in the Event Viewer window.

Event Viewer opens a viewer for each selected route. This can be useful to validate geometry changes when performing event processing. For example, original point geometry from a GeoEvent can be visualized in the first viewer while the same GeoEvent emitted from a Buffer Creator Processor, for example, can be visualized in the second viewer. This allows you to confirm the original point geometry was buffered successfully and is now a polygon.
Considerations and limitations
Keep the following in mind when using GeoEvent Sampler:
- GeoEvents are only sampled when a GeoEvent Service is published, started, and is actively receiving real-time event data. Nothing appears in the sampler window if the GeoEvent Service is not published or is stopped, or no event data is being received.
- GeoEvent Sampler can be used to perform sampling on the routes connecting inputs, outputs, processors, and filters only. Direct sampling of inputs, outputs, processors, and filter elements is not supported.
- Consider your real-time data and service design when sampling GeoEvents.
- GeoEvent Sampler automatically disconnects and is unavailable after 10 minutes of inactivity.
- GeoEvent Sampler only supports the comparison of two routes between elements of a GeoEvent Service.
- The order of GeoEvents sampled is not guaranteed. The order in which GeoEvents are collected into GeoEvent Server may not be the same order in which they appear in the sampler window.
- Sampled GeoEvents are not persisted or cached. Refreshing the sampler window or the browser session removes currently sampled GeoEvents.
- Changing the GeoEvent Sampler settings requires a refresh. If the settings are changed during an active sampling of GeoEvents, the new settings do not take effect until GeoEvent Sampler is refreshed.
- When comparing two routes, the first sampler window may reach its sample size before the second sampler window displays any GeoEvents. In this case, the route may not have met a filter or processing condition and is not being received.
- The sampler window displays a progress bar when waiting to receive the first GeoEvent.
- Viewing GeoEvents in the Event Viewer window is supported in offline environments. Access the global settings to configure Event Viewer with a basemap that is accessible offline.