Disponible avec la licence Location Referencing.
Characteristics of a route such as speed limit or functional class can be represented as a linear event with starting and ending measure information along the route. The Line Events tool provides an interface to add linear events by typing or selecting their x- and y-coordinates. You can also use reference offset data to add events to a route. The reference offset data is translated to routes and measures for storage.
Remarque :
In cases where events are being modified on a route and you want to see the previous events on the route at that location, don't use the Add Linear Event widget. Instead, edit events in the Event Selection table or the Attribute Set Selection table. If this method is used, you can see what was previously on the routes at the specified measures.
- Ouvrez Event Editor et, à l’invite, connectez-vous à votre organisation ArcGIS.
- Cliquez sur l’onglet Mise à jour.
- Dans le groupe Mettre à jour les événements, cliquez sur Événements ponctuels
 .
.Le widget Ajouter des événements linéaires apparaît.
Remarque :
Les sélections relatives au réseau ainsi qu’aux méthodes et aux mesures de départ et d’arrivée peuvent être prédéfinies lors de la configuration, de la création ou de la mise à jour des paramètres par défaut des jeux d’attributs.
En savoir plus sur la configuration, la création et la mise à jour des paramètres par défaut des jeux d’attributs.
- Cliquez sur la flèche de la liste déroulante Réseau et sélectionnez le réseau utilisé comme méthode de référencement linéaire (LRM) source pour la définition des mesures en entrée de nouveaux événements.
- Choose the name of the line feature on which the events will be located using one of the following options:
- Click the drop-down arrow to choose the line name in the Line Name text box.
- Click Select a Line on the Map
 and select the line from the map.
Conseil :
If the selected line is not in the active view of the map, click Zoom to the line extent or center on the line start or end point on the Map
 to refresh the map display to zoom in to the entire extent of the selected line.
The line is highlighted in light blue. The arrow at the end shows the direction of calibration of the line.
- In the From section, click the Method drop-down arrow and click Coordinates.
The Coordinate System section appears.
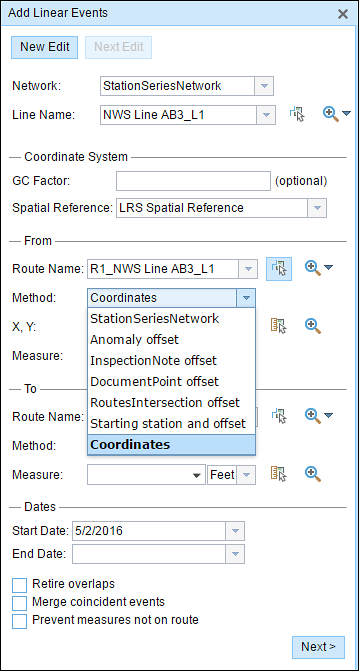
- Optionally, provide a value in the GC Factor text box.
This will adjust the coordinates by dividing X and Y by the value specified.
- Specify a spatial reference by choosing an option from the Spatial Reference drop-down menu.
- LRS Spatial Reference—The spatial reference of your LRS network
- Web Map Spatial Reference—The spatial reference of your basemap
- GCS_WGS_1984—A geographic spatial reference using units of degrees
Additionally, you can configure different coordinate systems by specifying the well-known ID (WKID) or well-known text (WKT) in the configuration file of your Event Editor.
- In the From section, click the Method drop-down arrow and choose Coordinates.
- Input the x- and y-coordinate values for X and Y.
Conseil :
You can select a coordinate by clicking Select an X/Y Location on the Map
 .
.The route measure closest to the original coordinates will be selected and its distance from the route will be displayed.
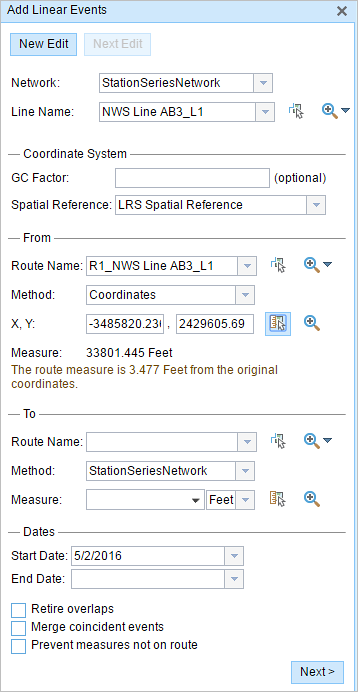
- Choose the route name in the To section using any of the following options:
- Click the Route Name drop-down arrow and choose the route.
- Provide a route name in the Route Name text box.
- Click Select a Route on the Map
 and select the route from the map.
Conseil :
If the selected route is not in the active view of the map, click Zoom to the route extent or center on the route start or end point on the Map
 to refresh the map display to zoom in to the entire extent of the selected line.
 - In the To section, click the Method drop-down arrow and choose Coordinates.
- Input the x- and y-coordinate values for X and Y.
Conseil :
You can select a coordinate by clicking Select an X/Y Location on the Map
 .
.The route measure closest to the original coordinates will be selected, and its distance from the route will be displayed.
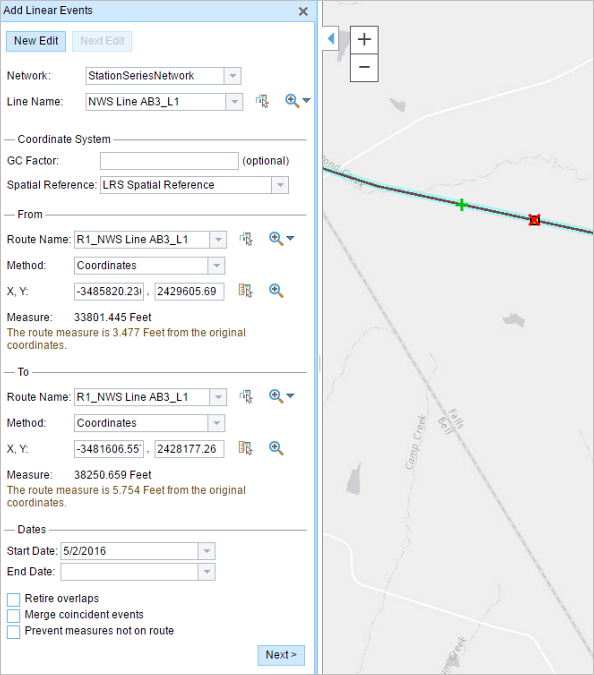
- Choose the date that will define the start date of the events by doing one of the following:
- Provide the start date in the Start Date text box.
- Click the Start Date drop-down arrow and choose the start date.
The start date defaults to today's date, but you can choose a different date using the date picker.
Remarque :
If you configured your instance of Event Editor to not allow dates before the start date of the route, and you provide a date before the start date of the selected route in Start Date, a warning message appears alerting you to choose a date on or after the start date of the selected route.
- Choose the date that will define the end date of the events by doing one of the following:
- Provide the end date in the End Date text box.
- Click the End Date drop-down arrow and choose the end date.
The end date is optional, and if it is not provided, the event remains valid now and into the future.
- Choisissez une des options de validation des données pour éviter une saisie erronée lors de la caractérisation d’un itinéraire avec des événements linéaires :
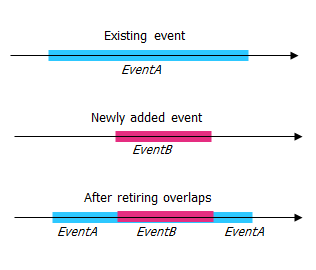
- Supprimer les superpositions : le système ajuste la mesure et les dates de début et de fin des événements existants de sorte que le nouvel événement n’entraîne pas de superposition des valeurs temporelles ou des mesures.
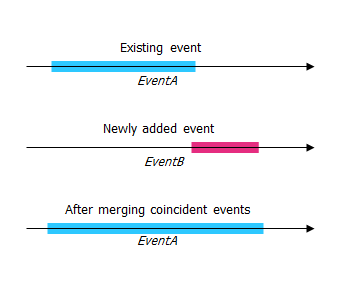
- Fusionner les événements coïncidents : si toutes les valeurs attributaires d’un nouvel événement sont strictement identiques à celles d’un événement existant, et si le nouvel événement est adjacent ou se superpose à l’événement existant en matière de valeurs de mesure, le nouvel événement fusionne avec l’événement existant et la plage de mesure est agrandie en conséquence.
- Interdire les mesures hors de l’itinéraire : les valeurs en entrée pour les mesures de départ et d’arrivée sont comprises dans la plage des valeurs de mesure minimale et maximale sur l’itinéraire sélectionné.
- Supprimer les superpositions : le système ajuste la mesure et les dates de début et de fin des événements existants de sorte que le nouvel événement n’entraîne pas de superposition des valeurs temporelles ou des mesures.
- Cliquez sur Next (Suivant).
L’onglet présentant le jeu d’attributs des événements s’affiche. Les champs relatifs aux événements sont visibles sous le groupe d’attributs G1.
Remarque :
Les cases à cocher vous permettent d’ajouter des données pour des événements spécifiques dans le jeu d’attributs. Aucun enregistrement n’est ajouté pour les événements non cochés. Comme illustré dans l’exemple ci-dessous, aucun enregistrement n’est ajouté aux événements County_A et City_A.
- Spécifiez les informations attributaires pour le nouvel événement de l’une des manières suivantes :
- Fournissez les informations attributaires pour le nouvel événement dans les tables définies par les jeux d’attributs.
- Cliquez sur Copier les valeurs attributaires
 et sur un itinéraire sur la carte pour copier les attributs d’événement d’un autre itinéraire.
Event Editor utilise un jeu d’attributs par défaut sous l’onglet Mise à jour. Vous pouvez modifier le jeu d’attributs pour créer des jeux d’attributs personnalisés ou utiliser le jeu d’attributs configuré par l’administrateur.
Remarque :
Les valeurs précodées, les domaines par plage et les sous-types sont pris en charge lorsqu’ils sont configurés pour un champ dans la table Valeur attributaire.
- Pour accéder à davantage d’informations sur le jeu d’attributs, effectuez l’une des opérations suivantes :
- Cochez la case Afficher le nom du réseau pour afficher le réseau LRS associé à la couche d’événements sélectionnée.
- La liste des attributs figurant dans les tables définies par les jeux d’attributs peut provenir de plusieurs couches d’événements. Pour identifier la couche d’événements source de chaque attribut, sélectionnez la case à cocher Afficher les noms des couches.
- Checking the Go to the next measure upon save check box results in prepopulating the starting measure value using the ending measure value of the present section to continue the event creation process. For example, this will occur if events are created on the route using a From measure value of 0 miles and a To measure value of 0.289 miles. If you click Save with this option checked on the Attribute Set tab, the Add Linear Events widget is prepopulated with the value of 0.289 miles as the starting measure value for the new events.
- Cliquez sur Enregistrer.
Les nouveaux événements linéaires sont créés et apparaissent sur la carte. Un message de confirmation s’affiche en bas à droite lorsque les nouveaux événements linéaires qui viennent d’être ajoutés ont été enregistrés.
Une fois qu’un événement a été créé, vous pouvez procéder comme suit pour continuer à caractériser l’itinéraire :
- Cliquez sur Nouvelle mise à jour pour effacer toutes les entrées saisies dans le widget et rétablir les valeurs par défaut de la géodatabase dans la table attributaire.
- Cliquez sur Mise à jour suivante pour conserver toutes les entrées existantes dans le widget et la table attributaire afin de mettre à jour rapidement et aisément des caractéristiques similaires.
Vous avez un commentaire à formuler concernant cette rubrique ?