Characteristics of a route such as speed limit or functional class can be represented as a linear event with starting and ending measure information along the route. The Line Events tool provides an interface to add linear events by typing or selecting their x- and y-coordinates. You can also use reference offset data to add events to a route. The reference offset data is translated to routes and measures for storage.
Hinweis:
In cases where events are being modified on a route and you want to see the previous events on the route at that location, don't use the Add Linear Event widget. Instead, edit events in the Event Selection table or the Attribute Set Selection table. If this method is used, you can see what was previously on the routes at the specified measures.
- Öffnen Sie Event Editor, und melden Sie sich bei Ihrer ArcGIS-Organisation an, wenn Sie dazu aufgefordert werden.
- Klicken Sie auf die Registerkarte Bearbeiten.
- Klicken Sie in der Gruppe Objekte bearbeiten auf Linienobjekte
 .
.Das Widget "Lineare Objekte hinzufügen" wird angezeigt.
Hinweis:
Die Auswahlmöglichkeiten für die Bis- und Von-Methode und den Bis- und Von-Messwert des Netzwerks können vorab beim Konfigurieren, Erstellen oder Bearbeiten der Standardeinstellungen für Attribut-Sets konfiguriert werden.
Weitere Informationen zum Konfigurieren und Erstellen und Bearbeiten der Standardeinstellungen für Attribut-Sets
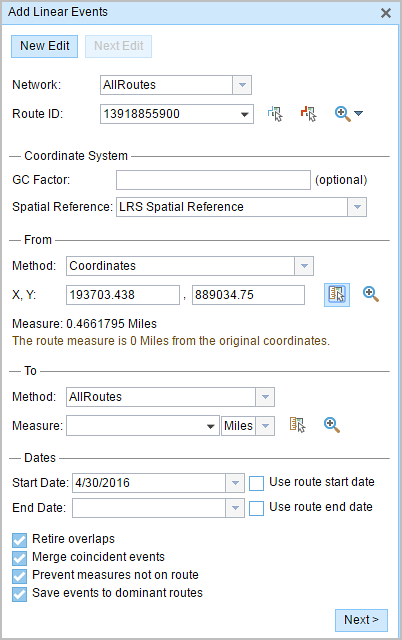
- Klicken Sie auf den Dropdown-Pfeil Netzwerk, und wählen Sie das Netzwerk aus, das als Quell-LRM zum Definieren der Eingabemesswerte für die neuen Objekte dienen soll.
- Choose the route ID on which the events will be located using any of the following options:
- Provide a route ID on which the new event measure will be based in the Route ID text box.
- Click Select a Route on the Map
 and select the route from the map.
Tipp:
If the selected line is not in the active view\ of the map, click Zoom to the route extent or center on the route start or end point on the Map
 to refresh the map display to zoom in to the entire extent of the selected line.
The line is highlighted in light blue. The arrow at the end shows the direction of calibration of the line.
Hinweis:
If a message appears that is related to acquiring locks, the need to reconcile, or not being able to acquire locks, Roads and Highways conflict prevention is enabled.
Learn more about conflict prevention messages in the Event Editor
- In the From section, click the Method drop-down arrow and click Coordinates.
The Coordinate System section appears.

- Optionally, provide a value in the GC Factor text box.
This will adjust the coordinates by dividing X and Y by the value specified.
- Specify a spatial reference by choosing an option from the Spatial Reference drop-down menu.
- LRS Spatial Reference—The spatial reference of your LRS network
- Web Map Spatial Reference—The spatial reference of your basemap
- GCS_WGS_1984—A geographic spatial reference using units of degrees
Additionally, you can configure different coordinate systems by specifying the well-known ID (WKID) or well-known Text (WKT) in the configuration file of your Event Editor.
- In the From section, click the Method drop-down arrow and choose Coordinates.
- Input the x- and y-coordinate values for X and Y.
Tipp:
You can select a coordinate by clicking Select an X/Y Location on the Map
 .
.The route measure closest to the original coordinates will be selected and its distance from the route will be displayed.

- In the To section, click the Method drop-down arrow and choose Coordinates.
- Input the x- and y-coordinate values for X and Y.
Tipp:
You can select a coordinate by clicking Select an X/Y Location on the Map
 .
.The route measure closest to the original coordinates will be selected, and its distance from the route will be displayed.

- Choose the date that will define the start date of the events by doing one of the following:
- Provide the start date in the Start Date text box.
- Click the Start Date drop-down arrow and choose the start date.
- Check the Use route start date check box.
The start date defaults to today's date, but you can choose a different date using the date picker.
Hinweis:
If you configured your instance of Event Editor to not allow dates before the start date of the route, and you provide a date before the start date of the selected route in Start Date, a warning message appears alerting you to choose a date on or after the start date of the selected route.
- Choose the date that will define the end date of the events by doing one of the following:
- Provide the end date in the End Date text box.
- Click the End Date drop-down arrow and choose the end date.
- Check the Use route end date check box.
The end date is optional, and if it is not provided, the event remains valid now and into the future.
- Wählen Sie eine der folgenden Datenvalidierungsoptionen aus, um fehlerhafte Eingaben beim Charakterisieren einer Route mit linearen Objekten zu vermeiden:
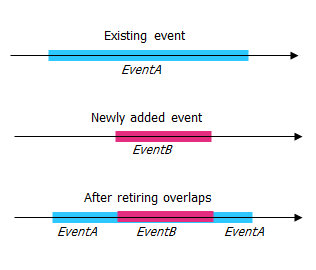
- Überlappungen stilllegen: Das System passt den Messwert sowie das Start- und Enddatum vorhandener Objekte so an, dass das neue Objekt keine Überlappung im Hinblick auf Zeit- und Messwerte verursacht.

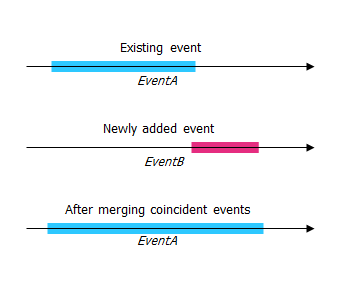
- Lagegleiche Objekte zusammenführen: Wenn alle Attributwerte für ein neues Objekt mit denen eines vorhandenen Objekts identisch sind und das neue Objekt im Hinblick auf die Messwerte an das vorhandene Objekt angrenzt oder dieses überlappt, wird das neue Objekt mit dem vorhandenen Objekt zusammengeführt und der Messwertbereich entsprechend erweitert.

- Nicht auf der Route liegende Messwerte vermeiden: Die Eingabemesswerte für Anfangs- und Endmesswerte liegen innerhalb des Minimal- und Maximalbereichs der Messwerte auf der ausgewählten Route.
- Objekte auf dominanten Routen speichern: In einem Abschnitt mit parallelen Routen werden Objekte auf der dominanten Route gespeichert. Wenn diese Option aktiviert ist, können Sie bei parallelen Abschnitten auf der ausgewählten Route auswählen, welcher Route Objekte auf dem jeweiligen parallelen Abschnitt hinzugefügt werden sollen. Diese Option ist verfügbar, wenn für das ausgewählte Netzwerk Dominanzregeln konfiguriert sind.
- Überlappungen stilllegen: Das System passt den Messwert sowie das Start- und Enddatum vorhandener Objekte so an, dass das neue Objekt keine Überlappung im Hinblick auf Zeit- und Messwerte verursacht.
- Klicken Sie auf Weiter.
Die Registerkarte mit dem Attribut-Set für die Objekte wird angezeigt. Die Objektfelder werden unter der Attributgruppe G1 angezeigt.
Hinweis:
Mithilfe der Kontrollkästchen können Sie Daten für spezifische Objekte im Attribut-Set hinzufügen. Den deaktivierten Objekten werden keine Datensätze hinzugefügt. Wie im folgenden Beispiel gezeigt, werden den Objekten "County_A" und "City_A" keine Datensätze hinzugefügt.
- Geben Sie die Attributinformationen für das neue Objekt mit einer der folgenden Möglichkeiten an:
- Geben Sie die Attributinformationen für das neue Objekt in die durch Attribut-Sets definierten Tabellen ein.
- Klicken Sie auf Attributwerte kopieren
 und dann auf eine Route auf der Karte, um Objektattribute aus einer anderen Route zu kopieren.
Event Editor verwendet das auf der Registerkarte Bearbeiten festgelegte Standard-Attribut-Set. Sie können das Attribut-Set ändern, um benutzerdefinierte Attribut-Sets zu erstellen oder das vom Administrator konfigurierte Attribut-Set verwenden.
Hinweis:
Domänen mit codierten Werten, Bereichsdomänen und Subtypes werden unterstützt, wenn sie für ein Feld in der Tabelle "Attribute-Value" konfiguriert wurden.
- Weitere Informationen zum Attribut-Set rufen Sie über eine der folgenden Aktionen ab:
- Aktivieren Sie das Kontrollkästchen Netzwerkname anzeigen, um das LRS-Netzwerk anzuzeigen, das mit dem ausgewählten Objekt-Layer verknüpft ist.
- Die Attribute in den durch Attribut-Sets definierten Tabellen können aus mehr als einem Objekt-Layer stammen. Um den Quellobjekt-Layer für die einzelnen Attribute zu identifizieren, aktivieren Sie das Kontrollkästchen Layer-Namen anzeigen.
- Checking the Go to the next measure upon save check box results in prepopulating the starting measure value using the ending measure value of the present section to continue the event creation process. For example, this will occur if events are created on the route using a From measure value of 0 miles and a To measure value of 0.289 miles. If you click Save with this option checked on the Attribute Set tab, the Add Linear Events widget is prepopulated with the value of 0.289 miles as the starting measure value for the new events.
- Klicken Sie auf Speichern.
Die neuen linearen Objekte werden erstellt und auf der Karte angezeigt. Nachdem die neu hinzugefügten Linienobjekte gespeichert wurden, wird unten rechts eine Bestätigungsmeldung angezeigt.
Nachdem ein Objekt erstellt wurde, stehen Ihnen die folgenden Optionen zur Verfügung, um die Route weiter zu charakterisieren:
- Klicken Sie auf Neue Bearbeitung, um alle Eingabeeinträge im Widget zu löschen und die Standardwerte aus der Geodatabase in der Attributtabelle wiederherzustellen.
- Klicken Sie auf Nächste Bearbeitung, um alle vorhandenen Einträge im Widget und in der Attributtabelle beizubehalten. Auf diese Weise lassen sich ähnliche Merkmale komfortabel und schnell bearbeiten.