Register your data with ArcGIS Server using ArcGIS for Desktop
In this topic
You can register data directories and databases with ArcGIS Server from ArcCatalog or the Catalog window in ArcMap. Data registration provides the server with a list of locations where the source data for your services originates. Data registration provides several benefits:
- Data registration helps you validate whether your services are using data locations known and approved by the server administrator.
- Data registration provides automatic remapping of the paths to your data when you publish (and thereby uploads) your map, globe, model, or other resources to the server.
Registering your data directories does not grant the ArcGIS Server account permissions to access your data. You'll need to give the ArcGIS Server account at least read permissions to any folder that you register. If you're registering a database, the type of permissions you need to grant depends on what type of database you are using and what type of authentication you are using to connect. See Making your data accessible to ArcGIS Server to learn more about the scenarios where you need to apply permissions.
Tip:
For more information on what is required to register a database or managed database, see the topic specific to your database management system. Note that if the database does not contain an enterprise geodatabase, it cannot be registered as the ArcGIS Server managed database.
- Register an ALTIBASE hybrid database with ArcGIS Server
- Register a DB2 database with ArcGIS Server
- Register an Informix database with ArcGIS Server
- Register a Netezza database with ArcGIS Server
- Register an Oracle database with ArcGIS Server
- Register a PostgreSQL database with ArcGIS Server
- Register an SAP HANA data warehouse with ArcGIS Server
- Register a SQL Server database with ArcGIS Server
- Register a Teradata database with ArcGIS Server
The way you register your databases and data directories with ArcGIS Server in ArcGIS for Desktop is through the Data Store tab of the ArcGIS Server Properties window. To access this tab, right-click your administrative or publisher connection to ArcGIS Server in the Catalog tree and choose Server Properties.
Follow the steps in the sections below based on what you want to register with the server.
Register a database
Tip:
Using the tools on the Data Store tab, you can register any enterprise database compatible with ArcGIS, such as SQL Server, Oracle, PostgreSQL, Informix, and DB2. See Relational database management systems requirements for supported databases. The 64-bit version of the database's client software must be installed on each GIS server in the site before registration.
Note:
You can register databases that contain enterprise geodatabases and databases that do not. See About registering your data with the server for information on which registration scenarios you can use for each.
To register the database, follow these steps. For file geodatabases, use the option described in the subsequent section titled Registering a folder.
- Next to the Registered Databases dialog box, click Add
 .
. - Enter a unique name for the registered database. Names can be alphanumeric and can contain spaces.
- Specify the database connection for the publisher.
- If you've already set up a connection to the publisher's database, click Import to select a connection file (.sde or .odc only). The default location is C:\Users\<user name>\AppData\Roaming\ESRI\Desktop<version number>\ArcCatalog.
- If you need to create a connection to the database, click Add next to the Publisher database connection section to specify the publisher's connection type, properties, and authentication mode. If you need help adding a connection, see Database connections in ArcGIS Desktop.
- Depending on how you've set up your data sources to work with ArcGIS, you'll need to choose one of the following scenarios:
- If the publisher's machine and the server are working with the same database
- Click the Same as publisher database connection check box. This specifies the publisher's machine and ArcGIS Server will view and access data residing in the same database. To learn more about this scenario, see About registering your data with the server.
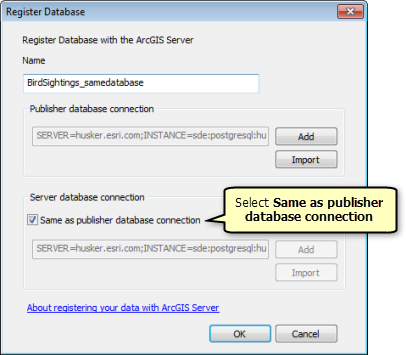
- If the publisher's machine and the server are working with different databases
- Next to the Server database connection section, click Add to specify the publisher's connection type, properties, and authentication mode. If you've already set up a connection to the server's database, click Import to select a connection file.
- If you are using an enterprise geodatabase for both the publisher and server databases, you can optionally click the Create geodata service check box. When this option is selected, a geodata service is automatically created for the server's enterprise geodatabase. You can use this geodata service to send a replica of the data from the publisher's enterprise geodatabase to the
server's enterprise geodatabase (thereby populating the server's database), and then later use it to synchronize changes between both databases. To learn more about this scenario, see About registering your data with the server.
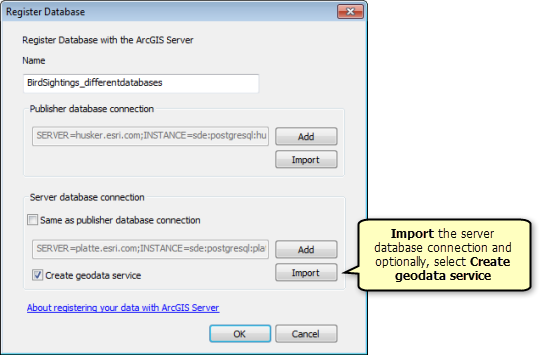
- Click OK. The database (or databases) you registered appear on the Registered Databases dialog box.
Register a folder
Tip:
Using the Data Store tab, you can register a local file directory or shared directory that contains GIS resources and data, such as shapefiles and file geodatabases. When you register a directory, all subdirectories under the folder you specify are also registered with the server.
To do so, follow these steps.
- Next to the Registered Folders dialog box, click Add
 .
. - Enter a unique name for the registered folder. Names can be alphanumeric and can contain spaces.
- Next to the Publisher folder path section, click Add to specify the path to the publisher's folder.
- Depending on how you've set up your data sources to work with ArcGIS, you'll need to choose one of the following scenarios:
- If the publisher's machine and the server are working out of the same folder
- Click the Same as publisher folder path check box. This specifies the publisher's machine and ArcGIS Server will view and access data residing in the same folder. To learn more about this scenario, see About registering your data with the server.
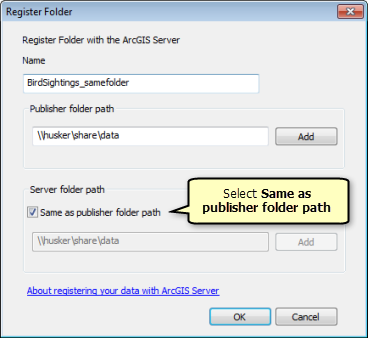
- If the publisher's machine and the server are working out of different folders
- Next to the Server folder path section, click Add to specify the path to the server's folder. To learn more about this scenario, see About registering your data with the server.
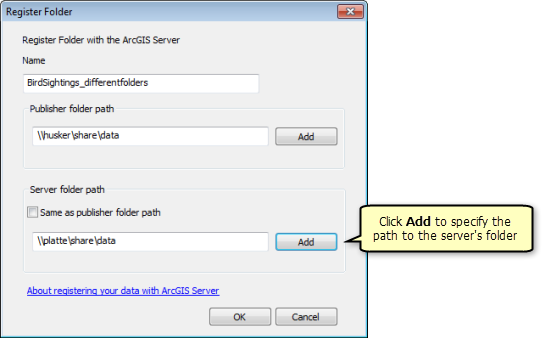
- Click OK. The folder or folders you registered appear on the Registered Folders dialog box.
Register ArcGIS Server's managed database
Using the tools on the Data Store tab, you can register an enterprise geodatabase as ArcGIS Server's Managed Database. You must explicitly create this database before you can register it. To learn more about ArcGIS Server's managed database and scenarios for using it, see Copying data to the server automatically when publishing.
To register ArcGIS Server's managed database, follow these steps.
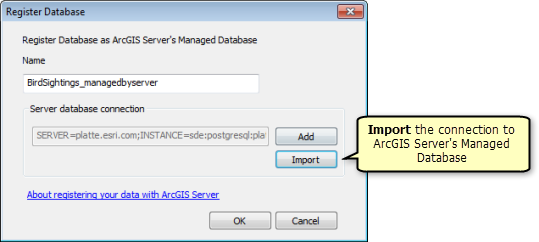
- Next to the Registered Databases dialog box, click the drop-down arrow next to Add
 and select Register Database as ArcGIS Server's Managed Database.
 - Enter a unique name for the geodatabase connection. Names can be alphanumeric and can contain spaces.
- Next to the Server database connection section, click Add to specify the connection to ArcGIS Server's managed database. If you've already set up a connection to the database, click Import to select a connection file (.sde). If you need help with adding a database connection, see Database connections in ArcGIS Desktop.
- Click OK. ArcGIS Server's managed database is registered and appears on the Registered Databases dialog box.