Characteristics of a route such as speed limit or functional class can be represented as a linear event with starting and ending measure information along the route. The Line Events tool provides an interface to add linear events by typing or selecting their x- and y-coordinates. You can also use reference offset data to add events to a route. The reference offset data is translated to routes and measures for storage.
備考:
In cases where events are being modified on a route and you want to see the previous events on the route at that location, don't use the Add Linear Event widget. Instead, edit events in the Event Selection table or the Attribute Set Selection table. If this method is used, you can see what was previously on the routes at the specified measures.
- Event Editor を開き、サイン インが要求されたら、ArcGIS 組織にサイン インします。
- [編集] タブをクリックします。
- [イベントの編集] グループで [ライン イベント] ボタン
 をクリックします。
 - [ネットワーク] ドロップダウン矢印をクリックし、新しいイベントの入力メジャーを定義するためのソース リニア リファレンス方法 (LRM) として使用するネットワークを選択します。
- Choose the route ID on which the events will be located using any of the following options:
- Type a route ID on which the new event measure will be based in the Route ID text box.
- Click the Select a Route on the Map tool
 and select the route from the map.
ヒント:
If the selected line is not in the active view of the map, click the Zoom to the route extent or center on the route start or end point on the Map button
 to refresh the map display to zoom in to the entire extent of the selected line.
The line is highlighted in light blue. The arrow at the end shows the direction of calibration of the line.
備考:
If a message appears that is related to acquiring locks, the need to reconcile, or not being able to acquire locks, Roads and Highways conflict prevention is enabled.
Learn more about conflict prevention messages in the Event Editor
- In the From section, click the Method drop-down arrow and click Coordinates.
The Coordinate System section appears.
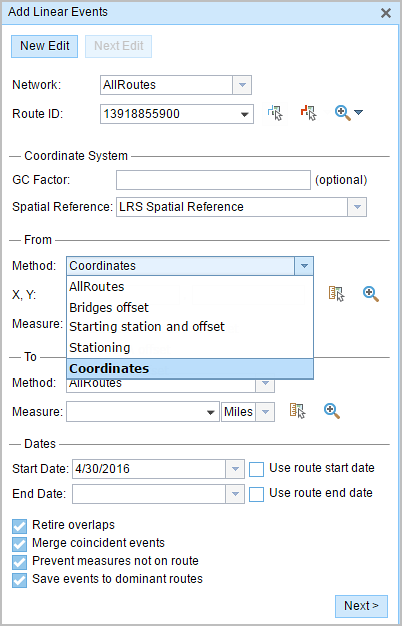
- Optionally type a value in the GC Factor text box.
This will adjust the coordinates by dividing X and Y by the value specified.
- Specify a spatial reference by choosing an option from the Spatial Reference drop-down menu.
- LRS Spatial Reference—The spatial reference of your LRS network
- Web Map Spatial Reference—The spatial reference of your basemap
- GCS_WGS_1984—A geographic spatial reference using units of degrees
Additionally, you can configure different coordinate systems by specifying the well-known ID (WKID) or well-known Text (WKT) in the configuration file of your Event Editor.
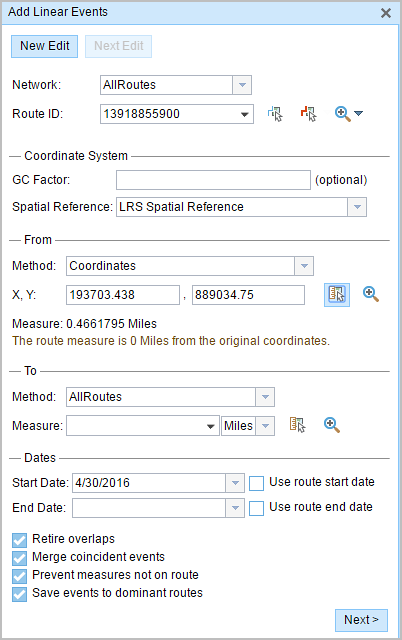
- In the From section, click the Method drop-down arrow and choose Coordinates.
- Input the x- and y-coordinate values for X and Y.
ヒント:
You can select a coordinate by using the Select an X/Y Location on the Map button
 .
.The route measure closest to the original coordinates will be selected and its distance from the route will be displayed.
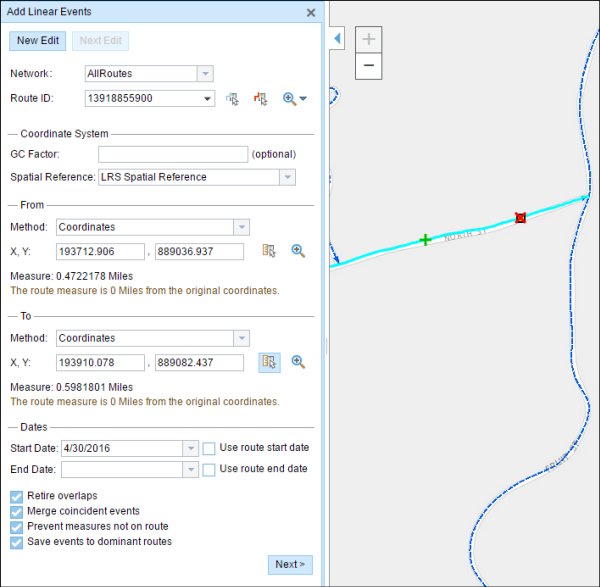
- In the To section, click the Method drop-down arrow and choose Coordinates.
- Input the x- and y-coordinate values for X and Y.
ヒント:
You can select a coordinate by using the Select an X/Y Location on the Map button
 .
.The route measure closest to the original coordinates will be selected, and its distance from the route will be displayed.
- Choose the date that will define the start date of the events by doing one of the following:
- Type the start date in the Start Date text box.
- Click the Start Date drop-down arrow and choose the start date.
- Check the Use route start date check box.
The start date defaults to today's date, but you can choose a different date using the date picker. The end date is optional, and if it is not provided, the event remains valid now and into the future.
備考:
If you configured your instance of Event Editor to not allow dates prior to the start date of the route, and you enter a date prior to the start date of the selected route in Start Date, a warning message appears alerting you to choose a date on or after the start date of the selected route.
- Choose the date that will define the end date of the events by doing one of the following:
- Type the end date in the End Date text box.
- Click the End Date drop-down arrow and choose the end date.
- Check the Use route end date check box.
- リニア イベントでルートを特徴付ける際に入力エラーを回避するために、次のデータ検証オプションの中から選択します。
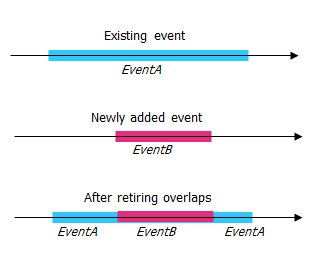
- [オーバーラップの廃止] - 既存イベントのメジャー値と開始日および終了日をシステムが調整し、新しいイベントによって、時間とメジャー値のオーバーラップが発生しないようにします。
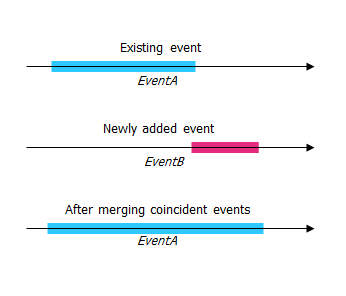
- [一致イベントのマージ] - 新しいイベントのすべての属性値が既存のイベントと完全に一致し、かつ、新しいイベントのメジャー値が既存イベントのメジャー値と隣接しているかオーバーラップしている場合、新しいイベントは既存のイベントにマージされ、メジャーの範囲はそれに応じて拡大されます。
- [ルート上にないメジャーを使用しない] - このデータ検証オプションを使用すると、開始メジャー値と終了メジャー値の入力メジャー値が、選択されたルートの最小メジャー値と最大メジャー値の範囲内にあることが保証されます。
- [主要ルートにイベントを保存] - 並列ルートを含むセクションでは、イベントは主要ルートに追加されます。 このオプションをオンにすると、選択されたルート上の並行セクションごとに、どのルートにイベントを追加するか選択できるようになります。 このオプションは、選択されたネットワークに優位性ルールが構成されている場合に使用できます。
- [オーバーラップの廃止] - 既存イベントのメジャー値と開始日および終了日をシステムが調整し、新しいイベントによって、時間とメジャー値のオーバーラップが発生しないようにします。
- [次へ] をクリックします。
イベントの属性セットを示すタブが表示されます。 イベント フィールドは、G1 属性グループに表示されます。
備考:
チェックボックスを使用し、属性セットの特定のイベントのデータを追加します。 オンになっていないイベントには、レコードは追加されません。 以下の例に示すように、County_A イベントと City_A イベントにはレコードは追加されません。
- 次のオプションを使用し、新しいイベントの属性情報を選択します。
- 属性セットによって定義されたテーブルに、新しいイベントの属性情報を入力します。
- [属性値をコピー] ボタン
 をクリックし、マップ上のルートをクリックして、別のルートのイベント属性をコピーします。
Event Editor では、[編集] タブで設定されたデフォルト属性セットを使用します。 属性セットを変更してカスタム属性セットを作成したり、管理者が構成した属性セットを使用したりできます。
備考:
コード値、範囲ドメイン、サブタイプは、属性値テーブルのフィールドに対して構成されている場合にサポートされます。
- 属性セットの詳細情報にアクセスするには、次のオプションを使用します。
- [ネットワーク名の表示] チェックボックスをオンにすると、選択されたイベント レイヤーに関連付けられた LRS ネットワークを表示できます。
- 属性セットによって定義されたテーブルの属性のリストは、2 つ以上のイベント レイヤーから取得されることがあります。 各属性のソース イベント レイヤーを特定したい場合は、[レイヤー名の表示] チェックボックスをオンにします。
- Checking the Go to the next measure upon save check box results in prepopulating the From measure value using the to measure value of the present section to continue the event creation process. For example, this will occur if events are created on the route using a From measure value of 0 miles and a to measure value of 0.289 miles. If you click Save with this option checked on the Attribute Set tab, the Add Linear Events widget is prepopulated with the value of 0.289 miles as the from measure value for the new events.
- [保存] をクリックします。
新しいリニア イベントが作成され、マップに表示されます。 新しいライン イベントが保存されると、右下に確認メッセージが表示されます。
イベントが正常に作成されると、次の 2 通りの方法でルートの特徴付けを行えます。
- [新しい編集] をクリックして、ウィジェットのすべての入力内容を消去し、ジオデータベースから属性テーブルにデフォルト値を復元します。
- [次の編集] をクリックして、ウィジェットと属性テーブルの既存の入力をすべて維持し、同様の特徴をすばやく編集する利便性を確保します。