Characteristics of a route such as speed limit and functional class can be represented as a linear event with starting and ending measure information along the route. The Line Events tool provides an interface to add linear events by typing or selecting their X and Y coordinates. You can also use reference offset data to add events to a route. The reference offset data is translated to routes and measures for storage.
In cases where events are being modified on a route and you want to see the previous events on the route at that location, don't use the Add Linear Event widget. Instead, edit events in the Event Selection table or the Attribute Set Selection table. If this method is used, you can see what was previously on the routes at the specified measures.
- Open Event Editor and, if prompted, sign in to Portal for ArcGIS or ArcGIS Online.
- Click the Edit tab.
- In the Edit Events group, click the Line Events button
 .
.The Add Linear Events widget appears.
Hinweis:
The selections for the network to and from method and measure can be configured in advance when configuring, creating, or editing the default settings for attribute sets. For more information about configuring, creating, and editing default settings for attribute sets, see Producing attribute sets and Configuring attribute sets.
- Click the Network drop-down arrow and choose the network that will serve as a source LRM for defining the input measures for the new events.
- Type the route name on which the new event measure will be provided in the Route Name text box.
- Type a route ID in the Route ID text box on which the new event measure will be based.
Tipp:
You can also click the Select a Route on the Map button
 to choose the route on the map.
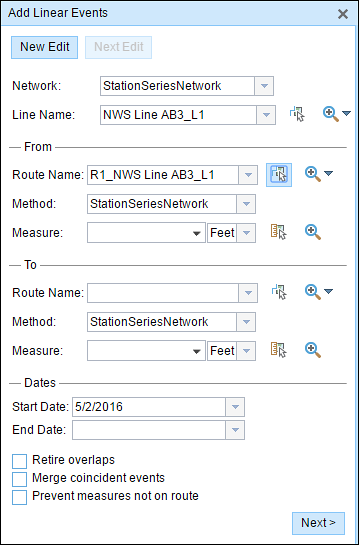
- In the From section, click the Method drop-down arrow and click Coordinates.
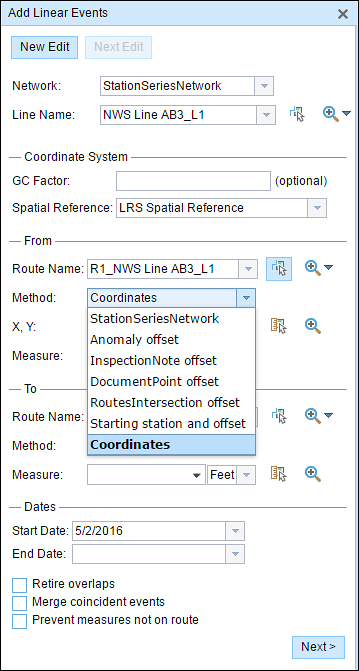
- Optionally type a value in the GC Factor text box.
This will adjust the coordinates by dividing X and Y by the value specified for the GC factor.
- Specify a coordinate system by choosing an option from the Coordinate System drop-down menu.
- LRS Map Service—The spatial reference of your LRS network.
- Web Map Spatial Reference—The spatial reference of your basemap.
- GCS_WGS_1984—A geographic spatial reference using units of degrees.
Additionally, you can configure different coordinate systems by specifying the Well Known ID (WKID) or Well Known Text (WKT) in the configuration file of your Event Editor. For more information, see Configuring the Event Editor web application.
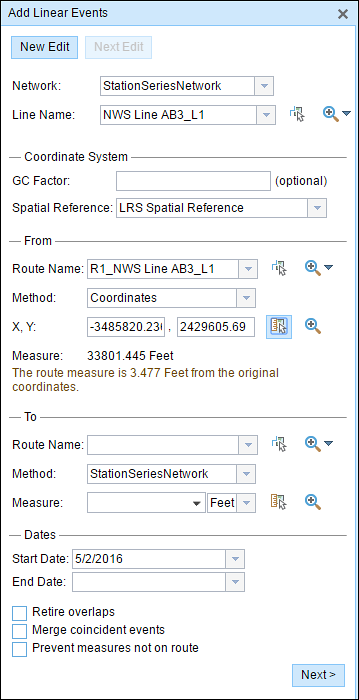
- Input the x- and y-coordinate values for X and Y.
Tipp:
You can select a coordinate by using the Select an XY Location on the Map button.
If the Route ID is specified, the route measure closest to the original coordinates will be selected, and its distance from the route will be displayed.
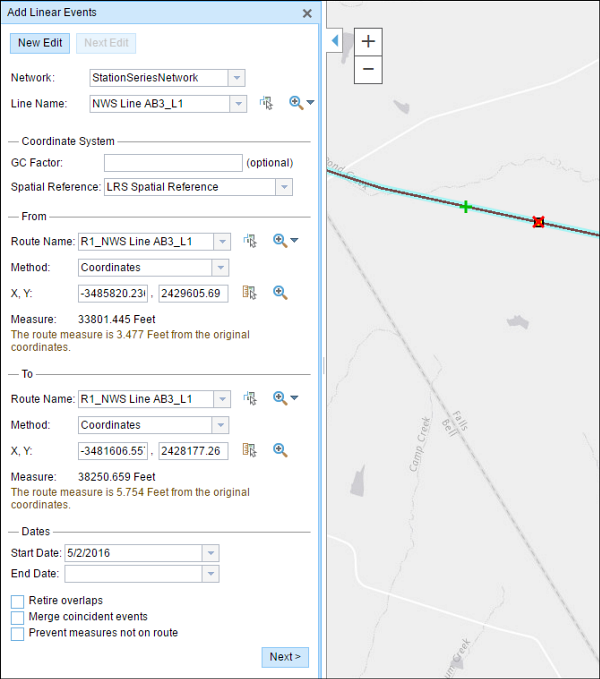
- In the To section, choose a method and input the location of the to measure value for the events.
- Choose the date that will define the start date of the events by doing one of the following:
- Click the Start Date drop-down arrow to choose the start date using a calendar.
- Check the Use route start date check box to use the start date of the routes.
The start date defaults to today's date, but you can choose a different date using the date picker. The end date is optional, and if it's not provided, the event remains valid now and into the future.
Hinweis:
If you configured your instance of Event Editor to not allow dates prior to the start date of the route and you enter a date prior to the start date of the selected route in Start Date, a warning message will appear alerting you to choose a date on/after the start date of the selected route.
- Choose the date that will define the end date of the events by doing one of the following:
- Click the End Date drop-down arrow to choose the end date using a calendar.
- Check the Use route end date check box to use the end date of the routes.
- You can choose four different data validation options to prevent erroneous input while characterizing a route with linear events.
- Retire overlaps—The system will adjust the measure and start and end dates of existing events in such a way that the new event does not cause
an overlap with respect to time and measure values.
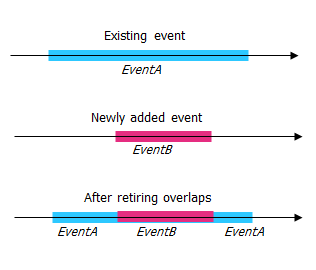
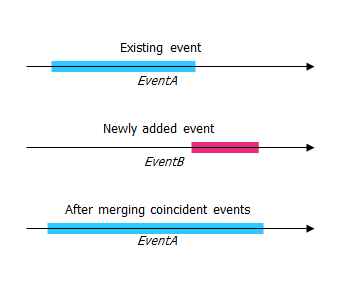
- Merge coincident events—When all attribute values for a new event are exactly the same as an existing event, and if the new event is adjacent to or overlapping the existing event in terms of measure values, the new event is merged into the existing event and the measure range is expanded accordingly.
- Prevent measures not on route—This data validation option ensures that the input measure values for From Measure and To Measure values fall within the minimum and maximum range of measure values on the selected route.
- Retire overlaps—The system will adjust the measure and start and end dates of existing events in such a way that the new event does not cause
an overlap with respect to time and measure values.
- Click Next.
The tab showing the attribute set for the events opens. The event fields are shown under the attribute group named G1.
Hinweis:
You can use the check boxes to add data for specific events within the attribute set. No records are added for the unchecked events. As shown in the example below, no records are added to the County_A and City_A events.
- Enter the attribute information for the new event in the tables defined by attribute sets.
You can click the Copy Attributes button
 and click a route on the map to copy event attributes from another route.
Hinweis:
Coded value, range domains, and subtypes are supported when configured for any field in the Attribute-Value table.
- Use these options to access more information on the attribute set.
- Check the Show network name check box to see which LRS Network the selected event layer is associated with.
- Checking the Go to the next measure upon save check box results in prepopulating the from measure value using the to measure value of the present section to continue the event creation process. For example, this will occur if events are created on the route using a from measure value of 0 miles and a to measure value of 0.289 miles. If you click Save, using this option checked on the Attribute Set tab, the Add Linear Events widget is prepopulated with the value of 0.289 miles as the from measure value for the new events.
- Klicken Sie auf Speichern.
The new linear events are now created and displayed on the map. The coordinates are translated to routes and measures for storage.
After an event has been successfully created, you have the following two options to continue characterizing the route:
- When you click New Edit, all the input entries in the widget are cleared, and the default values from the geodatabase are populated in the attribute table.
- When you click Next Edit, all the existing entries in the widget and the attribute table are retained for the convenience of quick editing of similar characteristics.