In the workflow described below, multiple Esri Amazon Web Services (AWS) CloudFormation templates are used to create an ArcGIS Enterprise deployment with each component on separate Amazon Elastic Compute Cloud (EC2) instances in the same Amazon Virtual Private Cloud (VPC). Using this workflow, you will also federate an additional ArcGIS Server site to fill a role of your choosing.
Placing components on separate EC2 instances allows you to use different instance types (sizes), numbers of instances, and configuration types for each component. Use the same operating system for each instance. In addition to making it more customizable, having components on separate instances allows you to more quickly recover if an instance fails.
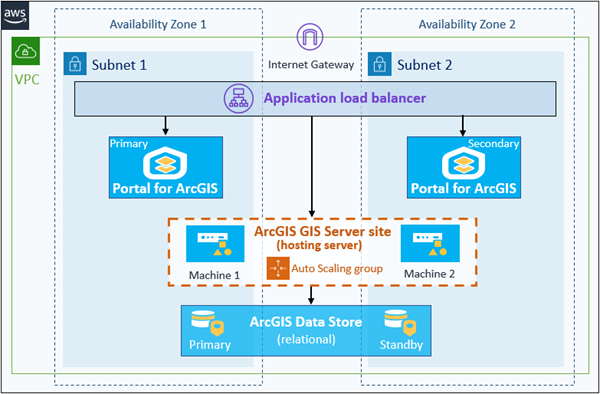
Using this workflow, you can create a deployment architecture similar to the one shown in the diagram below. It deploys Portal for ArcGIS, ArcGIS GIS Server (for the hosting server), and a relational ArcGIS Data Store each on its own EC2 instance. Each component contains two EC2 instances to provide high availability. This diagram shows a federated ArcGIS GeoEvent Server site, which uses a spatiotemporal big data store to archive data; however, you can license a different ArcGIS Server role. You can also include additional types of federated ArcGIS Server sites.

Create a VPCand application load balancer
All components in ArcGIS Enterprise on AWS are deployed in an Amazon VPC, so you'll run a CloudFormation template to create a VPC. Communication between the components and clients in this deployment is controlled through an application load balancer that you will create using another CloudFormation template.
- Complete all the prerequisites for the Esri AWS CloudFormation template for a VPC with two public subnets.
- Sign in to your account in AWS Management Console and open the CloudFormation service.
- Use the Esri AWS CloudFormation template for a VPC with two public subnets to create a VPC.
- Complete all the prerequisites for and run the Esri AWS CloudFormation template to create an application load balancer.
Create the load balancer in the same AWS region as the VPC.
Record the DNSName value from the load balancer template's output.
- In the Domain Name Service (DNS), map the Elastic Load Balancer (ELB) DNSName value to the domain name for the ArcGIS Enterprise deployment.
If you do not know how to do this, contact your IT department.
At this point, you have the following components:

Create a highly available Portal for ArcGIS
The next step in creating an ArcGIS Enterprise deployment is to configure Portal for ArcGIS.
- Complete the prerequisites for the template that deploys Portal for ArcGIS on two machines.
- In the CloudFormation service in AWS Management Console, use the Portal for ArcGIS on two machines template to deploy a highly available portal.
Deploy in the VPC and subnets you created in the previous section.
Provide the Elastic Load Balancer DNSName value for the application load balancer you created in the previous section.
The deployment now contains the Portal for ArcGIS component.

Create a highly available ArcGIS GIS Server site
An ArcGIS Enterprise portal requires a hosting server, so you'll add a multiple machine ArcGIS GIS Server site to the deployment.
- Complete the prerequisites for the highly available ArcGIS Server site CloudFormation template.
You must have an ArcGIS GIS Server license.
- In the CloudFormation service in AWS Management Console, use the highly available ArcGIS Server site template to create the site.
Use the same platform, VPC, and subnets as you did for the Portal for ArcGIS component.
The diagram for this workflow shows two EC2 instances in the site; however, you can create the site with more than two instances.
Take note of the ArcGIS Server services URL in the stack output; you need it when creating data stores and when you federate the site to the portal.
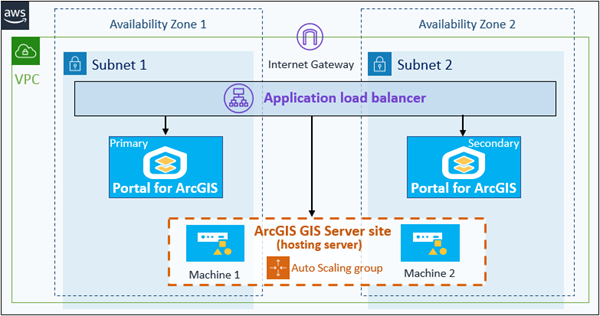
A GIS Server site now exists in the VPC but it is not yet set as the hosting server, as shown in the following diagram. You must add a relational data store to the GIS Server site before you can set the site as the hosting server.

Create a relational and spatiotemporal big data stores
Before you can set the ArcGIS GIS Server site as the hosting server for the portal, you must create a relational data store.
In the workflow shown in the first diagram, a spatiotemporal big data store is used with the federated ArcGIS GeoEvent Server site to archive data from streaming layers. If you federate a different type of ArcGIS Server role to the portal, you may not need a spatiotemporal big data store.
Create a relational data store
To create a relational data store, complete the following steps:
- Complete the prerequisites for the ArcGIS Data Store primary-standby mode CloudFormation template.
- In the CloudFormation service in AWS Management Console, use the ArcGIS Data Store primary-standby mode template to create a relational data store and register it with the ArcGIS GIS Server site you created in the previous section.
Use the same platform, VPC, and subnets as you did for the Portal for ArcGIS and ArcGIS GIS Server components.
The deployment now contains a relational data store.

Create a spatiotemporal big data store
To create a spatiotemporal big data store for the federated server, complete the following steps:
- Complete the prerequisites for the ArcGIS Data Store cluster mode CloudFormation template.
- In the CloudFormation service in AWS Management Console, use the ArcGIS Data Store cluster mode template to create a spatiotemporal big data store and register it with the ArcGIS GIS Server site you created in the previous section.
Use the same platform, VPC, and subnets as you did for the Portal for ArcGIS and ArcGIS GIS Server components.
The data store must contain an odd number of EC2 instances.
The spatiotemporal big data store is registered to the ArcGIS GIS Server site.

Configure the ArcGIS GIS Server site as the hosting server
Now that the ArcGIS GIS Server site includes a relational data store, you can set it as the portal's hosting server.
- Identify and record the instance ID of one of the EC2 instances in the Portal for ArcGIS deployment.
You can do this in the EC2 service in AWS Management Console.
If you used a file server for the Portal for ArcGIS content directory, ensure that the instance ID you use is not for the file server instance.
- Identify and record the instance ID of one of the EC2 instances in the ArcGIS GIS Server site.
Do not use the instance ID of the file server that was created to store ArcGIS Server directories.
- In the CloudFormation service in AWS Management Console, use the CloudFormation template to federate an ArcGIS Server site to add the ArcGIS GIS Server site as a hosting server to the Portal for ArcGIS deployment you created in the second section of this workflow.
Choose HostingServer for the ArcGIS Server role.
The hosing server is set for the portal.

Create and federate an additional ArcGIS Server site
You'll create another ArcGIS Server site and federate it with the portal. In this case, it will be an ArcGIS GeoEvent Server site.
- Complete the prerequisites for the highly available ArcGIS Server site CloudFormation template.
You must have an ArcGIS GeoEvent Server license to create an ArcGIS GeoEvent Server site. To federate an ArcGIS Image Server or another ArcGIS GIS Server, use the appropriate license.
- In the CloudFormation service in AWS Management Console, use the highly available ArcGIS Server site template to create the site.
Use the same platform, VPC, and subnets as you did for all the other components in this deployment.
- Identify and record the instance ID of the EC2 instance in the ArcGIS GeoEvent Server site.
You can do this in the EC2 service in AWS Management Console.
Do not use the instance ID of the file server that was created to store ArcGIS Server directories.
- In the CloudFormation service in AWS Management Console, use the CloudFormation template to federate an ArcGIS Server site to add the ArcGIS GeoEvent Server site to the Portal for ArcGIS deployment you created in the second section of this workflow.
- If you created an ArcGIS GIS Server site, choose GISServer.
- If you created an ArcGIS Image Server site, choose RasterAnalytics.
The deployment contains all the software components.