The Event Editor allows you to add point events to dominant routes in case route concurrences exist.
Concurrent routes
Concurrent routes are routes that share the same centerlines; that is, they travel the same pavement but are modeled with different measures. This relationship may exist to model two routes with different directions of calibration, to model different directions of travel on the highway, or to model locations on highways where multiple routes converge into a common roadway for a subset of their paths. Where these concurrent routes exist, you can choose a route that's considered dominant using a set of rules.
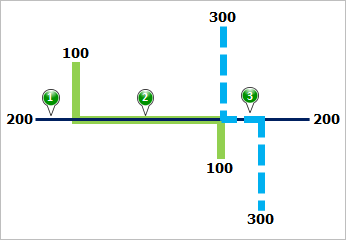
The Event Editor app allows you to add point events to the dominant routes. For example, in the following graphic and tables, there are three routes with route IDs: 100 with Name A, 200 with Name B, and 300 with Name B. The concurrent routes have different ranges in time.
| Route ID | From Date | To Date | Route Name |
|---|---|---|---|
100 | 1/1/2000 | Null | A |
200 | 1/1/2000 | Null | B |
300 | 1/1/2010 | Null | B |
| Point Event | Dominant Route ID |
|---|---|
1 | 200 |
2 | 100 |
3 | 200 or 300 |
路径优先级规则设置为:路径名称越小,路径优先级越高。 使用此条件,路径 100 为最高优先级路径,并且路径 200 和 300 具有相同的优先级。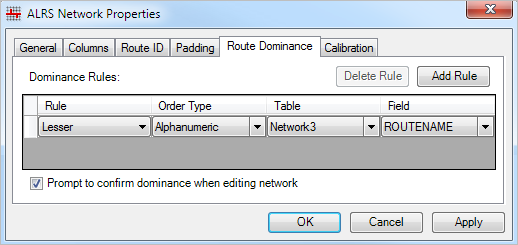
For example, you want to add point events at three locations on route 200. In Location 1, route 200 is the dominant route. Since no other route exists at that point, the event will be added to route 200. In Location 2, route 100 has a greater order of dominance, so the event will be added to route 100. In Location 3, both route 200 and route 300 have the same order of dominance, so the event will be added to the route of your choice.
注:
- 请配置路径优先级规则以访问此功能。
Complete the following steps to add point events to dominant routes:
- 打开 Event Editor 并在出现提示时登录到您的 ArcGIS 组织。
- 单击编辑选项卡。
- 在编辑事件组中,单击点事件按钮
 。
。随即显示添加点事件微件。
如果没有可编辑的点事件图层,则该微件将被禁用。
- 从事件图层下拉列表中选择要编辑的事件图层。
The point event will be added to this layer.
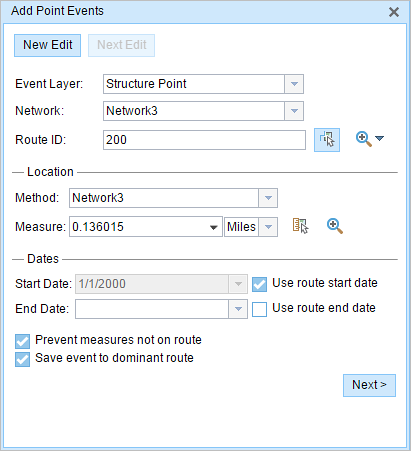
- 单击网络下拉箭头并选择将用作源线性参考方法 (LRM) 的网络,用于定义新事件的输入测量值。
该网络是一个 LRS 网络,作为图层发布在 Event Editor 中。
You can specify the LRS Network to be used as the LRM for defining the measure of the new point event.
- Type the route's ID on which the event's measure will be located in the Route ID text box.
提示:
也可以单击在地图上选择路径按钮
 以在地图上选择路径。
 - In the Location section, choose the first option (with the suffix Network) in the Method drop-down menu.
- Provide the intended location for the new point event along the route using any of the following options:
- Type the value in the Measure text box.
- Click the Select From Measure on the Map button
 and choose the measure value along the route on the map.
 - Click the Measure drop-down arrow to choose either Use the Route Start or Use the Route End option as the measure value for the event.
If you type the measure value, you can choose the unit for that value using the drop-down arrow. The measure value will be converted into LRS units before saving the newly added events. For example, if the LRS is in miles and you type 528 feet as the measure value, the newly added event will have a measure value of 0.1 miles, since 528 feet equals to 0.1 miles.
A red cross appears at the selected location on the map.
- 按如下步骤选择事件的开始日期:
- 在开始日期文本框中键入开始日期。
- 单击开始日期下拉菜单,然后选择开始日期。
- 选中使用路径开始日期复选框。
开始日期默认为今天的日期,也可以使用日期选择器选择不同的日期。
注:
如果将 Event Editor 实例配置为不允许输入路径开始日期之前的日期,那么当您在开始日期中提供所选路径开始日期之前的日期时,将出现一条警告消息,提醒您选择一个位于所选路径开始日期当天或之后的日期。
- 按如下步骤选择事件的结束日期:
- 在结束日期文本框中键入结束日期。
- 单击结束日期下拉菜单,然后选择结束日期。
- 选中使用路径结束日期复选框。
结束日期是可选的,如果未提供,则事件在现在和将来都仍然有效。
- Choose Prevent measures not on route to prevent erroneous input while characterizing a route with point events.
This data validation option ensures that the input measure value falls in the minimum and maximum range of measure values on the selected route.
- Check the Save events to dominant routes check box.
This option can be configured to be checked or unchecked by default using the Event Editor's configuration file. For more information, see Configuring the Event Editor web app.
- Click Next.
The route dominance table appears.
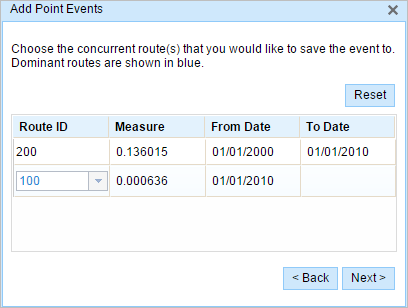
The Route ID and Measure columns show the values for each dominant route where the events will be added.
As an example, route 200 has a From Date value of 1/1/2000, and route 100 and route 300 have a From Date value of 1/1/2010. Therefore, if you choose 1/1/2000 as the start date of the event, there will be two time ranges:
- 1/1/2000–1/1/2010, when only route 200 existed.
- 1/1/2010–Null, when all three routes existed.
A black route ID without a drop-down arrow signifies that there was a single route in that location. A blue route ID with a drop-down arrow signifies that there are concurrent routes in that location, and the blue route is chosen by the software based on the route dominance rules. You can choose any other route using the drop-down arrow.
A yellow route ID box with a drop-down arrow signifies that there is an ambiguous situation (Location 3, for example) in choosing the dominant route, as there is a tie in the route names of route 200 and route 300. In this case, you need to manually choose a route ID using the drop-down arrow. The yellow disappears once you've manually chosen a route.
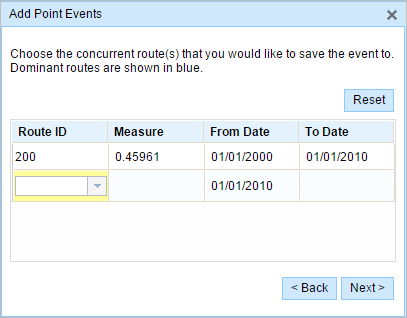
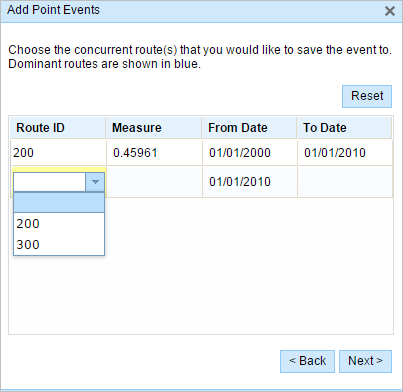
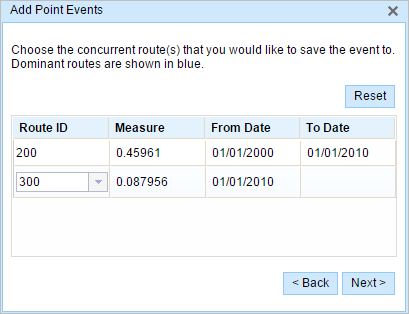
In this example, you would choose route 300. The Measure value along route 300 is the measure of that route at the same location in the separate time range.
- 单击下一步以查看属性值表。
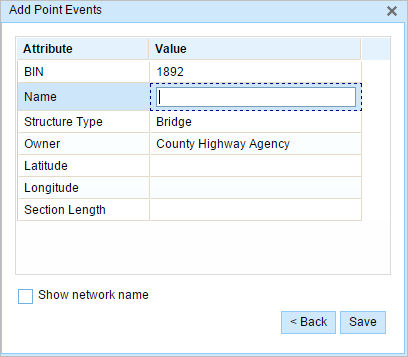
此表包含所有的事件图层属性。
注:
配置属性值表中的任何字段时,支持编码值属性域和范围属性域以及子类型。
- 在表中提供新事件的属性信息。
提示:
可以单击复制属性值按钮
 并单击地图上属于同一事件图层的现有点事件以从该点复制事件属性。
 - 选中显示网络名称复选框以显示与选定事件图层关联的 LRS 网络。
- 单击保存。
新添加的点事件保存后,将在右下角显示一条确认消息。 新的点图层将创建并出现在地图中。
成功创建事件后,您有以下两个选项来继续表征路径:
- 单击新建编辑以清除微件中的所有输入条目并将默认值从地理数据库恢复到属性表。
- 单击下一编辑可以保留小部件和属性表中的所有现有条目,以便于快速编辑相似的特征。